Snoopy Come Home: The Search For Apollo 10

When it comes to the quest for artifacts from the Space Race of the 1960s, few items are more sought after than flown hardware. Oh sure, there have been stories of small samples of the 382 kg of moon rocks and dust that were returned at the cost of something like $25 billion making it into the hands of private collectors, and chunks of the moon may be the ultimate collector’s item, but really, at the end of the day it’s just rock and dust. The serious space junkie wants hardware – the actual pieces of human engineering that helped bring an epic adventure to fruition, and the closer to the moon the artifact got, the more desirable it is.

Sadly, of the 3,000,000 kg launch weight of a Saturn V rocket, only the 5,600 kg command module ever returned to Earth intact. The rest was left along the way, mostly either burned up in the atmosphere or left on the surface of the Moon. While some of these artifacts are recoverable – Jeff Bezos himself devoted a portion of his sizable fortune to salvage one of the 65 F1 engines that were deposited into the Atlantic ocean – those left on the Moon are, for now, unrecoverable, and in most cases they are twisted heaps of wreckage that was intentionally crashed into the lunar surface.

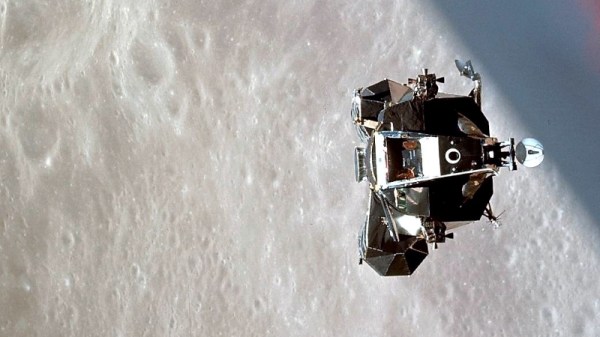
But at least one artifact escaped this ignominious fate, silently orbiting the sun for the last 50 years. This lonely outpost of the space program, the ascent stage from the Apollo 10 Lunar Module, appears to have been located by a team of amateur astronomers, and if indeed the spacecraft, dubbed “Snoopy” by its crew, is still out there, it raises the intriguing possibility of scoring the ultimate Apollo artifact by recovering it and bringing it back home.

Continue reading “Snoopy Come Home: The Search For Apollo 10”

Does The Cheese Grater Do A Great Grate Of Cheese?

Apple’s newest Mac Pro with its distinctive machined grille continues to excite interest, but until now there has been one question on the lips of nobody. It’s acquired the moniker “Cheese grater”, but can it grate cheese? [Winston Moy] set out to test its effectiveness in the kitchen with a piece of Pecorino Romano, a great cheese.

Of course, the video is not really about cheese grating, but about the machining process to create that distinctive pattern of intersecting spherical holes. He doesn’t have a real Mac Pro because nobody does as yet, so like others his approach was to reverse engineer the manufacturing process. He takes us through the entire thing and the rationale behind his decisions as he makes a 13-hole piece of Mac Pro-like grill from a billet of aluminium. It’s first roughly cut with a pair of decreasing-size end mills, then finished with a ball mill. He’s added an extra cut to round off the sharp edge of the hole that isn’t there on the Mac.

An unexpected problem came when he machined the bottom and the holes began to intersect, it was clear that they were doing so wrongly. Turning the piece over must be done in the correct orientation, one to note for any other would-be cheese-grater manufacturers. Finally the piece is blasted for a satin finish, and then anodised for scratch-resistance.

So, the important question must be answered: does it grate? The answer’s no, the best it can manage is something close to a crumble. He doesn’t seem bothered though, we get the impression he likes eating cheese whatever its form. The whole process is in the video below the break.

For more Apple grille examination, take a look at this mathematical analysis.

Continue reading “Does The Cheese Grater Do A Great Grate Of Cheese?”

The Practical Approach To Keeping Your Laser In Focus

You could be forgiven for thinking that laser cutters and engravers are purely two dimensional affairs. After all, when compared to something like your average desktop 3D printer, most don’t have much in the way of a Z axis: the head moves around at a fixed height over the workpiece. It’s not as if they need a leadscrew to push the photons down to the surface.

But it’s actually a bit more complicated than that. As [Martin Raynsford] explains in a recent post on his blog, getting peak performance out of your laser cutter requires the same sort of careful adjustment of the Z axis that you’d expect with a 3D printer. Unfortunately, the development of automated methods for adjusting this critical variable on lasers hasn’t benefited from the same kind of attention that’s been given to the problem on their three dimensional counterparts.

Ultimately, it’s a matter of focus. The laser is at its most powerful when its energy is concentrated into the smallest dot possible. That means there’s a “sweet spot” in front of the lens where cutting and engraving will be the most efficient; anything closer or farther away than that won’t be as effective. As an example, [Martin] says that distance is exactly 50.3 mm on his machine.

The problem comes when you start cutting materials of different thicknesses. Just a few extra millimeters between the laser and your target material can have a big difference on how well it cuts or engraves. So the trick is maintaining that perfect distance every time you fire up the laser. But how?

One way to automate this process is a touch probe, which works much the same as it does on a 3D printer. The probe is used to find where the top of the material is, and the ideal distance can be calculated from that point. But in his experience, [Martin] has found these systems leave something to be desired. Not only do they add unnecessary weight to the head of the laser, but the smoke residue that collects on the touch probe seems to invariably mar whatever surface you’re working on with its greasy taps.

In his experience, [Martin] says the best solution is actually the simplest. Just cut yourself a little height tool that’s precisely as long as your laser’s focal length. Before each job, stick the tool in between the laser head and the target to make sure you’re at the optimal height.

On entry level lasers, adjusting the Z height is likely to involve turning some screws by hand. But you can always add a motorized Z table to speed things up a bit. Of course, you’ll still need to make sure your X and Y alignment is correct. Luckily, [Martin] has some tips for that as well.