Retro consoles and handhelds are full of nostalgia and happy memories for many. However, keeping these machines and their media going can be a difficult job at times. [Taylor] was challenged to rescue a copy of Kirby’s Dream Land for the original Game Boy, and set about the task.
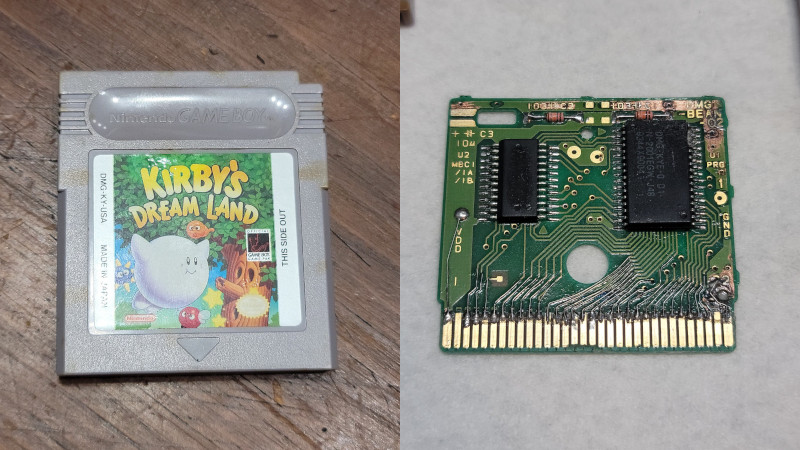
 The cartridge was badly corroded, with many of the traces eaten through, rendering the game inoperable. First, all the components were removed, and the board was cleaned. This allowed easy access to the traces across the whole board. Then, the job was to delicately remove some solder mask from the parts of the traces still remaining, and bridge the gaps with fine copper wire. Even worse, several vias were damaged, which [Taylor] tackled by feeding jumper wires through the board and executing a repair on each side.
It’s a simple enough repair for the experienced hand, but virtually magic to a retro gaming fan that doesn’t know how to solder. [Taylor] has given us a great example of how to deal with corroded carts properly, with enough detail to be quite educational to the beginner.
We’ve seen other great work in this vein too, like an Amiga 2000 brought back from a horrible creeping green death. If you’ve done your own retro rescue, be sure to drop us a line!


I wonder why nobody would make a more-or-less universal cartridge PCB, to which you could just move all the relevant components. It’s not like the schematic is a secret. There are probably a dozen combinations of the chips, which could be handled with multiple footprints and/or jumpers.
I suppose restoring the PCB is the point.
Yeah, I mean I can see the usefulness of this as a guide, but personally I’d have made a new pcb since all the vital components were still working.
But I am generally the smart kind of lazy…
I was thinking that myself. It probably would have been way easier just to get a new pcb printed out. And much more reliable after it’s done.
Failing that, even just reproducing the layout of this one could presumably be automated from a hi-res photograph of a de-populated board?
It’s certainly cheap enough to do, as it fits in JLCPCB’s 10x10cm 5 for $2 service. Unfortunately they don’t do hard gold or bevel edges, so it’s going to be a temporary fix and not something to last the ages.
PCBway will do beveled hard gold edge connectors, though you’d really have to order a good number to get the unit price at all reasonable. Looking at an STM32 based cartridge emulator project’s (linked below) kicad files, it looks like you could bring the dims down to 49mm on the card-edge and 42mm tall (wide enough for the connector, just tall enough to hit both round locating features in the case), so you could probably panelize four on a 100mmx100mm footprint
From PCBway:
-100mmx500mm (seems to get the best price per board out of the panel, 20boards/panel)
-hard gold beveled edges
-HASL lead free outside of beveled edges
-default options for everything else
For 2000 boards (100 panels), it would cost $0.80/board. For 200 boards, it would cost $2.60/board.
https://hackaday.com/2020/01/27/all-the-games-in-one-cartridge/
Different game titles could have a different PCB layout. They are not all the same. Some have multiple memory chips while others only have one. Here is a link to a bunch of photos for almost all the games btw. https://gbhwdb.gekkio.fi/cartridges/
Very interesting. There are really only like 10 layouts that have a handful of layout revisions. Someone could easily make a repo with a board that would work with each type. Now if they wanted to it wouldn’t be far fetched to make 100% identical PCBs for these. The hard part is documenting them and that site has already done that.
I also do my repairs that way and that’s what my customers and friends want. Every repairer has his own style and recognition value. There are even some dealers who are looking for such objects because they get a higher value. Like an art object. A friend compared it with Kintsugi. You can see the repair of the object and this gets its own philosophical and artistic value. Personally, I find a repaired object much more beautiful than a newly created PCB. It also shows the transience that is in our everyday technology that surrounds us.
I have made universal carts for NES and SNES, and there are others also, people have made Sega and PC-engine carts as well, so i’m sure there is already a custom PCB.
When I have been in school, about 35 yr ago, I got a defective foldable (two screen) “game and watch” LCD game from a friend. It had a single sided hard paper PCB with some jumper traces made of carbon paint. Unfortunately the casing had a quite big mold protrusion in the center of the back cover which cracked the PCB due to external pressure. Probably the game was often carried in the back pocket of a pair of jeans.
There were many (10 to 20) cracked copper and carbon paint traces, but I was able to repair it with thin magnet wire and patience. In the end I sold the repaired game to another friend for a quite good price.
Way back a long time ago in another life I worked at a place and we made Atari 2600 carts, or more properly the populated PCB’s for them. We all had a ton of fames with little stickers on the PCB as we did not have access to the cases. As far as the boars we made, the boards were all the same, only the ROMS were different. I am not sure about the game boy but I would have been looking for a common, easy to get game card to move the existing rom into. It has been decades, but I recall on the atari carts there not being anything else but the rom. I don’t even recall bypass caps, but as I said it has been a long long time.
Most Atari cartridge mask-ROMs had their circuitry customized to not need other chips. 2K/4K carts just need an active-high chip select, and the most common 1FF8/1FF9 8K circuit was usually incoporated into the ROM chip for large production runs.
Oh man, this was my favorite GB title back in the day! So cool to see it brought back to life.
I think I still have the Pokemon Blue cartridge I found in a field just outside of my previous property. It actually worked when I found it.
Real Life Pokemon Go!
B^)
Gotta catch ’em all!