Dog-Harnessing The Power Of Walkie Talkies

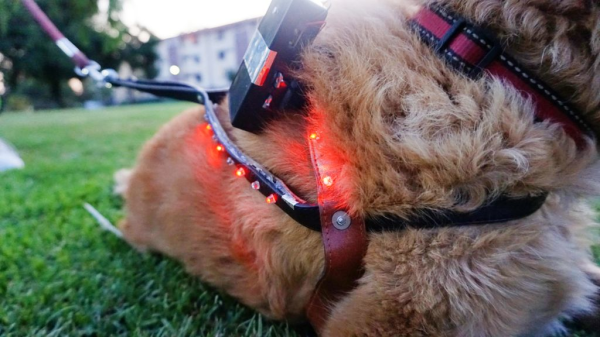
[javier.borquez] likes to take his dog to the hang out at the dog park around dusk. But once the sun goes down and [Rusio]’s off the leash, running amok with the other dogs, it’s almost impossible to keep track of him.

Sure, there are probably glow-in-the-dark or lighted collars out there, but if you go commercial, chances are good that someone else’s dog will be wearing the same thing. Besides, what’s the fun in buying something that you can do a better job making yourself? With this dog distance indicator harness, you don’t even have to program anything. Instead, it uses a cheap pair of modified walkie talkies to show green LEDs on the harness while the dog is in range, and red when it isn’t.

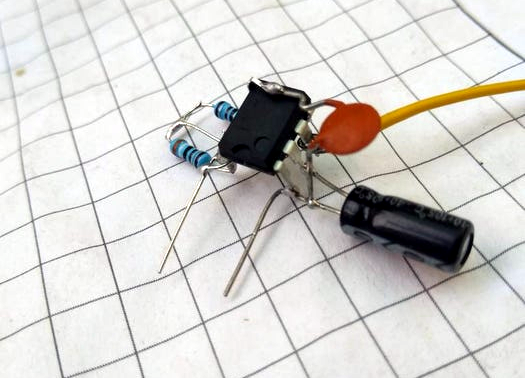
Although [javier]’s pupper is the best pupper yes he is, [Rusio] can’t be expected to hold down the button and bark his location. His walkie talkie uses a 555-based frequency generator and a glued-down button to speak at 1 kHz.

Over in [javier]’s walkie, there’s a resistor in place of the speaker to keep the talkie parts working. There’s also a half-wave bridge rectifier that charges a capacitor when [Rusio] is within range, and a resistor that drains it when he’s outside the 6-8 meter range. The rectifier’s output goes to a second 555 set up as a Schmitt trigger, which tells a transistor to turn the red LEDs on instead.

If you got stuck on the idea of hearing your dog talk to you over distances, here’s a Bluetooth Babelfish collar.

Raspberry Pi Walkie Talkie Mumbles To Friends

His kids wanted walkie talkies, so [Daniel Chote] built one. The TalkiePi is a neat project built around a Raspberry Pi running Mumble, the open-source voice chat system that his kids can share with their siblings and friends.

It’s easy enough to choose the Raspberry Pi, and Mumble is pretty well known. But what’s the easiest way you can think of to add microphone and speakers to the RPi? We applaud [Daniel’s] choice to equip it with the guts of a USB speakerphone. Mumble lets you choose voice activation or keyboard input — in this case an added button makes it push-to-talk, as you would expect in a traditional walkie talkie.

He put all of this into a nicely designed 3D case with a few LEDs, so it is easy to tell that it is ready to transmit. [Daniel] isn’t quite finished yet, though: he’s now working on a new version that is portable, battery powered and uses a Raspberry Pi Zero for the ultimate walkie talkie. We can’t wait to see someone take this to the extreme and include a cellular-modem. But then again, anywhere you can get on WiFi this rig should work, it’s not relegated to a single LAN, and that already far outperforms walkie talkies of yore.

Extending The Range Of Wireless Weather Stations With Walkie Talkies

[Roel] wanted to put a wireless weather station in his greenhouse. Even though the weather station was supposed to transmit over fairly long distances, the geometry of his back yard and a few stone walls killed the radio signal even after putting a good antenna on the receiving side of his wireless weather station setup. Wanting to get his weather station working, [Roel] did the sensible thing and built a packet radio setup out of a pair of walkie talkies, greatly increasing the range of his weather station.

This build comes after [Roel] spent a great deal of time reverse engineering the wireless protocol of his Thierry Mugler weather station. With a little bit of code, [Roel] is able to get the current temperature and humidity reading into his Linux box. This system relies on the transmitter inside the weather station, so the system falls apart over any sufficiently large distance.

To increase the range of his weather station, [Roel] took his existing hardware and added a pair of inexpensive FRS walkie talkies. The build uses the hardware from his previous build to get the radio data from the weather station. This data is sent over to an ATmega88 where it’s converted to packet radio and sent over the walkie-talkie. On the receiving side, the output of a second walkie-talkie is piped into the Linux soundmodem app (link, but it’s down as of this writing) where it’s decoded. Sending the received data to gnuplot makes a very nice graph of the temperature and humidity.

[Roel] put the code for both the tx and rx sides of the build up on his build page. Very nice work that uses very inexpensive hardware.

Hack A Walkie Talkie For Music

radio1

[nepheron] shows us how he hacked his walkie talkie to broadcast music. While using this to broadcast music is possibly illegal, it could be used to make actual upgrades to your system as well. He has replaced the microphone input with a headphone cable and extended the antenna. It is only mono, and he states it will only run for a minute before shutting off, so there is definitely room for improvement.

Computer Headset From Walkie Talkies

wireless headset

Okay, now I think we’ve covered all of the bases when it comes to modifying devices to use them as Skype peripherals. Reader Mad Matt chopped up a pair of toy walkie talkies so that he could build a wireless headset to use with his computer. Although he doesn’t mention VOIP, there are only a few other things this could be used for. Of note is that he used a usb connector between the headset and the receiver/transmitter so that he could have a quick disconnect if needed. If we kill Matt’s free hosting you can try the Coral Cache.

Continue reading “Computer Headset From Walkie Talkies”

DIY Walkie-Talkie With ESP32 And ESP-NOW

In a recent article in Elektor magazine, [Clemens Valens] describes the construction and software for an ESP32 walkie-talkie system that uses ESP-NOW for the wireless connection between units, along with a low-cost condenser microphone with a transistor-based preamplifier and an LM386 op-amp for the speaker circuit. In the ESP32 module the built-in DAC and ADC are used for audio in and output, which provide just about enough resolution for voice communication.

So why use ESP-NOW rather than WiFi or Bluetooth? Mostly because of range, power usage and convenience with no SSIDs and passwords to bother with.

The DIY Walkie-Talkie circuit diagram. (Credit: Clemens Valens, Elektor magazine)

ESP-NOW is Espressif’s own network protocol that uses the same underlying hardware as 2.4 GHz WiFi and Bluetooth, but focuses on more basic direct and mesh-style communication. It can be considered to be somewhat like low-level UDP with MAC address instead of IP address, which makes it useful for fire-and-forget traffic such as from IoT devices.

In the past, we’ve seen ESP-NOW control everything from fake security cameras to CNC machines. In fact, we’ve even seen it used in another walkie-talkie a couple years back.

ESPboy Turned Into Functional Walkie-Talkie

The ESPBoy was first built as a hackable open-source game engine and handheld console for educational purposes. However, it’s also a platform that can readily support all kinds of other uses. You can even turn the humble handheld device into a working walkie talkie.

The build relies on adding a SA868 transceiver module to the ESPBoy, along with a microphone, speaker, audio amplifier and antenna as supporting hardware. It then relies on the ESPBoy’s existing screen and buttons as a user interface for the radio. Assembled appropriately, it can then be used as a very basic and barebones walkie talkie for voice communication.

You won’t get coded squelch or other useful features, but it’s enough to let you talk over the air with other handheld radio users. The SA868 module can transmit on a variety of frequency bands, but the video shows it operating in the UHF band around 433 MHz. With a power on the order of 1.8W, it should get you a few kilometers of transmission range in an open field.

Check out our earlier coverage of the ESPBoy and its many different configurations. Video after the break.

Continue reading “ESPboy Turned Into Functional Walkie-Talkie”