DIY Walkie-Talkie With ESP32 And ESP-NOW

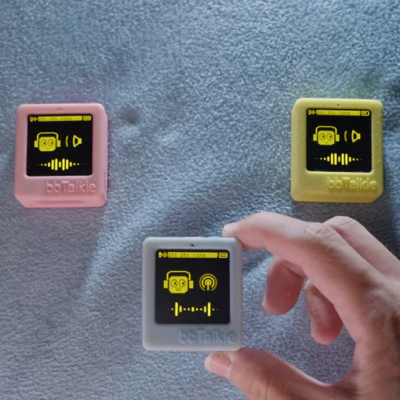
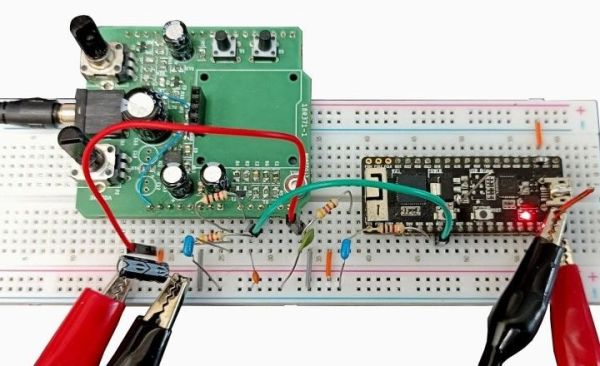
In a recent article in Elektor magazine, [Clemens Valens] describes the construction and software for an ESP32 walkie-talkie system that uses ESP-NOW for the wireless connection between units, along with a low-cost condenser microphone with a transistor-based preamplifier and an LM386 op-amp for the speaker circuit. In the ESP32 module the built-in DAC and ADC are used for audio in and output, which provide just about enough resolution for voice communication.

So why use ESP-NOW rather than WiFi or Bluetooth? Mostly because of range, power usage and convenience with no SSIDs and passwords to bother with.

The DIY Walkie-Talkie circuit diagram. (Credit: Clemens Valens, Elektor magazine)

ESP-NOW is Espressif’s own network protocol that uses the same underlying hardware as 2.4 GHz WiFi and Bluetooth, but focuses on more basic direct and mesh-style communication. It can be considered to be somewhat like low-level UDP with MAC address instead of IP address, which makes it useful for fire-and-forget traffic such as from IoT devices.

In the past, we’ve seen ESP-NOW control everything from fake security cameras to CNC machines. In fact, we’ve even seen it used in another walkie-talkie a couple years back.

UChaser Follows You Anywhere

If you’ve been making up for lost years of travel in 2023, you might have seen a fellow traveler in the airport terminal or train station walking with their luggage happily careening behind them. [Jesse R] and [Brian Lindahl] wanted more of that. They wanted an open-source, low-cost system that could be put in anything.

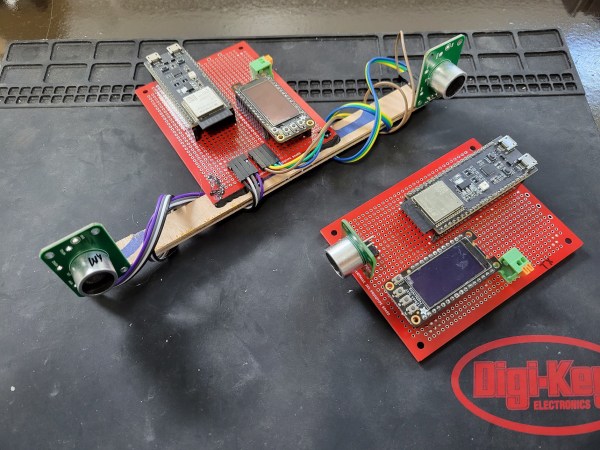
The basic principle is that they will have a transmitter that sends both a radio signal and an ultrasonic pulse. The receiver receives the radio signal and uses it as a reference for the two ultrasonic sensors. The time since the radio signal is compared between the two, and a distance and direction are established.

In practice, the radio is an ESP32-S3 using ESP-NOW (which we’ve seen relatively recently on another project), a protocol from Espressif that offers low latency 250 bytes payloads. The ultrasonic transceiver is based on Sparkfun’s HC-SR04. For prototyping purposes on the receiver, they just removed the transmitter to avoid populating the airwaves, as to listen, you had to transmit. The prototype was an electric wheelbarrow that would happily follow you around the yard wherever you go.

With the concept validated, they moved to a custom ultrasonic setup with a custom buffer amp and damp transistor, all centered around 20kHz. The simulations suggested they should have been better than the HC-SR04 from Sparkfun, but the 30-foot (9 meters) range went to 10 feet (3 meters). They ultimately returned to using Sparkfun’s circuit rather than the custom amp.

We’re looking forward to seeing the project continue. There are various challenges, such as variability in the speed of sound, echos and reflections, and ultrasonic line of sight. We love the peak behind the curtain that allows us to see what decisions get made and the data that informs those decisions. All the code and PCB design files are available on GitHub under an MIT and Creative Common license, respectively. This project was submitted as part of the 2o23 Hackaday Prize.

Video after the break.

Continue reading “UChaser Follows You Anywhere”

Weather Station With Distributed Sensors

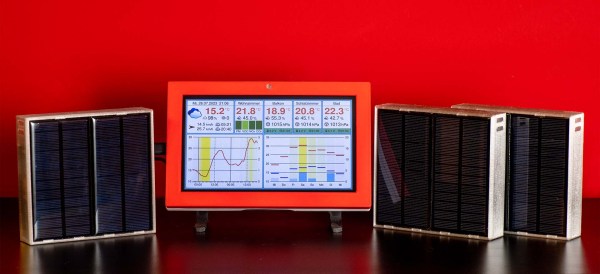
Building a weather station is a fairly common project that plenty of us have taken on, and for good reason. They can be built around virtually any microcontroller or full-scale computer, can have as many or few sensors as needed, and range from simple, straightforward projects to more complex systems capable of doing things like sending data off to weather services like Weather Underground. This weather station features a few innovations we don’t often see, though, with a modular and wireless design that makes it versatile and easy to scale up or down as needed.

Each of the modules in this build use the ESP32 platform, which simplifies design and also takes care of the wireless capability needed. The base station gets a few extra sensors including those for carbon dioxide, volatile organic compounds, and nitrogen oxides. It also includes a screen which can be used to display a wide variety of data gathered locally but also includes forecast information fetched from the free OpenWeatherMap API. For the sensor modules, BME280 sensors are used for temperature, pressure, and humidity and each module includes its own solar panel and battery with the ESP32 chips set to operate using as little energy as possible.

One of the things that helps easily integrate all of the sensor modules is the use of ESP-NOW, which we have seen a few times before. It essentially eliminates the need for a router and allows ESP modules to connect directly with one another. The build also goes into detail about most of the aspects of this project including the programming of the GUI that the ESP32 base station displays on its screen, so for anyone looking to start their own weather station project this should be an excellent guide. Make sure to check out this one as well if you want to send all of your weather data to Weather Underground.

Go In All The Directions With Omniwheeled ESP32 Bot

The ability to change direction without turning is the specialty of omnidirectional wheels, which [maker.moekoe] used to their full potential on a pair of ESP32-controlled robots. Video after the break.

Thanks to the rollers on the wheels, the wheels could be arranged at 120° in relation to each other on the 3-wheeler and 90° 4-wheeler. [maker.moekoe] used ChatGPT and a simple python simulation to find and verify the motor control algorithm required for smooth omnidirectional driving.

A single custom PCB incorporates all the electronics, and doubles as the robot’s chassis, with the geared brushed motors bolted directly to it. An ESP32-S2 runs the show, and can also stream FPV video from the same OV2640 camera used on the popular ESP32-cam modules. The LiPo battery is held by a 3D-printed support plate screws to the bottom of the PCB. The robots can controlled by a simple web-app served by the ESP32, or a using the IMU on custom controller also built around an ESP32-S2 which uses the ESP-NOW wireless protocol.

Even though the robots’ software is still in the early stages, the movement looks extremely smooth and effortless. Plus, their all-in-one PCB chassis makes for an elegant and clean build

Continue reading “Go In All The Directions With Omniwheeled ESP32 Bot”

Wireless CNC Pendant Implemented With ESP-NOW

As a fervent fan of twiddly and twirly widgets and tactile buttons in a device’s user interface, [Steve M Potter] created a remote control (pendant) for his CNC machine, which he explains in a recent video that’s also linked down below. In addition to all the tactile goodness, what is perhaps most interesting about this controller is that it uses Espressif’s ESP-NOW protocol. This still uses the same 2.4 GHz as WiFi would, but uses a system more akin to the pairing of a wireless mouse or keyboard.

Advantages of ESP-NOW include the lower power usage, longer range, no requirement for a router and WiFi SSID & password. As far as latency goes, [Steve] measured a round-trip latency of 2.4 ms, which is fast enough for this purpose. Since it does control a potentially dangerous machine, all transmissions are acknowledged and re-transmitted at higher power if needed.

The lower power usage means that the pendant will last a lot longer on a single charge from the 18650 Li-ion cell, while ESP-NOW’s fixed address pairing saves time when turning the pendant on. Meanwhile, on the CNC side, another ESP32 acts as the receiving end for commands, although theoretically an ESP8266 could be used as well, if size or power was a concern there.

As for the transparent enclosure? It’s to make it easier to show it off to interested folk, apparently.

Continue reading “Wireless CNC Pendant Implemented With ESP-NOW”

Farm Data Relay System: Combine LoRa And 2.4 Ghz Networks Without WiFi Routers And Cloud Dependence

Setting up a wireless sensor network over a wide area can quickly become costly, and making everything communicate smoothly can be a massive headache, especially when you’re combining short range Wi-Fi with long range LoRa. To simplify this, [Timm Bogner] created Farm Data Relay System which simplifies the process of combining LoRa, 2.4Ghz modules and serial communications in various topologies over wide areas.

The FDRS uses a combination of ESP32/8266 sensor nodes for short range, and LoRa nodes for long range. The ESP nodes use Espressif’s connectionless ESP-NOW peer-to-peer protocol on which allow multiple ESP boards to communicate directly without the need for a Wi-Fi router. The ESP modules can have one of 3 roles, nodes, repeaters or gateways, and gateways and repeaters share the same code. Nodes take sensor inputs, and are configured to each have a unique READING_ID.

Relays just retransmit ESP-NOW packets to extend the network range, while gateways convert packets between ESP-NOW, MQTT over Wi-Fi, LoRa or serial messages as required. Repeaters and gateways each have a unique UNIT_MAC for addressing. The code that handles communication for the ESP devices is simple and well documented, so you only need to set a few configuration values, and then can focus your efforts on the code required for your specific application.

The hub of the system is a Raspberry Pi running Node-RED which acts as the final MQTT gateway and connects to the ESP MQTT gateways. This means that all the action happens in the local network, without being dependent on an internet connection and cloud service. However, it can still send and receive data over the internet using MQTT or any other protocol as required. Node-RED makes it particularly easy to build custom automations and interfaces.

In the video after the break, Andreas Spiess, the man with the Swiss accent, who also has a hand in the project, goes over all the features, setup and caveats.

Continue reading “Farm Data Relay System: Combine LoRa And 2.4 Ghz Networks Without WiFi Routers And Cloud Dependence”

Building An Army Of Faux Cameras In The Name Of Art

After taking mental note of the number of surveillance cameras pointed at him while standing in line at the local Home Depot, [Mac Pierce] was inspired to create A Scanner Darkly. The art installation uses beams of light projected by mock security cameras to create a dot-matrix character display on the opposing wall, which slowly blinks out US surveillance laws and regulations.

[Mac] has put together an extensive behind the scenes look at how he created A Scanner Darkly, which among other things covers the incredible time and effort that went into producing the fifteen identical cameras used to project the 3×5 grid. Early on he decided on 3D printing each one, as it would give him complete control over the final result. But given their considerable size, it ended up taking 230 hours and 12 kilograms of PLA filament to print out all the parts. It took a further 55 hours to sand and paint the camera housings, to make sure they didn’t actually look like they’d been 3D printed.

Internally, each camera has an off-the-shelf LED flashlight that’s had its power button rigged up to an ESP8266. Once they’ve been manually pointed to the appropriate spot on the wall, [Mac] can turn each camera’s spotlight on and off over WiFi. Rather than rely on the gallery’s infrastructure, all of the cameras connect to the ESP32 M5Stack that serves as the central controller via ESP-Now.

From there, it was just a matter of writing some code that would load a text document from the SD card, convert the current character into a 3×5 array, and then command the appropriate cameras to turn their lights on or off. [Mac] has not only provided the STL files for the 3D printed camera, but the client and server Arduino code to control the lights. Combined with his excellent documentation, this makes A Scanner Darkly something of a viral art piece; as anyone with the time and appropriate tools can either duplicate the installation or use it as a base for something new.

While some will no doubt argue that [Mac] could have completed this project far faster had he just modified some commercial dummy cameras, it’s important to remember that as an artist, he had a very specific look in mind for A Scanner Darkly. This project is a perfect example of how a creator’s passion can take an idea to new heights, and we think the end result proves it’s worth the time and sweat to put in the extra effort.

Continue reading “Building An Army Of Faux Cameras In The Name Of Art”