Hacklet 83 – Tiny Robot Projects

Hackers, makers, and engineers have been hacking on robot projects since the era of clockwork mechanics. Any robot is a cool project, but there is something particularly attractive about small ones. Maybe it’s the skill required to assemble them, or perhaps it’s the low-cost. Either way, there are lots of palm-sized robot projects on Hackaday.io. This week on the Hacklet, we’re going to highlight a few of them!

tinyrobot2
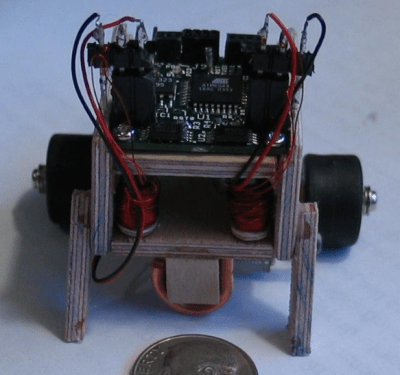
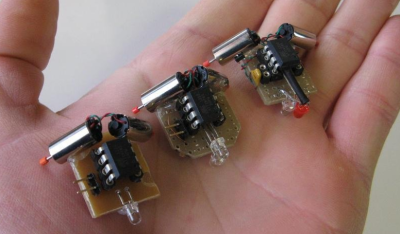
We start with the granddaddy of them all, [shlonkin] and Tiny robot family. [Shlonkin] built line following robots that can hide under a US half-dollar coin. The robots are simple circuits – an ATtiny85 with an LED and pair of phototransistors. The code is provided both in Arduino’s wiring, and in straight C++. Two coreless motors, normally used in cell phones vibrators or quadcopters, provide the locomotion. These robots only know one thing – moving forward and following a line. They do it well though! We love this project so much that we hosted a tiny robot workshop at the 10th anniversary back in 2014.

tote
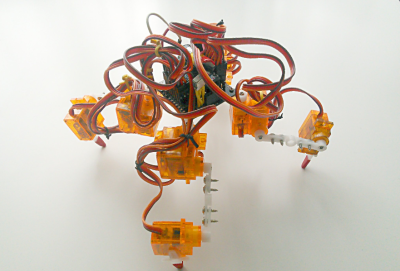
When it comes to tiny walking robots, [Radomir Dopieralski] is the king. Many of his projects are small biped, quadruped, or even hexapod robots. He’s done things with 9 gram nano servos that we thought were impossible. Tote, an affordable spider robot, is his latest creation. Tote is a four-legged bot utilizing 12 9 gram servos. [Radomir] created a custom PCB for Tote, which acts as a carrier for its Arduino Pro Mini Brain. This robot is easily expandable – [Radomir] has experimented with the Teensy 3 series as well. Controlling the robot can be anything from an ESP8266 to an infrared remote control.

botbot
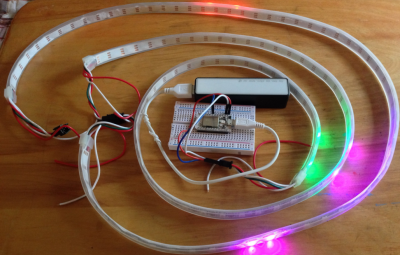
[Alan Kilian] may well have the ultimate tease project with Hand-wound inductors for a tiny robot. [Alan] was using some tiny GM-10 motors on his micro-bot. The motors didn’t have inductance for the locked-antiphase drive controller. His solution was to wind some coils to provide a bit of added inductance. The mod worked, current consumption dropped from 116 ma to about 6 ma. We want to know more about that ‘bot though! It’s controlled by a Megabitty, [Monty Goodson’s] ATmega8 controller board from sometime around 2003. The lilliputian board has been very popular with the nano sumo crowd. Other than the controller, motors, and the plywood frame, [Alan] has left us guessing about his robot. If you see him, tell [Alan] to give us more info on his micro robot’s design and construction!


espbot
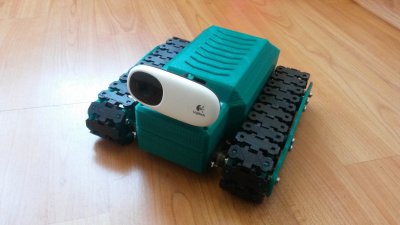
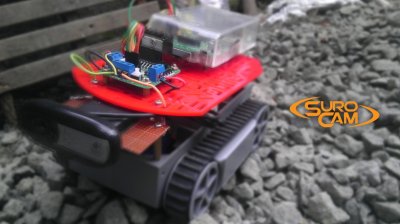
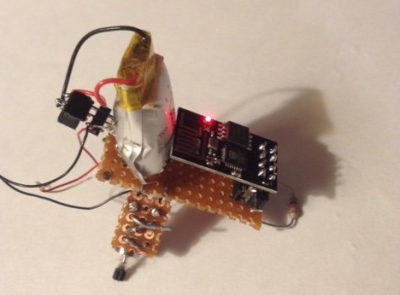
[Ccates] jumped on the tiny robot bandwagon with Tiny wi-fi robot. Rather than go with an Arduino for control, [Ccates] grabbed the popular ESP-8266 WiFi module. The construction of the bot is inspired by [shlonkin’s] tiny robot family up above. This bot is controlled by the Xtensa processor embedded in the ESP-8266. Since it only drives forward, it only takes two GPIO pins to control the transistors driving the motors. Even the diminutive ESP-01 module has enough I/O for that. We’d love see some sensors and a full H-bridge on this micro beastie!


If you want to see more palm-sized robot projects, check out our new tiny robot projects list! These ‘bots are small, so I may have missed yours. If that’s the case, don’t be shy, just drop me a message on Hackaday.io. That’s it for this week’s Hacklet. As always, see you next week. Same hack time, same hack channel, bringing you the best of Hackaday.io!

The Eloquence Of The Barcode

Beep. You hear it every time you buy a product in a retail store. The checkout person slides your purchase over a scanner embedded in their checkout stand, or shoots it with a handheld scanner. The familiar series of bars and spaces on the label is digitized, decoded to digits, and then used as a query to a database of every product that particular store sells. It happens so often that we take it for granted. Modern barcodes have been around for 41 years now. The first product purchased with a barcode was a 10 pack of Juicy Fruit gum, scanned on June 26, 1974 at Marsh supermarket in Troy, Ohio. The code scanned that day was UPC-A, the same barcode used today on just about every retail product you can buy.

The history of the barcode is not as cut and dry as one would think. More than one group has been credited with inventing the technology. How does one encode data on a machine, store it on a physical media, then read it at some later date? Punch cards and paper tape have been doing that for centuries. The problem was storing that data without cutting holes in the carrier. The overall issue was common enough that efforts were launched in several different industries.

Continue reading “The Eloquence Of The Barcode”

Hacklet 82 – Halloween Hacks 2015

Halloween is when the ghouls start haunting and the hackers start hacking. All hallows eve is the perfect holiday for eerie blinking LEDs, spooky audio oscillators, and wild animatronics. We had a double dose of Halloween hacks last year on the Hacklet. This year we’re bringing you even more of the best Halloween hacks on hackaday.io!

eyes1We start with [dougal] and Halloween Blinky Eyes. [Dougal] wanted to create the effect of creatures peeking at you from the dark corners of the room, and he’s certainly nailed it. A strip of WS2812 LEDs is the trick here. Pairs of LEDs light up, blink, and fade away like spooky eyes. The Strip is controlled by a Particle Core using Adafruit’s NeoPixel Library, though [Dougal] plans to move to the FastLed library. Everything is powered by a USB power pack. This hack isn’t much to look at with the lights on, so check out the video to see these eyes really shine!


witch1Next up is [controlmypad] with Blair the Witch Project. A normal trip to Home Depot turned paranormal when [controlmypad] spotted an awesome witch decoration. The free-standing mannequin had some basic animatronics and the all important manual trigger. [controlmypad] already had a discarded electric wheelchair. After replacing the chair batteries he modified it with a Sabertooth 2×32 Motor Controller and a standard radio control receiver. A spare channel was connected to Blair’s manual trigger. An aluminum tube joins the witch and the scooter. The hardest part of this hack was keeping Blair’s skirt out of the scooter wheels. Home Depot to the rescue! A simple hoop made of lawn edging plastic keeps the fabric and wheels apart.


tweet-trick

[Alex Cordonnier] and his team participated in Boilermake 2015, a 24 hour Hackathon at Purdue University. The fruit of their labor is Trick or Tweet, the tweeting Jack-o’-lantern. Yes folks, we now have the internet of gourds. Hiding inside Trick or Tweet is a Raspberry Pi and a Pi Camera. The pumpkin itself is also a giant capacitive touch switch. Touching the pumpkin triggers a count down after which Trick or Tweet snaps a photo. It then adds some spooky Halloween overlays, a pun or two, and throws the whole thing up on twitter @PumpkinPiPics. [Alex] hasn’t uploaded the code yet, but we’re guessing it consists of a few Python scripts. Pretty awesome for 24 hours of work!


hariSometimes Halloween hacks take on a life of their own. That’s exactly what happened when [Hari Wiguna] sat down with a few parts he ordered from China. Happy Halloween 2015 is the result. [Hari’s] order included some potentiometers, a two color OLED display, and some Arduino clones. In no time [Hari] had three pots wired up to the Arduino’s analog inputs. The OLED quickly followed, displaying graphics via the Arduino’s I2C bus. He really wanted a Jack-o’-lantern though. It took a bit more tweaking, but eventually [Hari] was successful. The first pot sets eye size.  The second controls eye rotation. The third pot changes the width of Jack’s mouth. [Hari] has all the code for this hack up on his most recent project log.

Not spooked enough? If you want to see more Halloween projects, check out our newly updated Halloween hacks list! Did I miss your project? Don’t be shy, just drop me a message on Hackaday.io. That’s it for this week’s Hacklet; As always, see you next week. Same hack time, same hack channel, bringing you the best of Hackaday.io!

Creepy Van Parked Down The Street Is A Nomadic Sauna

Sometimes you need a good sweat and if you’re like [JoeCMorgan] you can’t be bothered travelling to a sauna, it needs to come to you. He took care of that problem by building the SaunaVan.

Many moons ago, SaunaVan started life as a Vauxhall Combo van. At some point it was abbreviated from a Van to a trailer. You can’t tell from the picture above but this van no longer has a cab up front. Like many trailers, it eventually became a storage unit, which is how [Joe] found it. He cleaned out the old tires, tents, and detritus, and started planning out a mobile sauna. The van’s interior was already stripped, so the first order of business was to cut a hole in the front wall of the van. The hole became a steel “nose” which housed the chimney. All this allowed [Joe] to place his 1920’s Husqvarna stove as far forward as possible.

The van’s gas tank was cleaned out and became a water reservoir, complete with a pump that is safe to use with water. A shower placed outside allows for a quick cool down after a hot sauna. The biggest job was building the interior. [Joe] measured out the wheel wells and cut panels to form the interior walls of the van. Some fiberglass insulatisauna2
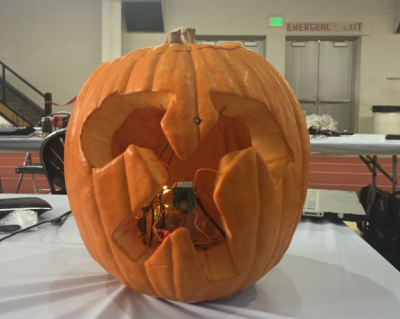
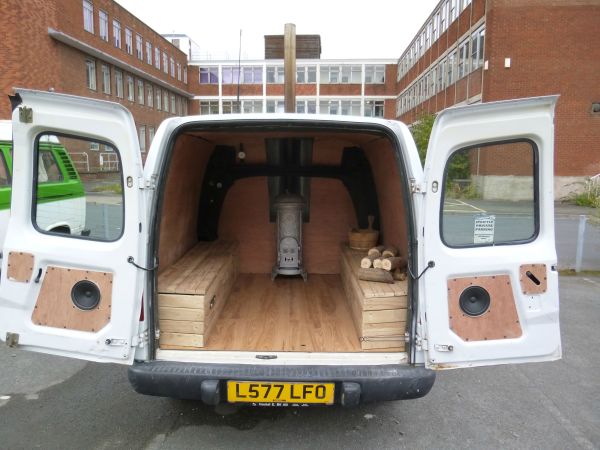
on between the wood and the outside wall ensured the van would stay nice and toasty. [Joe] put in some pre-finished flooring and added benches to cover the wheel wells. The benches hide storage for wood, and the wiring for the van’s sound system. Speaking of which, your sweaty friends won’t be happy without some tunes so [Joe] added speakers and a radio. Check out the video after the break to see it all in action. This thing is just begging to be parked next to the Carpool DeVille.

One thing [Joe] didn’t mention was a fresh air intake, which is vital on a setup like this. We’d also add a carbon monoxide detector just to be sure combustion gasses don’t build up inside the van’s body.

The first firing of the antique stove was a complete success. The newly christened SaunaVan’s temperature got up over 90°C (194°F)! That might sound hot to some, but it’s not far outside the norm for a sauna. The low humidity helps keep things comfortable, but we wouldn’t recommend staying inside for more than a few minutes.

Continue reading “Creepy Van Parked Down The Street Is A Nomadic Sauna”

Killed By A Machine: The Therac-25

The Therac-25 was not a device anyone was happy to see. It was a radiation therapy machine. In layman’s terms it was a “cancer zapper”; a linear accelerator with a human as its target. Using X-rays or a beam of electrons, radiation therapy machines kill cancerous tissue, even deep inside the body. These room-sized medical devices would always cause some collateral damage to healthy tissue around the tumors. As with chemotherapy, the hope is that the net effect heals the patient more than it harms them. For six unfortunate patients in 1986 and 1987, the Therac-25 did the unthinkable: it exposed them to massive overdoses of radiation, killing four and leaving two others with lifelong injuries. During the investigation, it was determined that the root cause of the problem was twofold. Firstly, the software controlling the machine contained bugs which proved to be fatal. Secondly, the design of the machine relied on the controlling computer alone for safety. There were no hardware interlocks or supervisory circuits to ensure that software bugs couldn’t result in catastrophic failures.

The case of the Therac-25 has become one of the most well-known killer software bugs in history. Several universities use the case as a cautionary tale of what can go wrong, and how investigations can be lead astray. Much of this is due to the work of [Nancy Leveson], a software safety expert who exhaustively researched the incidents and resulting lawsuits. Much of the information published about the Therac (including this article) is based upon her research and 1993 paper with [Clark Turner] entitled “An Investigation of the Therac-25 Accidents”. [Nancy] has since published updated information in a second paper which is also included in her book.

Continue reading “Killed By A Machine: The Therac-25”

3D Printed Turbofan Features Reverse Thrust

[Harcoreta] has created a 3D printed model of the GE GEnx-1B Turbofan. This is the engine that powers Boeing’s 787 dreamliner. What sets this model apart is that it has a complete working reverse thrust system. A real jet engine would be asking a bit much of 3D printed ABS plastic. This model is more of an Electric Ducted Fan (EDF). An NTM 1400kv 35mm brushless motor hides in the core, cooled by a small impeller.

jet-naked
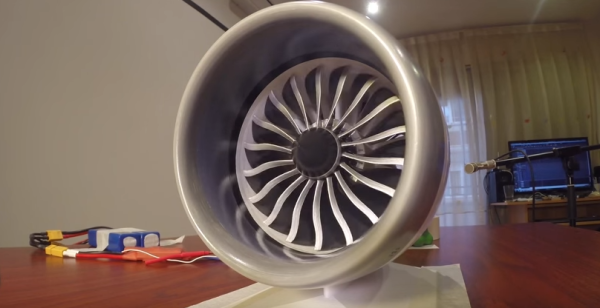
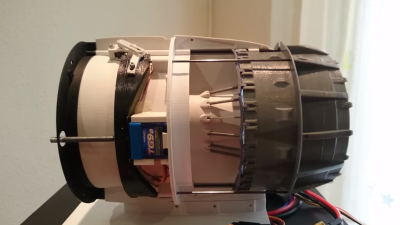
What sets this apart from other jet models is the working reverse thrust system. [Harcoreta] painstakingly modeled the cascade reverse thrust setup on the 787/GEnx-1B combo. He then engineered a way to make it actually work using radio controlled plane components. Two servos drive threaded rods. The rods move the rear engine cowling, exposing the reverse thrust ducts. The servos also drive a complex series of linkages. These linkages actuate cascade vanes which close off the fan exhaust. The air driven by the fan has nowhere to go but out the reverse thrust ducts. [Harcoreta’s] videos do a much better job of explaining how all the parts work together.

The model was printed on an Reprap Prusa I3 at 0.1mm layer height. [Harcoreta] smoothed his prints using acrylic thinner, similar to the acetone vapor method. Unfortunately, [Harcoreta] has only released a few of the design files on rcgroups, but we’re hoping he will drop the whole model. We can’t wait to see a model dreamliner landing just like the big boys!

Continue reading “3D Printed Turbofan Features Reverse Thrust”

Hacklet 81 – Tracked Projects

Sometimes wheels just don’t cut it. When the going gets tough, the tough make tracks. Continuous track drive systems – aka tank treads, or tracks, have been around for centuries. The first known use in relatively modern history is a system designed in 1770’s by [Richard Lovell Edgeworth]. Since then there has been a slew of engineers, hackers, and makers who have contributed to this versatile drive system. Today, tread systems find their way into plenty of robotics and transportation projects. This week’s Hacklet is all about some of the best track drive projects on Hackaday.io!

track1We start with [jupdyke] and Modular Continuous Track System. [Jupdyke] has made a project out of making the tracks themselves. These tracks are strong – shore 70A urethane rubber is no joke! Quite a bit of research and experimentation has gone into this project. [Jupdyke] started with 3D printed parts, before moving on to molded 2 part rubber. The rubber is cast in custom machined aluminum molds. The molds are even heated to ensure a quality casting. Rubber alone doesn’t make a track though. The backbone of these tracks are machined steel pins. The pins go through the treads and connect through roller chain components. We’re betting a set of these tracks could easily carry a person!

robot-tankNext up is [williamg42] with Expandable Ruggedized Robotic Platform. [Williamg42] describes this vehicle as “able to operate in harsh environments”. We would shorten that to “It’s a beast”. Some incredible machine work has gone into this robot, especially on the suspension and idler wheels. Everything is made of metal – the frame is 8020 aluminum extrusion covered in plates. The suspension is aluminum and steel. Motors are mini-CIM motors. This robot isn’t lacking on brains, as a BeagleBone black controls it through a custom cape board. Next time we go out on a desert trek, we want this ‘bot at our side!

ttbn-alphaFrom the mind of [TinHead] comes TTBN Alpha, a TelePresence robot. TTBN alpha is based on a Raspberry Pi. Rather than start with Raspbian, [TinHead] built his own lightweight Linux distribution with buildroot. Control is through a web interface. The operator’s view of the world is through the electronic eye of a Logitech C110 webcam. [TinHead] printed his own tracks, using straightened paperclips as pins. Two servos modified for continuous rotation serve as the main drive motors.


surocam

Finally we have [Hendra Kusumah] with Surveillance Robot Camera (SUROCAM). SUROCAM was [Hendra’s] project for both the 2014 and 2015 Hackaday Prize. The chassis is based upon the common RP5 robot kit. This robot’s DC motors are driven by the classic L298n driver chip. Unlike TTBN Alpha above, SUROCAM uses a full Raspbian install, so this Pi is ready for anything. The code is written in Python, and pagekite and ngrok to help make connections to the outside world.

If you want to see more tank treaded rovers, check out our new tracked projects list. Did I miss your project? Don’t be shy, just drop me a message on Hackaday.io. That’s it for this week’s Hacklet; As always, see you next week. Same hack time, same hack channel, bringing you the best of Hackaday.io!