Salvaging Your Way To A Working Tesla Model S For $6500

If you possess modest technical abilities and the patience of a few dozen monks, with some skillful haggling you can land yourself some terrific bargains by salvaging and repairing. This is already a well-known ideology when it comes to sourcing things like electronic test gear, where for example a non working unit might be purchased from eBay and fixed for the price of a few passive components.

[Rich] from Car Guru has taken this to a whole new level by successfully salvaging a roadworthy Tesla Model S for $6500!

Sourcing and rebuilding a car is always a daunting project, in this case made even more challenging because the vehicle in subject is fairly recent, state of the art electric vehicle. The journey began by purchasing a black Tesla Model S, that [Rich] affectionately refers to as Delorean. This car had severe water damage rendering most of its electronics and mechanical fasteners unreliable, so [Rich’s] plan was 
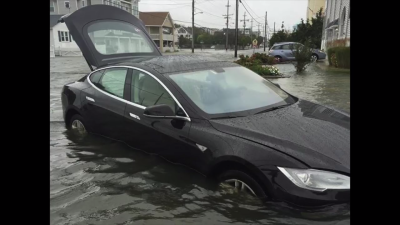
to strip this car of all such parts, and sell what he could to recover the cost of his initial purchase. After selling the working modules of the otherwise drenched battery, motor and a few other bells and whistles his initial monetary investment was reduced to the mere investment of time.

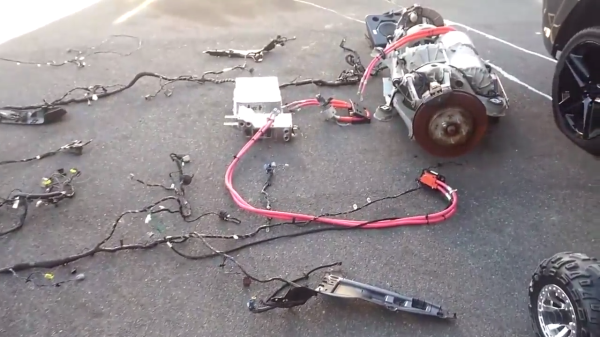
With an essentially free but empty Tesla shell in his possession, [Rich] turned his attention to finding a suitable replacement for the insides. [Rich] mentions that Tesla refused to sell spare parts for such a project, so his only option was to purchase a few more wrecked vehicles. The most prominent of these wrecks was nicknamed Slim Shady. This one

The Donor

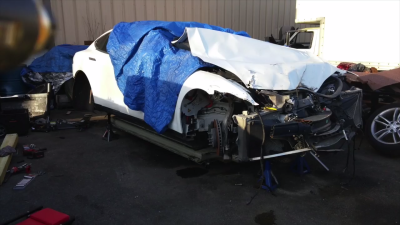
had an irreparable shell but with most electronics preserved, and would serve as the donation vehicle. After painstakingly transplanting all the required electronics and once again selling what he did not need, his net investment came to less than 10% of a new car!

Was all of the effort worth it? We certainly think it was! The car was deemed road worthy and even has functioning Super Charging capabilities which according to [Rich] are disabled by Tesla if such a Frankenstein build is detected.

At this point it would probably be instructive to ask [Rich] if he would do it again, but he is already at it, this time salvaging the faster self driving P86. We suggest you stay tuned.

[Thankyou to Enio Fernandes for sending in the tip]

Continue reading “Salvaging Your Way To A Working Tesla Model S For $6500”

3D Prints That Fold Themselves

3D printing technologies have come a long way, not only in terms of machine construction and affordability but also in the availability of the diverse range of different printing materials at our disposal. The common consumer might already be familiar with the usual PLA, ABS but there are other more exotic offerings such as PVA based dissolvable filaments and even carbon fiber and wood infused materials. Researchers at MIT allude to yet another possibility in a paper titled “3D-Printed Self-Folding Electronics” also dubbed the “Peel and Go” material.

The crux of the publication is the ability to print structures that are ultimately intended to be intricately folded, in a more convenient planar arrangement. As the material is taken off the build platform it immediately starts to morph into the intended shape. The key to this behavior is the use of a special polymer as a filler for joint-like structures, made out of more traditional but flexible filament. This special polymer, rather atypically, expands after printing serving almost like a muscle to contort the printed joint.

Existing filaments that can achieve similar results, albeit after some manual post-processing such as immersion in water or exposure to heat are not ideal for electronic circuits. The researchers focus on this new materials potential use in manufacturing electronic circuits and sensors for the ever miniaturizing consumer electronics.

If you want to experiment printing extremely intricate structures, check out how [_primoz_] brilliant technique revolutionized how the 3D printing community prints thin fibers, bristles, and lion sculptures.

Continue reading “3D Prints That Fold Themselves”

A 3D Printed Junction Transistor Model

Transistors are no doubt one of humankinds greatest inventions. However, the associated greatness brings with it unprecedented complexity under the hood. To fully understand how a transistor works, one needs to be familiar with some Quantum Mechanics! As perhaps any EE undergraduate would tell you, one of the hardest subject to fathom is in fact semiconductor physics.

Take your pick: Mathematical equations governing the various currents inside a BJT

A good place to start to comprehend anything complex is by having an accurate but most importantly, tangible model at hand. Semiconductors are hard enough to describe with elaborate mathematical tools, is a physical model too much to ask?

[Chuck] has designed, printed and explained the workings of a BJT transistor using a 3D printed model. We really like this model because it goes a long way to shed light on some of the more subtle features of BJT transistors for beginners.

For example, the simplest “electronic switch” model completely ignores the application of a transistor as a linear amplifier and cannot be used to explain important transistor parameters such as hfe (DC current gain Beta) or the VBE (voltage to forward bias the base-emitter junction). [Chuck’s] model on the other hand certainly offers better intuition on these, as the former can be linked to the length of the levers arm and the latter to the minimum force needed to rotate the lever. The Tee structure even signifies the combination of base current with the collector current during operation!

If physical models are not your thing, the classic pictorial depiction, the “Transistor Man” in the Art of Electronics might be of interest. If you’ve even outgrown that, its time to dig into the quantum mechanics involved.

Continue reading “A 3D Printed Junction Transistor Model”

FPGA Rescues Scope From The Dumpster

I’m always on the lookout for a quality addition to my lab that would respect my strict budget. Recently, I’ve found myself pushing the Hertz barrier with every other project I do and hence desperately wanted a high bandwidth scope. Unfortunately, only recently have 70 MHz to 100 MHz become really affordable, whilst a new quad channel oscilloscope in the 500 MHz to 1 GHz range still costs a fortune to acquire. My only option was to find an absolute miracle in the form of an old high bandwidth scope.

It seemed the Gods of Hand Me Down electronics were smiling upon me when I found this dumpster destined HP 54542C. It appeared to be in fairy good shape and was the Top Dog in its day. But something had to be broken right? Sure enough, the screen was clearly faulty and illegible. Want to know how I fixed it? Four letters: FPGA.

Continue reading “FPGA Rescues Scope From The Dumpster”

Scope Review: Keysight 1000 X-Series

A few weeks ago we published an article on the newly released Keysight 1000X, an oscilloscope that marks Keysight’s late but welcome entry into the hacker-centric entry-level market. Understandably, this scope is causing a lot of excitement as it promises to bring some of the high-end pedigree of the well-known 2000X and 3000X models down to a much affordable price. Now couple that with the possibility of hacking its bandwidth lock and all this fuss is well justified.

[Dave Jones] from the EEVblog got his hands on one, and while conducting a UART dump saw the scope report 200 MHz bandwidth despite being labelled as a 100 MHz model. He then proceeded to actually hack the main board to unlock an undocumented 200 MHz bandwidth mode. This created a lot of confusion: some said [Dave] got a “pre-hacked” version, others assumed all 100 MHz versions actually have a stock bandwidth of 200 MHz.

Alongside the question of bandwidth, many wondered how this would fare against the present entry-level standard, the Rigol 1054Z. Is the additional cost and fewer channels worth the Keysight badge?

Keysight’s response to our queries and confusion was the promise to send us a review unit. Well, after receiving it and playing around with it, clearly a lot of Keysight’s high-end excellence has trickled down to this lower end version. However, this machine was not without some silly firmware issues and damning system crashes! Read on the full review below. Continue reading “Scope Review: Keysight 1000 X-Series”

Brazil Wins The Raspberry Pi Overclocking Olympics

[Alex Rissato] proudly reports that he now holds the record for highest benchmark score on HWBOT (machine translation); something he sees not only as a personal achievement but admirably, of national pride. Overclocking a Raspberry Pi is not as simple as achieving the highest operational clock rate. A record constitutes just the right combination of CPU clock, memory clock, GPU clock and finally the CPU core voltage. If you’ve managed to produce that special sauce, the combination must be satisfactorily cooled and most importantly be stable enough to pass an actual performance benchmark.

More POWAAA to the CPU!

[Alex] realized that the main hurdle to achieving the desired CPU clock was the internally generated and hence restricted, CPU core voltage; This is externally LC filtered and routed back to the CPU on a stock Pi. [Alex] de-soldered the filter on the PCB and provided the CPU with an externally generated core voltage.

Next, the cooling had to be tended to. Air cooling simply wouldn’t cut it, so a Peltier based heatsink interface had to be devised with the hot side immersed in a bucket of salt water. All of this translated to a comfy 16C at a clock speed of 1600 MHz.

Was all the effort justified? We certainly think it was! Despite falling short of the Pi zero CPU clock rate record, currently set at 1620MHz,  [Alex] earned the top spot in the HWBOT Prime overclocking benchmark. Brazil can now certainly add this to its trophy cabinet, arguably overshadowing the 129 Olympic medals.

Defeat The Markup: Iphone Built By Cruising Shenzhen

[Scotty Allen] from Strange Parts, has just concluded a three month journey of what clearly is one of the most interesting Shenzhen market projects we have seen in a while. We have all heard amazing tales, pertaining the versatility of these Chinese markets and the multitude of parts, tools and expertise available at your disposal. But how far can you really go and what’s the most outrageous project can you complete if you so wished? To answer this question, [Scotty] decided to source and assemble his own Iphone 6S, right down to the component level!

The journey began by acquiring the vehemently advertised, uni-body aluminium back, that clearly does not command the same level of regard on these Chinese markets when compared to Apple’s advertisements. [Scotty’s] vlog shows a vast amount of such backings tossed as piles in the streets of Shenzhen. After buying the right one, he needed to get it laser etched with all the relevant US variant markings. This is obviously not a problem when the etching shop is conveniently situated a stones throw away, rather simplistically beneath a deck of stairs.

Next came the screen assembly, which to stay true to the original cause was purchased individually in the form of a digitizer, the LCD, back-light and later casually assembled in another shop, quicker than it would take you to put on that clean room Coverall, you thought was needed to complete such a job.

[Scotty] reports that sourcing and assembling the Logic board proved to be the hardest part of this challenge. Even though, he successfully  purchased an unpopulated PCB and all the Silicon; soldering them successfully proved to be a dead end and instead for now, he purchased a used Logic board. We feel this should be absolutely conquerable if you possessed the right tools and experience.

All the other bolts and whistles were acquired as separate components and the final result is largely indistinguishable from the genuine article, but costs only $300. This is not surprising as Apple’s notorious markup has been previously uncovered in various teardowns.

Check out [Scotty’s] full video that includes a lot of insight into these enigmatic Shenzhen Markets. We sure loved every bit of it. Now that’s one way get a bargain!

Continue reading “Defeat The Markup: Iphone Built By Cruising Shenzhen”