The Two-Dimensional Stepper Motor

Over on hackaday.io and deep in the Hackaday Prize, a lot of cool people are playing around with the possibilities of putting coils in printed circuit boards. On the face of it, it makes sense: drawing spirals on a PCB gets you an electromagnet. This allows you to do all sorts of crazy things. You can make miniature model maglev trains using the track as a motor. Someone built a wearable Tesla coil.

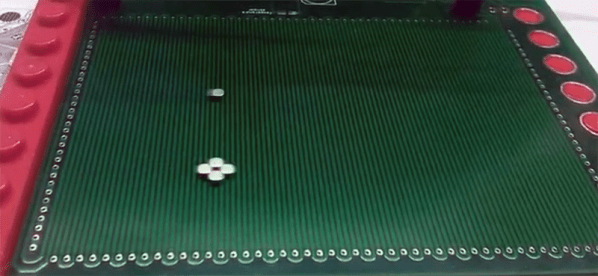
The latest build to show off the possibilities of motors etched on PCBs is [bobricius]’ micro manipulator. It’s a 100 mm square board capable of moving a small magnet around the surface. The point? Well, if you have to ask that question you’re really never going to get the point.

The design of this stepper motor is simply two coils of wire, with the X axis of the grid placed on the top copper layer of the PCB and the Y axis on the bottom copper layer. There are four poles to each of these coils, and they plug right into a standard stepper driver, so to control this board all you need is a basic Arduino and a motor shield. Or a RepRap board, take your pick, you probably have something sitting around in a junk drawer.

In the test of this board, the stepper motor can move small rare earth magnets around quickly and with high repeatability. As for what use this PCB stepper motor has, if you have to ask that question, you’ll never know. Also, because it looks cool.

Continue reading “The Two-Dimensional Stepper Motor”

Pushing 3D Printed Wheels And Transmissions To The Limit

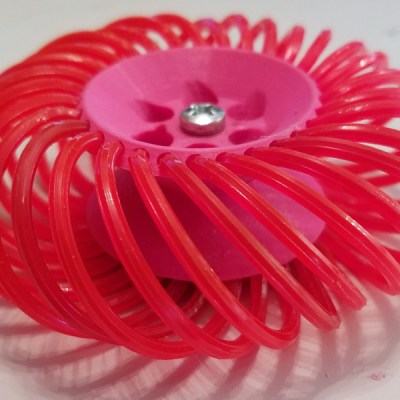
What do you do if you want a robot with great mobility? Walking is hard, and wheels are good enough, especially if you use the ‘wheels within wheels’ Mecanum setup. But you need torque, too. That’s what makes this entry into the Hackaday Prize so fantastic. It’s a Mecanum wheel of sorts, with an integrated gear set that produces a phenomenal amount of torque using a small, cheap stepper motor.

The wheel itself if 3D printed and fully parametric, using nylon weed wacker filament for the treads. This allows the wheel to scoot back and forth like a Mecanum wheel, or at the very least like one of those hyper mobile wheeled robots you see from time to time. It goes backwards, forwards, and side to side, and also has a zero turn radius.

A 3D printed Mecanum wheel is great, but how on earth do you drive it? That problem is solved with this hybrid planetary/strain-wave  3D-printed gear set. [Daren] has created a very compact ‘single’ stage gear set that fits right on top of a stepper motor. It’s thin, flat, and has a gear reduction of about 66:1. That’s a lot of torque in a very small package. Both of these projects are combined, and together they represent a freaky wheel with a lot of torque.

Even though [Daren] doesn’t have a robot in mind for this build, these are most certainly the building blocks of a fantastic robot, and a great entry in the Hackaday Prize.

Continue reading “Pushing 3D Printed Wheels And Transmissions To The Limit”

This Atomic Pi Eats Other Pis For Lunch

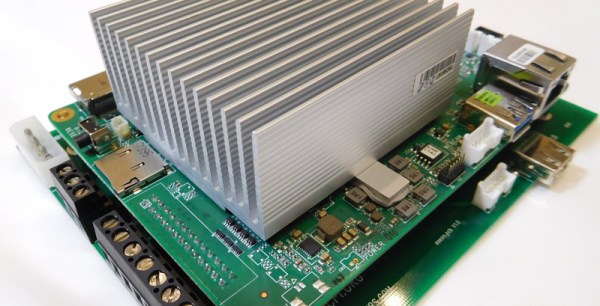
The world is full of single board computers that want a slice of the Raspberry Pi action. Most of them are terrible. But fools and their money, yadda yadda, and there’s a new sucker born every minute. The latest contender to the Raspberry Pi is the Atomic Pi. It’s an x86-based single board computer that costs $35, shipped to your door. Is it worth it? Is it even in the same market as a Raspberry Pi? Or is it just a small budget computer without a box? I have no idea.

With that said, the Atomic Pi comes with an Intel Atom x5-Z8350 with Intel HD Graphics (Cherry Trail). There is 2 GB of DDR3L-16000, 16 GB of eMMC, and an SD slot for storage. Connectivity is a full HDMI port (primary audio out), USB 3.0 and 2.0 ports, a Mediatec RT5572 used for WiFi, a Qualcomm CSR8510 for Bluetooth 4.0, a “Legitimate licensed BIOS”, and a real-time clock. Overall, you’re looking at a top-of-the-line tablet computer from four years ago. One that would run Windows.

To use all the features of the Atomic Pi, you will need to buy a $15 breakout board to supply power to the board, and use a large industrial power supply, the kind you would normally find bolted to a RepRap or a homemade CNC machine. You will need to supply both 5 V and 12 V to the board if you would like to use the Class D audio amplifier, but if you only want to use audio over HDMI, supplying only 5 V will do. If you want to boot this board, it looks like you’ll need to bring a USB/TTL cable to make everything work. This may be a tough sell to a crowd with zero experience booting a bare Linux system. That said, it runs Nintendo 64 emulators well, which is the only reason people buy Raspberry Pis anyway.

Is the Atomic Pi the single board computer you need? I don’t know. But we’ve got an Atomic Pi on order, and we’re ready to go with a full review when it show up.

Arduino’s Pluggable Discovery Programs With Any Protocol

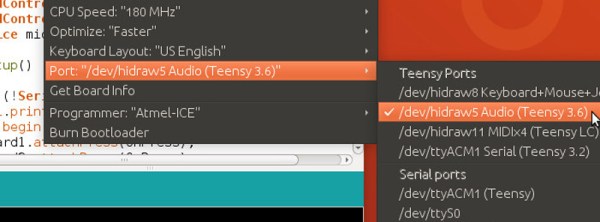
The first Arduino was serial, and over the decade and a half, this has been the default way to upload code to an Arduino board. In 2008, support for in-circuit programmers was added, and later port detection was added. The latest version of the Arduino IDE adds something new: pluggable discovery. Now any protocol is supported by the Arduino IDE.

This feature is the brainchild of [Paul Stoffregen], creator of the Teensy. If you’ve ever used a Teensy, you’ll remember the Teensyduino application used to upload code to the board. The Teensy uses HID protocol instead of serial for uploading. After working to improve the integration between the Teensy and Arduino IDE, [Paul] stated extending the DiscoveryManager. After some discussion with the Arduino developers, this feature was then added to Arduino 1.8.9, released a month or so ago.

There are some issues with Pluggable Discovery, most importantly that it doesn’t yet exist in the Arduino Command Line Interface (yeah, that exists too). If you’re looking to contribute to Open Source, that would be a nice project to pick up.

With the right JSON, and configuration, it is now theoretically possible to extend the Arduino IDE to any sort of protocol. This means (again, theoretically), it’s possible to update the firmware in your DIY MIDI synth over SysEx message, or a parallel port, maybe. Someone is going to upload to an Arduino board over PCIe, eventually.

The Sampler That Fits In Your Pocket

The future of the music instrument industry lies in synthesizers, and nowhere is this more apparent than the suite of tiny, pocket-sized synths more than capable of making bleeps and bloops. You’ve got tiny Korgs and Pocket Operators, and the time is ripe for people to wake up to tiny, pocket-sized synths.

The latest in a wide, diverse range of pocketable synthesizers is the Bitty. It’s a pocket-sized drum machine that’s the closest we’ve seen to a pocketable MPC to date. It’s a Kickstarter project that’s already completely funded only a day into the campaign.

The core of the Bitty is built around the Arduino, and for good reason. The last few years have seen some incredible advances in Arduino audio libraries, and this is no exception. The Bitty is built around the Mozzi library that gives it actual oscillators and ready-made wavetables. The Bitty comes with ‘software packs’ that include the Theremin Bitty, Techno Bitty, Basement Bitty, Trap Bitty, Lofi Bitty Bitty, and Beach Bitty. All of these are different sounds and samples, turning this tiny device into an all-in-one sampling solution. Seriously: look at how many Pocket Operators there are, how much they sell for, and realize this is a device that can download new samples and sounds. There’s a market here.

The Arduino-compatible Bitty is available on Kickstarter right now, with the base reward starting at under $100, with delivery in February, 2020. You can check out the video demo below.

Continue reading “The Sampler That Fits In Your Pocket”

Building Keyboards With Resin Printers

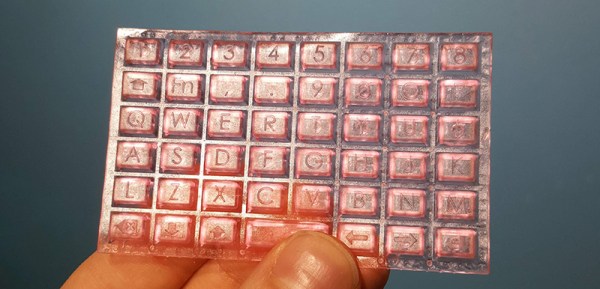
Aside from putting a whole lot of tact switches on a board, no one has quite figured out how to make very small keyboards for wearable projects. [Madaeon] might have the answer, and it’s using a resin-based 3D printer to create a flexible keyboard without silicone.

The world of small keyboards is filled with what are effectively the squishy parts of a remote control. This uses a piece of silicone and tiny carbon ‘dots’ on the underside of each button. Press the button, and these carbon dots bridge two traces on a PCB, closing a switch. No one has yet mastered home-casting silicone, although the people behind the ESP32 WiPhone have been experimenting with aluminum molds.

Instead of going down the path of casting and curing silicone, [Madaeon] decided to use 3D printing, specifically resin 3D printing, using a very flexible resin. The build process is what you would expect — just some button-shaped objects, but this gets clever when it comes to bridging the connections on the keyboard matrix. This is done with conductive paint, carefully applied to the underside of each button.

Right now this is a viable means of getting a tiny keyboard easily. The color is a garish pink, and the labels on each button aren’t quite as visible as anyone would like, but the latter can be fixed with silkscreening, just like how it’s done on the silicone buttons for remote controls.

Hackaday Links Column Banner

Hackaday Links: May 5, 2019

Simulacra and simulation and Kickstarter videos. The Amigo Robot is a 4-wheeled omnibot robot on Kickstarter. It does STEM or STEAM or whatever. Oh neat, injection molded magnetic pogo pins, that’s cool. Watch the video for this Kickstarter, it is a work of postmodern horror. We live in a post-reality world, and this is beyond parody.  You have the ubiquitous cheerful whistling, a ukulele, tambourine and a glockenspiel. You’ve got a narrator that falls squarely into the uncanny valley and a cadence that could have only been generated by a computer. You’ve got grammar that is very much correct, but somehow wrong; ‘It is the key to interact with family pets’. This is really, really bad.

Who is Satoshi? The creator of Bitcoin, a person or persons known as Satoshi Nakamoto, has been an open question for years now, with many people claiming they are the one that invented Bitcoin (with the implication that they’re in control of the first coins and therefore a multi-Billionaire). Newsweek found someone named Dorian Nakamoto, but that guy didn’t make Bitcoin. Wired magazine used back-dated blog posts to identify the creator of Bitcoin. Needless to say, the creator of Bitcoin has not been identified yet. Now, there’s an unveiling of sorts coming up. gotsatoshi.com has a live countdown and doesn’t use Rockapella as a house band. This bears repeating, again: there is exactly one way to prove the identity of Satoshi Nakamoto. To prove you are Satoshi, all you need to do is move some of the first Bitcoins. That’s it, that’s all you need to do, and it’s not going to happen when the gotsatoshi.com countdown hits zero.

CNC machines controlled by a Pi abound, but here’s a word of warning about buying a ‘bargain’ CNC machine from China from [Rob] via our tips line:

In the “homebrew” community, I know some people have their own CNC machines – I’ve seen a hundred and one projects using Raspberry Pis to run homemade CNCs and so on, so I guess there is a good supply of open-source/freeware to software to control them with.
However, some people, like a mate at work, might be tempted by a good “bargain” from China.  No names, no pack drill, but just before last Christmas, my mate bought a “cheap” CNC system from China – It was about three or four thousand Euros, if I remember rightly.  It has been working well and he done some work for our work as well. No problems.
Last week, our firm was contacted by Siemens. They claimed that someone at our firm has been using unlicensed Siemens software.  At first no-one knew what they were on about.  Someone thought it might be about some CAD system or other – we had been trialing a few to see which suited us best, but we had stuck well within the restrictions for the trials.
Then we found out it was the software on his CNC machine.  Because he had used his work laptop with it, the system had “phoned home” and alerted Siemens that an unlicensed version was being used.  Siemens then demanded EUR 32,000 – yes, thirty two THOUSAND Euros to license the software.  That was something like EUR 27,000 for the commercial license and EUR 5 000 for the second one.  It was explained that he had bought the CNC system from where-ever and had a license issued by the manufacturer.  I license that Siemens do not acknowledge.  They have now accepted that he bought and used it in good faith that it was fully legit, so they waived the commercial license and are now demanding “only” EUR 5,000, but that still comes with the threat – pay up or we take you to court…

We’re all very familiar that Dassault Systems will start hitting you up for that Solidworks license you didn’t pay for, but this is effectively firmware for a CNC machine that is phoning home through a laptop. In effect it’s a reverse Stuxnet, brought to you by a cheap Chinese CNC machine.

Here’s a hot tip for anyone who wants to do something people want. Direct to garment printers (DTG printers) are pretty much inkjet printers modified to print on t-shirts. ‘dtg printer’ is one of Hackaday’s perennial top search terms, most likely because of a post we did ten years ago. If you want to join the cool kids club and do something people desperately want, find a cheap inkjet and turn it into a DTG printer.

Red Hat has changed its logo. Red Hat, the company that somehow makes money on Open Source software, changed their logo this week. The branding for Red Hat hasn’t been very good since 2016 or thereabouts, and the branding for the Fedora project has been taking hits for just as long, m’lady. Beyond that, customer surveys revealed that the old ‘Shadowman’ logo evoked feelings like, ‘sinister, secretive, evil, and sneaky’. The new logo removes the shadowman entirely, and makes the hat the focus of attention. There is now official confirmation that there is a black band around the crown of the hat (in the Shadowman logo, this band could be confused for a shadow), and the crown is sharper. The jury is still out on the fedora vs. trilby argument, and indeed the argument is even more divisive now: the difference between a trilby and a fedora is in how they are worn, and by removing the Shadowman from the logo we now have fewer context clues to make the determination. Bet you didn’t think you were going to read two hundred words about the Red Hat logo today, did you?