Every Digital Clock Is Made Of Analog Components

In 2008, an art studio out of Stockholm released the ClockClock, a digital clock with an analog heart. The ClockClock used 24 individual analog clocks — hour and minute hands and all — to display time digitally. The world went crazy, Pinterest blew up, and everyone wanted a digital analog clock until the next interesting project distracted the masses.

This was ten years ago, and for a project that’s neck deep in stepper motors, timekeeping, and 3D printed parts, we haven’t seen a DIY project that puts these tools together to build a clone of the ClockClock. Until now, that is. [Wojtek] was inspired by the ClockClock and decided to make his own.

For the plastic bits, each of the 24 analog clocks are printed out of PLA. So far, it’s exactly what we would expect. The trick to the ClockClock is moving the hour and minute hand of each analog clock independently. This is done with a double shaft — just like a real clock — and two stepper motors. Each of the stepper motors are controlled by a single PCB in each analog clock with two 360° stepper drivers, a dual motor driver, and an ATMega328pb microcontroller. As a group, the individual analog clocks are controlled over I2C, with a single ‘satellite’ board serving as the master.

While there are a few details missing from this build, specifically how to attach the hands to the stepper motors, this is an amazing project. Someone finally built a ClockClock, and it didn’t cost thousands of dollars as the original did. You can check out some videos of the Analog/Digital clock below.

Continue reading “Every Digital Clock Is Made Of Analog Components”

Security Engineering: Inside The Scooter Startups

A year ago, ridesharing scooter startups were gearing up for launch. Workers at Bird, Lime, Skip, and Spin were busy improving their app, retrofitting scooters, and most importantly, figuring out the logistics of distributing thousands of electronic scooters along the sidewalks of the Bay Area. These companies were gearing up for a launch in early summer, but one company — nobody can remember exactly who — decided to launch early. First mover advantage, and all. Overnight, these scooter companies burst into overdrive, chucking scooters out of panel vans onto the sidewalk simply to keep up with the competition.

The thing about San Francisco, and California in general, is that it’s a very direct democracy masquerading as a representative government. Yes, there are city council members and a state legislature, but the will of the people will rule. No one liked tripping over the scooters littering the sidewalks, so the scooters ended up at the bottom of a lake. Or in trees. Or in the trash. In time, city permits were issued, just like a hot dog cart or any other business operating on a public sidewalk, and the piles of electric scooters disappeared. Not before hundreds of scooters were vandalized, that is.

It’s still early in the electric scooter rental startup space, but if there’s one company leading the pack, It’s Bird. they’re getting the most press, the CEO was formerly at Lyft and Uber (which explains the press), and they’ve raised nearly a half Billion dollars in funding (which explains the press). Bird is valued at two Billion dollars, and it’s one of four major ridesharing scooter startups. Pets.com had nothing on this.

Despite how overvalued you think a scooter startup might be, they’re still a business, and they’re ruled by the bottom line. Bird has grown a lot in the past year, and with that comes engineering challenges. The Bird scooters must be more resistant to vandalism. The Bird scooters must be harder to steal. Above all else, they must remain in service longer. This is the teardown of how Bird managed to improve their bottom line and engineer a better scooter.

Continue reading “Security Engineering: Inside The Scooter Startups”

A Network Card For The Trash-80

Around these parts, [Peter] is well-known for abusing the TRS-80 to do things it should never do. You can read Wikipedia on the TRS-80, you can look at Google Images, and you can browse the web. As with any retrocomputer, there are limitations for what you can do. To browse Wikipedia, [Peter] had to set up an AWS instance which translated everything and used serial to IP converters. It can be done, but it’s hard.

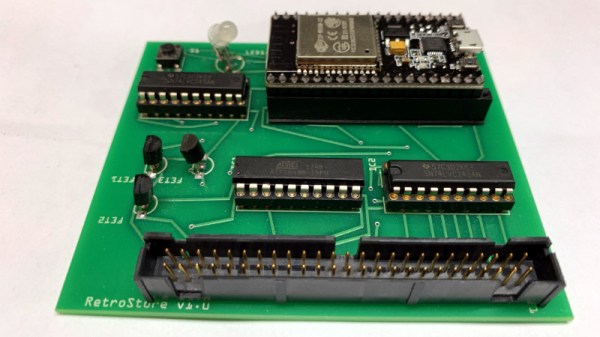
Now, after seeing a few interesting projects built around the ESP32, [Peter] built a network card for the TRS-80. It’s called the trsnic, and it’s a working network card for almost all the TRS-80s out there, with the eventual goal of supporting the TRS-80 Model I / II / III / 4 / 12 / 16 / 16B and 6000.

The idea for the trsnic comes from [Arno Puder]’s RetroStoreCard, a device that plugs into the TRS-80 Model III and connects it to a ‘personal cloud’ of sorts that hosts and runs applications without the need for cassettes or floppys. It does this with an ESP32 wired up to the I/O bus in the Model III, and it’s all completely Open Source.

[Peter] took this idea and ran with it. Thanks to the power found in the ESP32, real encrypted Internet communication can happen, and that means HTTPS and TLS.

Right now, documentation for the trsnic is limited, but the project does exist and building it is as easy as stuffing some headers and DIP sockets in a PCB and soldering them on. There’s a bit of work to do on the ESP32 code, but if you’re looking for a network card for your Trash-80, this is the one that works now.

Building A RISC-V Desktop

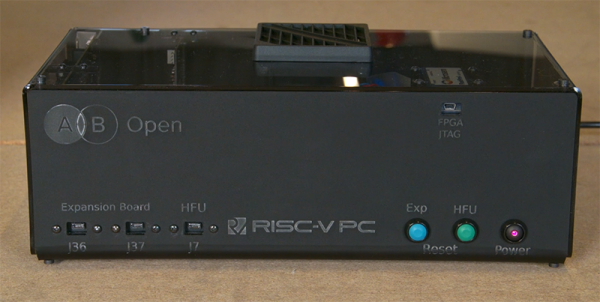
If you want to talk about RISC-V, the Open Source instruction set for CPUs, you’re probably talking about microcontrollers. You can buy small but powerful RISC-V micros on par with an ARM Cortex-M4 right now. Deep in the pipeline are cores for something resembling SoCs, the kind you’d find in desktop NAS solutions, maybe a few routers, and smart TVs. This is great and all, but our idea of a ‘computer’ is still a desktop. When is the Open instruction set desktop coming? Well, it’s here right now. [Andrew Back] built a RISC-V desktop computer. It runs Linux, it comes in a case, it has HDMI and USB, there’s a graphics card in there somewhere, and it works. This is a desktop, running with a RISC-V core.

The core of this build is the HiFive Unleashed, a Linux-capable board from SiFive, makers of the first (production) RISC-V microcontroller. This board uses the Freedom U540 SOC built with a 28nm process, has 8GB of DDR4, and 32MB of Flash. For a board built on an Open archetecuture this is impressive, but it comes at a cost: the HiFive Unleashed ran for $1000 during its crowdfunding campaign.

But a board with an Open CPU does not a desktop make. You need peripheral IO, maybe a few PCIe, and hopefully a SATA interface. This problem has been solved by Microsemi with an Expansion board for the HiFive Unleashed. It includes a big ‘ol FPGA and all the connectors you could use. It also costs $2000.

With most of the parts ready to go, a few buttons, M.2 PCIe and SATA SSD storage, a graphics card, and a nice acrylic case were added. Thanks to Western Digital, building Linux was as easy as building Linux, and you end up with a desktop computer with a RISC-V brain.

Compared to a bog-standard ‘gaming machine’, this is an expensive build. The quick and dirty ballpark for the price is somewhere around $4000 USD for a machine that will let you check your Facebook. There’s a video of the machine running, you can check that out below.

Continue reading “Building A RISC-V Desktop”

New Part Day: Mapping With RealSense Cameras For $200

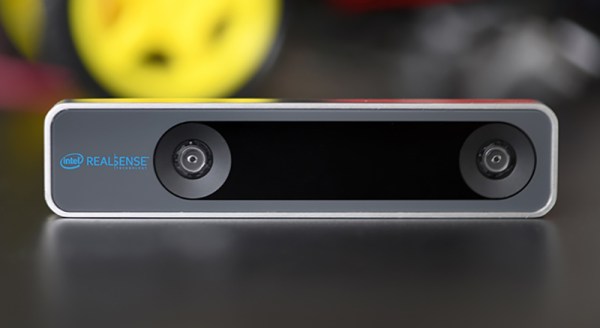
Robot cars, DIY or otherwise, are hot right now. To do this right, you’re going to need cameras, LIDAR, or some other way of sensing the the world. Intel is again getting into the fray with a RealSense tracking camera for simultaneous localization and mapping for robotics, drone, and augmented reality needs.

The tech specs for the Intel RealSense T265 are impressive for small robotics uses. It includes 6DoF tracking gathered by two cameras, each with a 170° FoV. Connection to a computer is through USB 2.0 or 3.0. If you want to get an idea of how seriously Intel is taking the ‘robotics, and other power- and weight-limited platforms’ market, here’s a sample of what is on the one-page spec sheet: the T265 only uses 1.5 Watts, weighs 55 grams, and is 108 x 25 x 13 mm. There are also two M3 taps spaced 50mm apart on the back, which is an astonishing spec to publish on the product landing page. Simply the fact that the location and dimensions of the mounting holes is so prominent gives you an idea of how seriously Intel is taking robotics and prototyping applications.

This new SLAM camera complements Intel’s other tracking camera offerings, including those we’ve seen at Maker Faires past. It’s a competitor to the new crop of solid state LIDAR modules we’ve seen pop up recently. It’s not a Kinect, but we’re years past using a first-gen Kinect for robotics applications. Now, everything is custom chips and SLAM processing, and the RealSense T265 is the smallest platform to do that now.

Hackaday Links Column Banner

Hackaday Links: February 10, 2019

Last month was NAMM, the National Association of Musical Something that begins with ‘M’, which means we’re synthed and guitarded out for the year. The synth news? Behringer are making cheap reproductions and clones of vintage gear. There’s something you need to know about vintage gear: more than half of everything produced today has a Roland 808 or 909 drum machine (or sample), a 303 bass synth, or a 101 mono synth in it. Put an 808, 909, 303, and 101 on the same table, connected to a mixer, and you can make most of the electronic music from the ’80s and ’90s. And Behringer is cloning these synths. Neat times. But there’s a problem: Roland is trademarking these drum machines and synths, with trademark filings in the US and Germany. These are ‘trade dress’, or basically the beautiful red, orange, yellow, and white buttons of the 808 and the digital cyber silver plastic aesthetic of the 303, but there you go. It’s round one in the Roland v. Behringer match, may the first person to give me an 808, 909, 303, and 101 for a thousand dollars win.

Synths? Sure thing. Here’s a stash of New Old Stock 8580 SID chips, the ‘synth on a chip’ found in the Commodore 64. The price? $50. [ben] bought one of these, and the card that came with it said,  “We purchased these chips in 2006 and they’ve been stored in our climate-controlled storage area ever since. Even still, we found a handful of them that didn’t pass testing. Treat them with care!” Yes, a bunch of SID chips for sale is noteworthy, but at $50 a piece for 1980s technology, can someone explain why a chip fab isn’t cranking these things out? If there’s one ancient piece of silicon where the demand meets what it would cost to spin up the silicon line, the SID is it. Where are the modern reproductions?

Excited about making an electronic badge this year? Seeed is offering badge sponsorships for 2019, with an offer of a 5% discount on PCBA, and a 10% discount if you put the Seeed logo on the board. I might be a little biased, but Seeed is a place where you can just ask, “hey, you guys do clear soldermask?” and they find a way to do it.

The best way to tell if someone is rich isn’t by seeing if they have an i8 parked outside their mansion, or just a piece of junk with an M badge. It isn’t whether or not their filet mignon is wagyu or just Kobe, and it isn’t if they’re cruising the skies in a G650 or just puttering around in a Cessna Citation. No, the best way to tell if someone is rich is to notice their AirPods. Yes, Apple’s wireless headphones (which are actually pretty good!) are the best foundation of a class division these days. The best class signal since private railroad cars now has a problem: people are printing their own AirPods. [Brady32] over on Thingiverse has modeled AirPods, and now the design is being given away for free. The horror. Now anyone can print out their own little bits of white plastic, stick them in their ears, and tell the world, ‘I’m better than you. Don’t bother talking back, because I obviously can’t hear you.’

Raspberry Pi has a store! Yes, everyone’s favorite single board computer now has an ‘experimental space’ in Cambridge’s Grand Arcade. The Beeb is saying this store is ‘bucking the retail trend’, yes, but any retail trend doesn’t really apply here; brands have storefronts, and it’s not about revenue per square foot. Makerbot had a store, and it wasn’t about selling printers. Microsoft has stores. Sony built a mall to advertise the original PlayStation. While the Raspberry Pi brick and mortar store will probably never make any money, it is an indication the Raspberry Pi foundation has built a valuable brand worthy of celebration. Here’s some pics of the store itself.

Did you know Hackaday has a retro edition? It’s true! retro.hackaday.com is a lo-fi version of Hackaday without CSS or Javascript or any other cruft. It’s hand-written HTML (assembled by a script) of the first ten thousand or so Hackaday posts. The idea is that old computers could load the retro site, just to prove they could. [Matthias Koch] has an Atari PC3 — Atari’s PC compatible with an 8088 running at 8Mhz, 640k of RAM and a 20 MB hard drive — and got this thing to pull up the retro site. Good work!

What is the current state of 3D printing? What is the current state of 3D printing videos on YouTube? Oh boy we’re going to find out. [Potent Printables] did an ‘analysis’ of 3D printing videos published to YouTube, and found the category riddled with ‘clickbait’, without giving an operational definition of what ‘clickbait’ actually is, or how it’s different from any other content (because who would make a video that doesn’t have the purpose of attracting viewers) Anyway, there’s a problem with the YouTube algorithm, and 3D printing blogs are copying it, filling the entire hobby with disillusioned beginners, or something. After defining ‘The Most Viewed’ as not being a news or documentary footage (okay, that’s fair), having at least three printing videos, not clickbait, and gives the designer proper attribution, [Potent Printables] found a list filled with [Maker’s Muse], [3D Print Guy] and other channels who do 3D printing work, but don’t put 3D printing in the title. This is great; 3D printing isn’t a fascinating new technology that’s the first step towards Star Trek replicators; we’ve slid down the trough of disillusionment and now 3D printers are just tools. It’s great, and in 2018 things are as they should be.

Finite Element Analysis Results In Smart Infill

If you would like to make a 3D print stronger, just add more material. Increase the density of the infill, or add more perimeters. The problem you’ll encounter though is that you don’t need to add more plastic everywhere, only in the weak areas of the part that will be subjected to the most stress. Studying where parts will be the weakest is the domain of finite element analysis, and yes, you can do it in Fusion 360. With the right techniques, you can make a stronger part on your 3D printer, and [Stefan] is here to show you how to do it.

The inspiration for this build comes from [Adrian Bowyer]’s blog, where he talks about adding ‘fibers’ to the interior of 3D printed objects to increase strength. These ‘fibers’ aren’t really fibers at all, but long, thin, cylindrical voids. The theory of this is that the slicer will interpret this as a hole and place perimeters around these voids, effectively increasing the density of the infill in a local area in the print. Combine this with finite element analysis, and you get a part that is stronger where it needs to be, and doesn’t waste plastic.

However, there is an easier way. Fusion 360 and ANSYS Finite Element Simulation are both free-ish tools that allow for some amount of finite element analysis on an imported 3D object. This can be used to find the weakest part of any 3D print, and it can this can be exported as a 3D mesh. Slic3r has a modifier mesh function, and combining this finite element analysis mesh (printed at 100% infill) with the original part (printed at 10% or so infill) results in something that’s strong where it needs to be, doesn’t waste plastic, and is much easier to set up than [Adrian Bowyer]’s ‘fiber’ technique.

After printing a few 3D printed hooks with varying degrees and techniques of infill, [Stefan] found the baseline of 2 perimeters failed in a test hook at about 50kg load. The Smart Infill hook failed at about 100kg. Not bad, and the fancy-pants hook only weighs about 30% more.

You can check out a video of the entire toolchain and testing below. Thanks [Keith] for sending this one in.

Continue reading “Finite Element Analysis Results In Smart Infill”