Connect Your Electric Heater To The Internet (Easily And Cheaply)!

Winter has arrived, and by now most households should have moved on from incandescent bulbs, so we can’t heat ourselves that way. Avoiding the chill led [edent] to invest in an electric blanket. This isn’t any ordinary electric blanket — no, this is one connected to the Internet, powered by Alexa.

This is a project for [edent] and his wife, which complicates matters slightly due to the need for dual heating zones. Yes, dual-zone electric heating blankets exist (as do two electric blankets and sewing machines), but the real problem was finding a blanket that turned on when it was plugged in. Who would have thought a simple resistive heating element could be so complicated?

For the Internet-facing side of this project, [edent] is using a Meross smart plug and a Sonoff S20 smart plug. These are set up through to work with Alexa and configured as an ‘electric blanket’ group. Simply saying, “Alexa, switch on the electric blanket” turns on the bed.

There are a few problems in need of future improvement. Alexa doesn’t recognize voices, so saying ‘Turn on my side of the bed’ doesn’t work. The blanket also shuts off after an hour, but the plug sockets stay live. There’s also the possibility that hackers could break into this Alexa and burn down the house, but this is a device on the Internet; that sort of stuff virtually never happens.

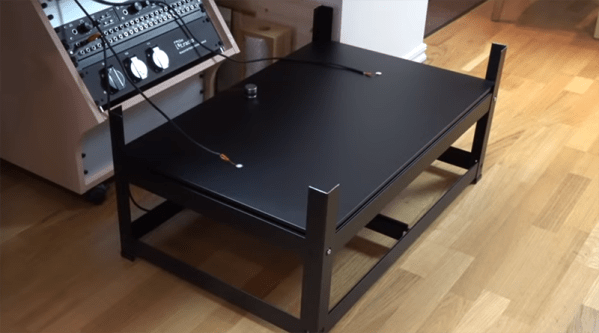
You can check out the demo of the electric bed below.

Continue reading “Connect Your Electric Heater To The Internet (Easily And Cheaply)!”

New Part Day: The Twenty Five Cent USB Microcontroller (With A Toolchain!)

Last year, Jiangsu Yuheng Co., Ltd introduced a new microcontroller. The CH554 is a microcontroller with an E8051 core with a 24 MHz clock, a little more than 1 kB of RAM, and a bit more than 14 kB split between the code and data Flash. In short, it’s nothing too spectacular, but it makes up for that with peripherals. It’s got SPI and ADCs and PWM, UARTs, and even a few capacitive touch channels. It’s also a USB device, with some chips in the series able to function as a USB host. You can buy this chip for a quarter through the usual retailers.

Normally, this isn’t huge news. The 8051 is the most copied microcontroller on the planet, and there are probably billions produced each year. Cheap parts are only cheap if your time is free; you’ll usually spend ages trying to digest the datasheet and get a toolchain up and running. That’s where this chip is a little different. There are multiple efforts to bring an Open Source toolchain to this chip. And they’re doing it in Windows and Linux. Someone really cares about this chip.

The current best option for an SDK for this chip comes from Blinkinlabs, with a port of the CH554 SDK from Keil to SDCC. There are real, working code examples for this chip using an Open Source toolchain. Sure, it might just blink a LED, but it’s there. If you can blink a LED, you can do just about anything from there. Programming the chip happens over USB with the ‘official’ WCHISPTool (Windows) or LibreCH551 (command line). The end result is a completely Open Source toolchain to program and upload a hex file to a cheap chip.

There are a few more chips in the CH554 series, ranging from the CH551 in an SOP-16 package to the CH559 in an LQFP48 package, with more features available as the chips get bigger. It’s an interesting chip, with some somehow implementing a USB hub, and could be a very cool chip for some low-level USB hacking.

Build A Plate Reverb From Ikea

Back before we all pirated FruityLoops, before ProTools, and before VSTs and DAWs, audio recording was much, much cooler. Reverbs were entire rooms. Sometimes they were springs. Sometimes, in the high-end music studios, reverbs were plates. These plate reverbs were simply a gigantic sheet of metal mounted in a box about ten feet long, four feet high, and a foot thick. Inside, you had some transducers, some pickups, and not much else. Send a signal into the plate reverb and it will bounce around on this flexible membrane, and  emerge through the output in a suitably reverberant form.

Of course, very few places have a plate reverb anymore because they’re gigantic and expensive and software effects are small and cheap. That doesn’t mean a plate reverb is made of unobtanium. [Leo] just made his own plate reverb out of Ikea shelves and some simple electronics.

This build used an Ikea Bror shelving unit that cost about $50 sans meatballs. The electronics are a surface transducer and two piezo pickups. Total cost was about $100. That’s all that’s needed to put this plate reverb together, but the real trick is making it work as a reverb.

The plate is driven by the audio output of [Leo]’s computer, through a battery-powered amp, and into a transducer. The transducer is then simply placed on the metal shelf. The two piezo pickups are placed on either end of the shelf, with one going to the right channel of one input, the other going to the left channel of the same input. From there, it’s a simple matter of using this Ikea shelf in an effects loop.

From the video below, the setup absolutely works. [Leo] is playing a few drum loops through the reverb, and the results sound like they should. There’s also a neat trick in using a shelf as a reverb; by placing a rag or a cardboard box on the shelf, the reverb is dampened allowing you to ‘mix’ this reverb in real time.

Continue reading “Build A Plate Reverb From Ikea”

Reverse Engineering With Sandpaper

Every once in a while, and more so now than before, you’ll find a really neat chip with zero documentation. In [David]’s case, it’s a really cool USB 3.0 eMMC/ SD MMC controller. Use this chip, attach a USB port on one end, and some memory on the other, and you have a complete bridge. There are drivers, too. There are products shipping with this chip. The problem is, there is no data sheet. Wanting to use this chip, [David] turned to sandpaper to figure out the pinout of this chip.

The best example of a product that came with this chip is a simple board from the hardkernel store that happily came with fairly high resolution product photos. While waiting for these boards to be delivered, [David] traced the top layer of copper. This was enough to get an idea of what was going on, but the real work started when the boards arrived. These were placed in a flatbed scanner and carefully photographed.

The next step was to desolder all the parts, taking care to measure and catalog each component. Then, it’s off to sanding with 200 and 600 grit wet sandpaper. Slowly, the soldermask is removed and the top copper layer appears. After that, it’s just a matter of sanding and scanning, stacking all the layers together with your image processing software of choice.

There are a few caveats to hand-sanding a PCB to reverse-engineer the copper layers. First, it makes a mess. This is wet/dry sandpaper, though, and you can and should sand with water. Secondly, even pressure should be applied. We’re not sure if [David] was holding the sandpaper or not, but the best technique is to actually hold the board itself.

Despite a few problems, [David] did get the pictures of each copper layer. After assembling these images, he could make an Eagle part for an eMMC reader for his Nintendo Switch.

Advances In Flat-Pack PCBs

Right now, we’ve got artistic PCBs, we’ve got #badgelife, and we have reverse-mounted LEDs that shine through the fiberglass substrate. All of this is great for PCBs that are functional works of art. Artists, though, need to keep pushing boundaries and the next step is obviously a PCB that doesn’t look like it has any components at all. We’re not quite there yet, but [Stephan] sent in a project that’s the closest we’ve seen yet. It’s a PCB where all the components are contained within the board itself. A 2D PCB, if you will.

[Stephen]’s project is somewhat simple as far as a #badgelife project goes. It’s a Christmas ornament, powered by two coin cells, hosting an ATTiny25 and blinking two dozen LEDs via Charlieplexing. The PCB was made in KiCAD, with some help from Inkscape and Gimp. So far, so good.

Castellated edges, containing a part

The trick is mounting all the components in this project so they don’t poke out above the surface of the board. This is done by milling a rectangular hole where every part should go and adding castellated pads to one side of the hole. The parts are then soldered in one at a time against these castellated pads, so the thickness of the completed, populated board is just the thickness of the PCB.

The parts used in this project are standard jellybean parts, but there are a few ways to improve the implementation of this project. The LEDs are standard 0805s, but side-emitting LEDs do exist. If you’d like to take this idea further, it could be possible to create a sandwich of PCBs, with the middle layer full of holes for components. These layers of PCBs can then be soldered or epoxied together to make a PCB that actually does something, but doesn’t look like it does. This technique is done in extremely high-end PCBs, but it’s expensive as all get out.

Still, this is a great example of what can be done with standard PCB processes and boards ordered from a random fab house. It also makes for a great Christmas ornament and pushes the boundaries of what can be done with PCB art.

Amazon Creates Distributed Satellite Ground Stations

Here’s an interesting thought: it’s possible to build a cubesat for perhaps ten thousand dollars, and hitch a ride on a launch for free thanks to a NASA outreach program. Tracking that satellite along its entire orbit would require dozens or hundreds of ground stations, all equipped with antennas and a connection to the Internet. Getting your data down from a cubesat actually costs more than building a satellite.

This is the observation someone at Amazon must have made. They’ve developed the AWS Ground Station, a system designed to downlink data from cubesats and other satellites across an entire orbit. Right now, Amazon only has two ground stations attached, but they plan to have a dozen in place by the middle of next year. Each of these ground stations are associated with a particular AWS region (there are a total of sixteen AWS regions, which might limit the orbital coverage of the AWS Ground Station system), and consists of an antenna, an alt-az mount, and a gigantic bank of servers and hard drives to capture data from satellites orbiting overhead.

The Amazon blog post goes over how easy it is to capture data from a satellite, and it’s as easy as getting a NORAD ID, logging into your AWS account, and clicking a few buttons.

It should go without mention that this is the exact same idea behind SatNOGS, an Open Source global network of satellite ground stations and winner of the 2014 Hackaday Prize. One of their ground stations is what’s pictured at the top if this article. Right now, SatNOGS has over seventy ground stations in the network, including a few stations that are in very useful locations like the Canary Islands. The SatNOGS network already has a lot more coverage than the maximum of sixteen locations where Amazon has their data centers — made possible by its open nature. Congrats to the SatNOGS team once again for creating something so useful, and doing it four years before Amazon.

Bill Gross On Why Your Startup Will Succeed

Bill Gross is one of the great heros when it comes to technology incubators. Twenty years ago, he founded Idealab, a business whose business plan is to create more businesses. This started out with just a handful of companies in 1996, and has since gone on to found 150 companies, that have collectively raised three and a half billion dollars. Out of these companies, more than half have either gone through successful IPOs and acquisitions, or are currently operating. That investment has generated a 13.5x return, and created more than 10,000 jobs.

Obviously, when you want to talk about what goes into a successful startup, Bill Gross is the person you want to talk to. We were happy to have him Keynote the Hackaday Superconference this year, and the lessons he shared might surprise you, especially if you’re interested in starting your own business.

Continue reading “Bill Gross On Why Your Startup Will Succeed”