3D Printed Brushed Motor Is Easy To Visualize

A motor — or a generator — requires some normal magnets and some electromagnets. The usual arrangement is to have a brushed commutator that both powers the electromagnets and switches their polarity as the motor spins. Permanent magnets don’t rotate and attract or repel the electromagnets as they swing by. That can be a little hard to visualize, but if you 3D Print [Miller’s Planet’s] working model — or just watch the video below — you can see how it all works.

We imagine the hardest part of this is winding the large electromagnets. Getting the axle — a nail — centered is hard too, but from the video, it looks like it isn’t that critical. There was a problem with the link to the 3D model files, but it looks like this one works.

Continue reading “3D Printed Brushed Motor Is Easy To Visualize”

Connect Your Electric Heater To The Internet (Easily And Cheaply)!

Winter has arrived, and by now most households should have moved on from incandescent bulbs, so we can’t heat ourselves that way. Avoiding the chill led [edent] to invest in an electric blanket. This isn’t any ordinary electric blanket — no, this is one connected to the Internet, powered by Alexa.

This is a project for [edent] and his wife, which complicates matters slightly due to the need for dual heating zones. Yes, dual-zone electric heating blankets exist (as do two electric blankets and sewing machines), but the real problem was finding a blanket that turned on when it was plugged in. Who would have thought a simple resistive heating element could be so complicated?

For the Internet-facing side of this project, [edent] is using a Meross smart plug and a Sonoff S20 smart plug. These are set up through to work with Alexa and configured as an ‘electric blanket’ group. Simply saying, “Alexa, switch on the electric blanket” turns on the bed.

There are a few problems in need of future improvement. Alexa doesn’t recognize voices, so saying ‘Turn on my side of the bed’ doesn’t work. The blanket also shuts off after an hour, but the plug sockets stay live. There’s also the possibility that hackers could break into this Alexa and burn down the house, but this is a device on the Internet; that sort of stuff virtually never happens.

You can check out the demo of the electric bed below.

Continue reading “Connect Your Electric Heater To The Internet (Easily And Cheaply)!”

Arcade1up Cabinet Mod Raspberry Pi 3

Arcade1up Cabinet Solderless Upgrade With A Side Of Raspberry Pi

Upon announcement of the Arcade1up replica arcade cabinets earlier this year, many laid in waiting for the day they could see a teardown. A four foot tall cab with an LCD outputting the proper 4:3 aspect ratio and the simple construction of IKEA furniture certainly seemed appealing. In theory, it wouldn’t take long to customize such a piece of hardware provided the internals lent themselves to that sort of thing. Now that the cabinets are on store shelves, [ETA Prime] made a tutorial video on his method for upgrading the Arcade1up cabinet with a Raspberry Pi calling the shots.

The entirety of the mod is solder-free and uses plenty of readily available parts from your favorite online reseller. The brains of the operation is a Raspberry Pi 3 Model B+ running Emulation Station. The Arcade1up Street Fighter 2 cabinet’s less than stellar audio receives an upgrade in a 2x20W car audio amp, while the middling joysticks are swapped out for some more robust Sanwa-clone ball tops.

Since there is no “select/coin” button natively, [ETA Prime] added some and in the process replaced them all with beefier LED-lit 30mm buttons. The replacement joysticks and buttons were all part of a kit, so they plug-in conveniently to a plug and play USB encoder. To adapt the 17″ LCD’s output over LVDS, [ETA Prime] elected to go with an LCD controller board that outputs DVI, VGA, or HDMI. Luckily the Arcade1up cabinet’s 12V power supply could be reused to power the LCD controller board and in the process bring down the overall cost of the upgrade.

While this Arcade1up cabinet mod won’t solve the whole “bats versus ball tops” argument, it does provide a template to build on. The tutorial video is below and the list of parts used can be found in the YouTube description.

Continue reading “Arcade1up Cabinet Solderless Upgrade With A Side Of Raspberry Pi”

Naomi Wu On The Sino:Bit, 3D Printers, And Open Source Hardware In China

Many readers will be familiar with [Naomi Wu], the prolific hardware hacker who has shown us so much of the epicentre of Chinese tech in her native Shenzhen through a lens that most outsiders would struggle to achieve. We’ve seen her touring factories and electronics marts, building a load of interesting projects, and achieving the first open source hardware certifications in China.

We’ve seen a lot of [Naomi] speaking to us in English as an audience outside her country, so it is extremely interesting to see her latest video posting in which she makes her case for open source hardware in Chinese to a Chinese audience (Chinese audio with English subtitles). She’s speaking at the recent China open source conference, and her description starts with “**THIS IS VERY BORING UNLESS YOU ARE INTO OPEN SOURCE**”, which we think is a little unfair as it should appeal to anyone with an interest in the Chinese tech business.

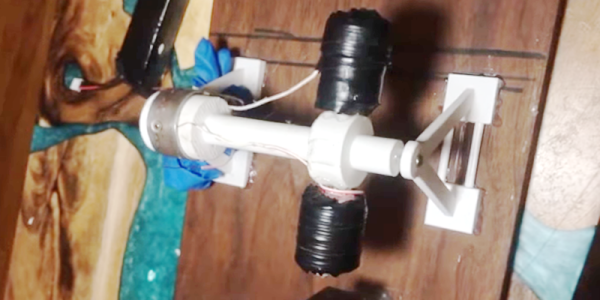
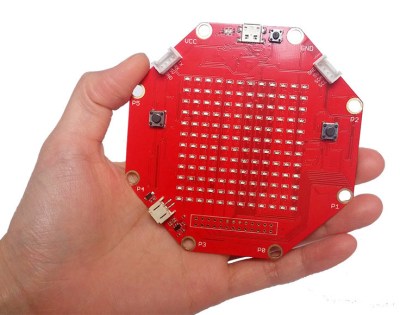
In the talk she takes us through the potential benefits of open source to Chinese business by using her projects as case studies. In particular she concentrates on how the arguments for open source in a commercial arena have to be made differently for a Chinese business to those used in the rest of the world. Using the analogy of a college dorm hotpot party, she outlines the importance of a community in open-source development, then we get a blow-by blow account of her work with Elecrow and Creality on the Sino:bit (a single-board computer targeting education in China) and the 3D printers.

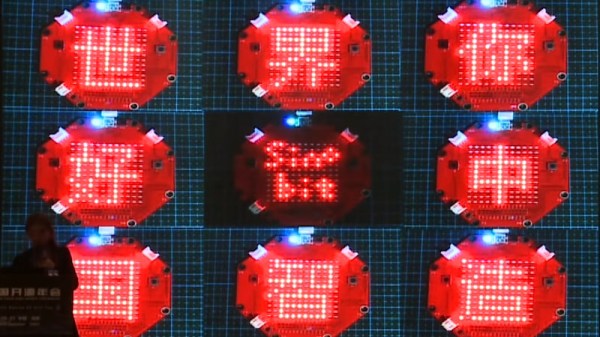
The software support for the Sino:bit in particular demonstrates the added value of open source to a business, with significant tutorial and curriculum material coming from Adafruit Industries, Hindi language and character set support from developers in India, and a Chinese developer painstakingly transcribing all the Chinese character set for the device. That last step alone would have cost a non open-source developer a significant sum.

During her talk we are shown the commercial benefits to all three devices, for example one of the Creality 3D printers rapidly becoming Amazon’s top seller despite an array of knock-off machines appearing. We’ve embedded the video below the break, and we think it should be required viewing for anyone with an interest in open source or the Chinese tech industry.

Once you have seen the video you might find [Naomi’s] guide to buying on Taobao to be of interest, as well as her explanation of the Chinese cultural attitude to engineers while introducing us to the historical master craftsman, [Lu Ban].

Continue reading “Naomi Wu On The Sino:Bit, 3D Printers, And Open Source Hardware In China”

Retrotechtacular: Before The Internet: MUDPIE

It is easy to forget how disconnected computers used to be. There was a time when sites with similar computers would do a tape rotation where a tape (or whatever media) would arrive in the mail. You’d spend some time looking at what was on it and then add anything interesting that you had to the end of it before sending it on to the next person. Eventually, the tape would come back to you, presumably loaded with more things. Late in 1967, Dr. James Peters started a newsletter called MUDPIE — Museum and University Data Program and Information Exchange. The newsletter would wind up with 26 issues over five years and while it started out with as few as 25 members, it would grow to over 250.

The newsletter was a real hardcopy newsletter, because as Dr. Peters put it:

MUDPIE represents an attempt to keep everyone up to date on the development of time-shared computing in museums and universities engaged in systematic research. Several individuals receiving this first copy had written asking the same questions, and this is a quick way of answering them. There was a tremendous temptation to set it up so that it could be received only through the teletype and computer — but that proved to be a little too advanced for the present!

Continue reading “Retrotechtacular: Before The Internet: MUDPIE”

Simple, Low-Cost Rig Lets The Budding Biohacker Run DNA Gels

We all the know the basic components for building out an electronics lab: breadboards, bench power supply, a selection of components, a multimeter, and maybe an oscilloscope. But what exactly do you need when you’re setting up a biohacking lab?

That’s the question that [Justin] from The Thought Emporium is trying to answer with a series of videos where he does exactly that – build a molecular biology lab from scratch. In the current installment, [Justin] covers the basics of agarose gel electrophoresis, arguably the fundamental skill for aspiring bio-geeks. Electrophoresis is simply using an electric field to separate a population of macromolecules, like nucleic acids and proteins, based on their sizes. [Justin] covers the basics, from building a rig for running agarose gels to pouring the gels to doing the actual separation and documenting the results. Commercial grade gear for the job is priced to squeeze the most money out of a grant as possible, but his stuff is built on the cheap, from dollar-store drawer organizers and other odd bits. It all works, and it saves a ton of money that can be put into the things that make more sense to buy, like fluorescent DNA stain for visualizing the bands; we’re heartened to see that the potent carcinogen ethidium bromide that we used back in the day is no longer used for this.

We’re really intrigued with [Justin]’s bio lab buildout, and it inspires us to do the same here. This and other videos in the series, like his small incubators built on the cheap, will go a long way to helping others get into biohacking.

Continue reading “Simple, Low-Cost Rig Lets The Budding Biohacker Run DNA Gels”

Henry The Hoover Gets A Weapons Upgrade

In this day and age of unprecedented military expenditure, we’re used to seeing weapons upgrades across all manner of war fighting hardware – tanks, helicopters, attack aircraft, you name it. We’re somewhat less accustomed to seeing the same on a domestic appliance. Regardless, we now have Henry the Hoover packing some serious heat.

Originally a mere vacuum cleaner, Henry was given movement through two motors and gearboxes sourced from a children’s ride on vehicle. A tank was created out of copper pipe to store the flammable gas (which appears to be butane, as used in cigarette lighters), and discharge is controlled with a solenoid valve. Ignition is then handled by a pair of electric ignitors fired by relay. It’s all controlled over a standard hobby radio controller, so you can stand at a safe distance while flambeeing your rug.

It’s a dangerous project, but one that is particularly fun when Henry’s dazed and amused countenance is taken into account. But then again, you might like your flamethrowers wrist mounted, instead. Video after the break.

Continue reading “Henry The Hoover Gets A Weapons Upgrade”