Casting A Cannon Is A Lot Harder Than You Think

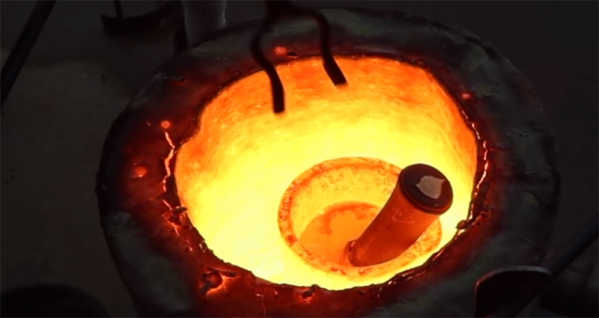
We’ve seen backyard casting, and for the most part, we know what’s going on. You make a frame out of plywood or two by fours, get some sand, pack it down, and very carefully make a mold around a pattern. This is something else entirely. [FarmCraft101] is casting a bronze cannon. Sure, it’s scaled down a bit, but this is the very limit of what sanity would dictate a single person can cast out of molten metal.

This attempt at casting a cannon is more or less what you would expect from a backyard bronze casting experiment. There’s a wooden flask and a greensand mold, everything is tamped down well and there’s a liberal coating of talcum powder inside. This is a large casting, though, and this presented a problem: during the pour, the halves of the flask were only held together with a few c-clamps. This ended poorly, with molten bronze pushing against the mold and eventually flowing onto the garage floor. Doing this alone was perhaps a bad idea.

The failure of the mold meant some math was necessary, and after some quick calculations it was found that more than 300 pounds pushing the sides of the mold apart. A second pour, with the sides of the flask bound together with nylon straps, was much more successful with a good looking bronze cannon ready for some abuse with a wire wheel.

This is only the first video in the series, with the next videos covering the machining and boring out of the barrel. That’s some serious craft right there.

Continue reading “Casting A Cannon Is A Lot Harder Than You Think”

Experiments In Creating The Best Epoxy Granite

If you want a big CNC machine you need a strong, vibration-resistant base. They build bells out of metal, so that might not be the best if you want something that doesn’t shake. Epoxy granite is your best bet, but what epoxy granite is the best? That’s the question [Adam Bender] answered in a series of experiments that resulted in a great-looking CNC machine.

While this is a project that resulted in a completed base for a CNC machine, this is also an experiment to determine the best formula for creating your own epoxy granite. The purpose of the experiment is effectively to determine the best-looking epoxy granite and uses four variables in the composition of this composite. Play sand, gravel, dye (in the form of iron oxide and liquid epoxy dye), and two-part epoxy were used to create seven different samples. Samples using rock didn’t turn out that great and still had trapped air. This was true even if the epoxy was put in a vacuum chamber for degassing. The winning combination turned out to be a mix of 80% sand and 20% epoxy with a bit of black dye, vibrated for 30 minutes on a DIY shaker table.

With the correct formula for epoxy granite, [Adam] set up his mold and waxed everything liberally. The internal skeleton, or what the CNC machine will be bolted to, is assembled inside the mold and the epoxy is poured in. The result is fantastic, and an excellent base for a machine that turns metal into chips. You can check out the video below.

Continue reading “Experiments In Creating The Best Epoxy Granite”

3D Prints Turn Any Keyboard Isomorphic

In the history of weird musical instrument interfaces, isomorphic keyboards are a favorite. These keyboards look like a grid of buttons, but when you play them, the relative shapes of chords are always the same. The benefit? Just say no to five hundred years of clavier tradition. It looks cool, too. Theoretically, it’s easier to play independent of whatever key you’re in. [John Moriarty] has built one of these isomorphic keyboards, and unlike everything we’ve ever seen, there are no electronics. It’s all 3D printable and turns any MIDI keyboard into an isomorphic keyboard.

We have seen isomorphic (piano) keyboards before, from a slew of Cherry keyboard switches to a bunch of arcade buttons. There is one downside to these builds, and that is that it’s really just building a MIDI controller. [John]’s build is simply a 3D printable overlay for a traditional piano that turns any standard keyboard into an isomorphic keyboard. The advantage being that this is really just a few pounds of plastic to be printed out and not a mess of wiring and electronics. Simple, removable, reversible. Not bad.

This keyboard effectively adds two differently colored keytops to each key on a keyboard. The best explination of how this keyboard works is in this video, but the basic idea is that all the note names are grouped together by color; C flat, C natural, and C sharp are all blue, for example. This means a third interval is two colors away, and a minor third is two colors to the right and one ‘row’ down. Yeah, it’s weird but that’s what an isomorphic keyboard is.

Since this is just a bunch of 3D printed parts meant to fit on any piano keybed, this is something that’s extremely easy to replicate. All the files for this keyboard overlay are available on Thingiverse, and [John] is offering to print these key tops for others without a 3D printer.

The Automated Solution To Your Unpopularity

You feel that you’re unpopular and no one likes you. The bad news is that if that’s the case in the real world there’s no easy way to fix it. The good news is there’s a great substitute — your popularity on Instagram. With this vending machine you can replace your personality with followers on Instagram. It’s just a shame we have to wait a year until Coachella.

This project is an interactive installation from [Dries Depoorter] that makes it possible to buy followers and likes in just a few seconds. It’s not limited to Instagram — you can get followers on FaceBook, YouTube, and Twitter, too. The hardware consists of a Raspberry Pi 3B+, an Arduino, coin acceptor, a few character LCDs running over I2C, and somewhat surprising for a one-off ‘art installation’, a lot of DIN rails mounted to a real industrial enclosure. Someone here knows what they’re doing;  there’s something resembling cable management inside this box and this vending machine is built to last.

Using this vending machine is as easy as sticking a few Euro coins in the slot and selecting the number of followers or likes you’d like. In a few minutes afterward, hundreds of notifications pop up on your phone. There’s no mention of the software in this vending machine aside from it being written in Python, which makes us wonder where these Instagram bots are based. Check out the video below.

Continue reading “The Automated Solution To Your Unpopularity”

The Motor Synth Is What You Get When You Forget Hammond Organs Exist

There’s nothing new, ever. It’s all been done. But that doesn’t mean you can’t invent something interesting. A case in point is the Motor Synth, a crowdfunding project from Gamechanger Audio. It’s what you get when you combine advanced quadcopter technology with the market for modular and semi-modular synthesizers.

The core feature of the Motor Synth is an octet of brushless motors tucked behind a plexiglass window. These (either through an electromagnetic pickup or something slightly more clever) produce a tone, giving the Motor Synth four-note polyphony with two voices per key. On top of these motors are reflective optical discs sensed with infrared detectors. These are mixed as harmonics to the fundamental frequency. The result? Well, they got an endorsement from [Jean-Michel Jarre] at Superbooth earlier this month (see video below). That’s pretty impressive. Continue reading “The Motor Synth Is What You Get When You Forget Hammond Organs Exist”

Linear CCDs Make For Better Cameras

Digital cameras have been around for forty years or so, and the first ones were built around CCDs. These were two-dimensional CCDs, and if you’ve ever looked inside a copier, scanner, or one of those weird handheld scanners from the 90s, you’ll find something entirely unlike what you’d see in a digital camera. Linear CCDs are exactly what they sound like — a single line of pixels. It’s great if you’re into spectroscopy, but these linear CCDs also have the advantage of having some crazy resolutions. A four-inch wide linear CCD will have thousands of pixels, and if you could somehow drag a linear CCD across an image, you would have a fantastic camera.

Many have tried, few have succeeded, and [heye.everts]’ linear CCD camera is the best attempt at making a linear CCD camera yet. It took a fuzzy picture of a tree, which is good enough for a proof of concept.

The linear CCD used in this project works something like an analog shift register. With a differential clock, you simply push values out of the CCD and feed them into an ADC. The driver board for this CCD uses a lot of current and the timings are a bit tricky but it does work with a Teensy 3.6. But that’s only one line of an image, you need to move that CCD too. For that, this project uses something resembling a homebrew CD drive. There’s a tiny stepper motor and a leadscrew dragging the CCD across the image plane. All of this is attached to the back of a Mamiya RZ67 camera body.

Does it work? Yes. Surprisingly yes. After a lot of work, an image of a tree was captured. This is an RGB CCD, and at the moment it’s only using one color channel, but it does work. It’s a proof of concept rendered in a 2000 x 3000 grayscale bitmap. The eventual goal is to build a 37.5 Megapixel medium format camera around this CCD, and the progress is looking great.

Visualizing How Signals Travel In A PCB

If you play with high speed design for long enough, eventually you’re going to run into clock skew and other weird effects. [Robert Feranec] recently ran into this problem and found an interesting solution to visualizing electric fields in a PCB.

A word of warning before we dig into this, for most of the projects we see on Hackaday something like this is completely superfluous. There aren’t many people dealing with high speed interfaces here, and there aren’t many people dealing with 100 Gigabit per second data links, period. That said, it’s not unheard of, and at the very least it’s interesting to look at.

The basics of this video is simulating the signals visually in a differential pair on a (virtual) printed circuit board. The software for this is Simbeor, and [Robert] talked to the founder of the company behind this software after watching a video on simulating electric fields in differential traces. This software does what it says, and is a great illustration of why differential pairs must have the same length.

While this might not be for everyone, it is a fantastic visualization of signals in high-speed design that goes above and beyond what you would expect from a Spice simulation. Even if you’re not doing high-speed design, you may someday and it’s never too soon to get an intuitive understanding of how electrons work.

Continue reading “Visualizing How Signals Travel In A PCB”