This Solar-Powered Ear Ring Turns With The Sun

Jewelry making offers many opportunities for the electronics tinkerer, and on these pages we’ve seen some eye-catching creations using LEDs to great effect. They all have the same limitation though, it’s difficult to power something that tiny without a cumbersome battery. In seeking to solve that problem there have been a variety of inventive solutions tried, but they haven’t matched the approach of [Lloyd Konneker] who has turned the whole premise of most electronic jewelry on its head.

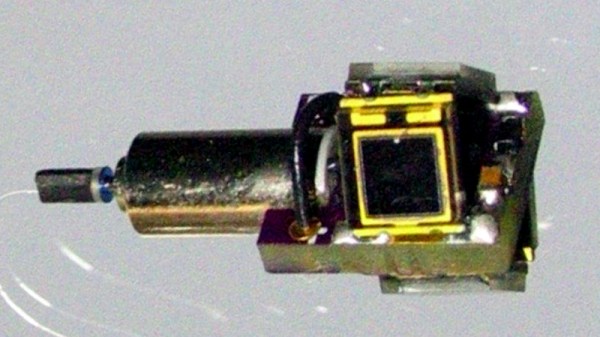
Instead of LEDs, the party trick of his earring is an electric motor that makes it spin, and instead of giving out light it takes it in as solar power.  The motor is a pager alert device, the solar cells are repurposed photodiodes, and the power is stored in a capacitor until there is enough to drive the motor, at which point a MOSFET is triggered to do the work. It’s all made possible by a Texas Instruments TPS3839 supply voltage supervisor chip, and it works well enough to turn from time to time in bright sunlight. The prototype uses a conventional PCB, but a better version is in the works with a flexible board.

His write-up should be of interest to anyone with a need to learn about micropower circuits, as it goes into significant detail on their tuning and operation. Last year’s Hackaday Prize had an entire section devoted to energy harvesting which is well worth searching the site for, a typical example was this solar powered microcontroller board.

Nvidia Jetson Robots Get A Head Start With Isaac Software Tools

We live in an exciting time of machine intelligence. Over the past few months, several products have been launched offering neural network processors at a price within hobbyist reach. But as exciting as the hardware might be, they still need software to be useful. Nvidia was not content to rest on their impressive Jetson hardware and has created a software framework to accelerate building robots around them. Anyone willing to create a Nvidia developer account may now play with the Isaac Robot Engine framework.

Isaac initially launched about a year ago as part of a bundle with Jetson Xavier hardware. But the $1,299 developer kit price tag pushed it out of reach for many of us. Now we can buy a Jetson Nano for about a hundred bucks. For those familiar with Robot Operating System (ROS), Isaac will look very familiar. They both aim to make robotic software as easy as connecting common modules together. Many of these modules called GEMS in Isaac were tailored to the strengths of Nvidia Jetson hardware. In addition to those modules and ways for them to work together, Isaac also includes a simulator for testing robot code in a virtual world similar to Gazebo for ROS.

While Isaac can run on any robot with an Nvidia Jetson brain, there are two reference robot designs. Carter is the more expensive and powerful commercially built machine rolling on Segway motors, LIDAR environmental sensors, and a Jetson Xavier. More interesting to us is the Kaya (pictured), a 3D-printed DIY robot rolling on Dynamixel serial bus servos. Kaya senses the environment with an Intel RealSense D435 depth camera and has Jetson Nano for a brain. Taken together the hardware and software offerings are a capable and functional package for exploring intelligent autonomous robots.

It is somewhat disappointing Nvidia decided to create their own proprietary software framework reinventing many wheels, instead of contributing to ROS. While there are some very appealing features like WebSight (a browser-based inspect and debug tool) at first glance Isaac doesn’t seem fundamentally different from ROS. The open source community has already started creating ROS nodes for Jetson hardware, but people who work exclusively in the Nvidia ecosystem or face a time-to-market deadline would appreciate having the option of a pre-packaged solution like Isaac.

Postal-Themed Rat Rod Mower Really Delivers

There are birthday presents, and then there are birthday presents. You know, the amazing ones that are the polar opposite of phoning it in. This is one of those presents.

So, [peterbrazil]’s wife is a rural mail carrier on a small island. For her upcoming birthday, he wanted to build a lil’ something she could show off in the local Tractor Days Parade. He found an old Cub Cadet riding mower that was destined for the dump, and the rest is well-documented history.

This glorious conversion required a lot of frame work, but it’s obvious this wasn’t [peterbrazil]’s first rodeo. He got some tires and tie rods from a friend who used to race lawnmowers (yeah, really) and went from there. He wanted this rat rod to be totally slammed (lowered as far as possible), but that would prohibit [Mrs. peterbrazil] from riding it ’round the farm after her parade dust settles. Instead, he went for the raked look, which means the front is lower than the back.

We love all of the reuse here, which includes a wheelbarrow cleverly cut into a seat and a dashboard, an old mailbox for a bed/cargo box, and a pitchfork grill. There are some modern touches as well, like a 3D printed mailbox shift knob with a working door, printed ignition switch box for the dash, and an adapter that makes room for a huge cone air filter. The seat cushion is a nice touch, too—the sunflower fabric adds both femininity and farm flavor to the build.

Always wanted to build a hot rod, but don’t have the garage space? Get some traction with an R/C rod.

Simulated Newton’s Cradle Makes A Flashy Desk Toy

Newton’s Cradle was once upon a time, a popular desk toy in offices around the world. For [TecnoProfesor], however, it wasn’t quite flashy enough. Instead, they built a simulated version with flashing LEDs. As you do.

Rather than relying on the basic principles of the cradle to make it work, this relies on two servo motors to move the balls on the ends, with the ones in the middle remaining stationary. Each ball is fitted with an RGB LED, which flashes with the simulated “motion” of the cradle. By using ping pong balls, the light from the LEDs is nicely diffused. The frame is built from wooden dowels, metal rods, and acrylic.

It’s a project that is sure to confuse at first glance, but it’s a great way to learn basic microcontroller skills like interfacing with LEDs and servomotors. We’d love to see a version that works like a real Newton’s Cradle, flashing the LEDs as they are hit by their neighbours. We’ve even seen them automated, for the truly lazy among us.  Alternatively, one could go completely ridiculous and have such a device tweet on every hit, though you might run afoul of the API’s spam restrictions. If you give it a go, drop us a line.

This Commodore 16 Is An NTSC One… No, Wait, It’s A PAL One!

We’re used to our computers being powerful enough in both peripheral and processing terms to be almost infinitely configurable under the control of software, but there was a time when that was not the case. The 8-bit generation of home computers were working towards the limits of their capability just to place an image on a TV screen, and every component would have been set up to do just the job it was intended for. Thus when different countries had different TV standards such as the mostly-European PAL and the mostly-American NTSC, there would have been different models of the same machine for each market. The Commodore 16 was just such a machine, and [Adrian Black] has modified his NTSC model with a custom ROM, an Arduino and an Si5351 clock generator to be switchable between the two.

The differences between a PAL and NTSC C16 are two-fold. The clock for the video chip is of a different frequency, and the ROM contents differ too. [Adrian]’s machine therefore has a larger ROM containing both versions which are switchable via one of the upper address lines. A couple of tracks cut in the crystal oscillator circuit allow him to inject a new clock from the Si5351 module, and and Arduino controls everything. The appropriate ROM and clock are selected via a very simple interface, the reset button is captured and while a short press still resets the computer a long one switches the mode.

Despite having its principal engineer, [Bil Herd] as a colleague here at Hackaday, it’s sad that we don’t see as many Commodore 16s as we should. A recent feature showed a 64k C16, but didn’t make it into a C64.

Continue reading “This Commodore 16 Is An NTSC One… No, Wait, It’s A PAL One!”

Experiments In Creating The Best Epoxy Granite

If you want a big CNC machine you need a strong, vibration-resistant base. They build bells out of metal, so that might not be the best if you want something that doesn’t shake. Epoxy granite is your best bet, but what epoxy granite is the best? That’s the question [Adam Bender] answered in a series of experiments that resulted in a great-looking CNC machine.

While this is a project that resulted in a completed base for a CNC machine, this is also an experiment to determine the best formula for creating your own epoxy granite. The purpose of the experiment is effectively to determine the best-looking epoxy granite and uses four variables in the composition of this composite. Play sand, gravel, dye (in the form of iron oxide and liquid epoxy dye), and two-part epoxy were used to create seven different samples. Samples using rock didn’t turn out that great and still had trapped air. This was true even if the epoxy was put in a vacuum chamber for degassing. The winning combination turned out to be a mix of 80% sand and 20% epoxy with a bit of black dye, vibrated for 30 minutes on a DIY shaker table.

With the correct formula for epoxy granite, [Adam] set up his mold and waxed everything liberally. The internal skeleton, or what the CNC machine will be bolted to, is assembled inside the mold and the epoxy is poured in. The result is fantastic, and an excellent base for a machine that turns metal into chips. You can check out the video below.

Continue reading “Experiments In Creating The Best Epoxy Granite”

3D Prints Turn Any Keyboard Isomorphic

In the history of weird musical instrument interfaces, isomorphic keyboards are a favorite. These keyboards look like a grid of buttons, but when you play them, the relative shapes of chords are always the same. The benefit? Just say no to five hundred years of clavier tradition. It looks cool, too. Theoretically, it’s easier to play independent of whatever key you’re in. [John Moriarty] has built one of these isomorphic keyboards, and unlike everything we’ve ever seen, there are no electronics. It’s all 3D printable and turns any MIDI keyboard into an isomorphic keyboard.

We have seen isomorphic (piano) keyboards before, from a slew of Cherry keyboard switches to a bunch of arcade buttons. There is one downside to these builds, and that is that it’s really just building a MIDI controller. [John]’s build is simply a 3D printable overlay for a traditional piano that turns any standard keyboard into an isomorphic keyboard. The advantage being that this is really just a few pounds of plastic to be printed out and not a mess of wiring and electronics. Simple, removable, reversible. Not bad.

This keyboard effectively adds two differently colored keytops to each key on a keyboard. The best explination of how this keyboard works is in this video, but the basic idea is that all the note names are grouped together by color; C flat, C natural, and C sharp are all blue, for example. This means a third interval is two colors away, and a minor third is two colors to the right and one ‘row’ down. Yeah, it’s weird but that’s what an isomorphic keyboard is.

Since this is just a bunch of 3D printed parts meant to fit on any piano keybed, this is something that’s extremely easy to replicate. All the files for this keyboard overlay are available on Thingiverse, and [John] is offering to print these key tops for others without a 3D printer.