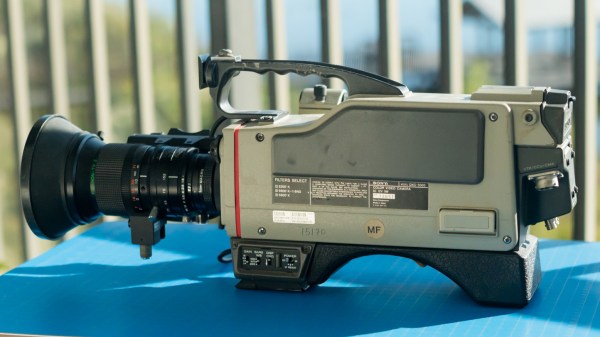
SLR To DSLR Conversion Becomes Full Camera

At least as far as the inner workings are concerned, there’s not a whole lot of difference between an single-lens reflex (SLR) camera that uses film and a digital SLR (DSLR) camera that uses an electronic sensor except the method for capturing the image. So adding the digital image sensor to a formerly analog camera like this seemed like an interesting project for [Wenting Zhang]. But this camera ballooned a little further than that as he found himself instead building a complete, full-frame digital camera nearly from scratch.

The camera uses a full-frame design and even though the project originally began around the SLR mechanism, in the end [Wenting] decided not to keep this complex system in place. Instead, to keep the design simple and more accessible a mirrorless design is used with an electronic viewfinder system. It’s also passive M lens mount, meaning that plenty of manual lenses will be available for this camera without having to completely re-invent the wheel.

As far as the sensor goes, [Wenting] wanted something relatively user-friendly with datasheets available so he turned to industrial cameras to find something suitable, settling on a Kodak charge-coupled device (CCD) for the sensor paired with an i.MX processor. All of the electronics have publicly-available datasheets which is important for this open-source design. There’s a lot more work that went into this build than just picking parts and 3D printing a case, though, and we’d definitely recommend anyone interested to check out the video below for how this was all done. And, for those who want to go back to the beginnings of this project and take a different path, it’s definitely possible to convert an analog SLR to a digital one.

Continue reading “SLR To DSLR Conversion Becomes Full Camera”

Hackaday Links Column Banner

Hackaday Links: May 7, 2023

More fallout for SpaceX this week after their Starship launch attempt, but of the legal kind rather than concrete and rebar. A handful of environmental groups filed the suit, alleging that the launch generated “intense heat, noise, and light that adversely affects surrounding habitat areas and communities, which included designated critical habitat for federally protected species as well as National Wildlife Refuge and State Park lands,” in addition to “scatter[ing] debris and ash over a large area.”

Specifics of this energetic launch aside, we always wondered about the choice of Boca Chica for a launch facility. Yes, it has all the obvious advantages, like a large body of water directly to the east and being at a relatively low latitude. But the whole area is a wildlife sanctuary, and from what we understand there are still people living pretty close to the launch facility. Then again, you could pretty much say the same thing about the Cape Canaveral and Cape Kennedy complex, which probably couldn’t be built today. Amazing how a Space Race will grease the wheels of progress.

Continue reading “Hackaday Links: May 7, 2023”

Inside Digital Image Chips

Have you ever thought how amazing it is that every bit of DRAM in your computer requires a teeny tiny capacitor? A 16 GB DRAM has 128 billion little capacitors, one for each bit. However, that’s not the only densely-packed IC you probably use daily. The other one is the image sensor in your camera, which is probably in your phone. The ICs have a tremendous number of tiny silicon photosensors, and [Asianometry] explains how they work in the video you can see below.

The story starts way back in the 1800s when Hertz noticed that light could knock electrons out of their normal orbits. He couldn’t explain exactly what was happening, especially since the light intensity didn’t correlate to the energy of the electrons, only the number of them. It took Einstein to figure out what was going on, and early devices that used the principle were photomultiplier tubes, which are extremely sensitive. However, they were bulky, and an array of even dozens of them would be gigantic.

Semiconductor devices use silicon. Bell Labs was working on bubble memory, which was a way of creating memory that was never very popular. However, as a byproduct, the researchers realized that moving charges around for memory could also move around charges from photosensitive diodes. The key idea was that it was harder to connect many photodiodes than it was to create the photodiodes. Using the charge-coupled device or CCD method, the chip could manipulate the charges to reduce the number of connections to the chip.

CCDs opened up the digital image market, but it has some problems. The next stage was CMOS chips. They’d been around for a while since IBM produced the scanistor, but the sensitivity of these CMOS image chips was poor. Since most people were happy with CCD, there wasn’t as much research on CMOS. However, CMOS sensors would eventually become more capable, and the video explains how it works.

We’ve looked at image sensors before, too. The way you read them can make a big difference in your images.

Continue reading “Inside Digital Image Chips”

Laser And Webcam Team Up For Micron-Resolution Flatness Measurements

When you want to measure the length, breadth, or depth of an object, there are plenty of instruments for the job. You can start with a tape measure, move up to calipers if you need more precision, or maybe even a micrometer if it’s a really critical dimension. But what if you want to know how flat something is? Is there something other than a straightedge and an eyeball for assessing the flatness of a surface?

As it turns out, there is: a $15 webcam and a cheap laser level will do the job, along with some homebrew software and a little bit of patience. At least that’s what [Bryan Howard] came up with to help him assess the flatness of the gantry he fabricated for a large CNC machine he’s working on.

The gantry arm is built from steel tubing, a commodity product with plenty of dimensional variability. To measure the microscopic hills and valleys over the length of the beam, [Bryan] mounted a lens-less webcam to a block of metal. A cheap laser level is set up to skim over the top of the beam and shine across the camera’s image sensor.

On a laptop, images of the beam are converted into an intensity profile whose peak is located by a Gaussian curve fit. The location of the peak on the sensor is recorded at various points along the surface, leading to a map of the microscopic hills and valleys along the beam.

As seen in the video after the break, [Bryan]’s results from such a quick-and-dirty setup are impressive. Despite some wobblies in the laser beam thanks to its auto-leveling mechanism, he was able to scan the entire length of the beam, which looks like it’s more than a meter long, and measure the flatness with a resolution of a couple of microns. Spoiler alert: the beam needs some work. But now [Bryan] knows just where to scrape and shim the surface and by how much, which is a whole lot better than guessing.   Continue reading “Laser And Webcam Team Up For Micron-Resolution Flatness Measurements”

Blu-ray player with 3 slides on a disk

Blu-ray Microscope Uses Blood Cells As Lenses

When you think of high-throughput ptychographic cytometry (wait, you do think about high throughput ptychographic cytometry, right?) does it bring to mind something you can hack together from an old Blu-ray player, an Arduino, and, er, some blood? Apparently so for [Shaowei Jiang] and some of his buddies in this ACS Sensors Article.

For those of you who haven’t had a paper accepted by the American Chemical Society, we should probably clarify things a bit. Ptychography is a computational method of microscopic imaging, and cytometry has to do with measuring the characteristics of cells. Obviously.

This is definitely what science looks like.

Anyway, if you shoot a laser through a sample, it diffracts. If you then move the sample slightly, the diffraction pattern shifts. If you capture the diffraction pattern in each position with a CCD sensor, you can reconstruct the shape of the sample using breathtaking amounts of math.

One hitch – the CCD sensor needs a bunch of tiny lenses, and by tiny we mean six to eight microns. Red blood cells are just that size, and they’re lens shaped. So the researcher puts a drop of their own blood on the surface of the CCD and covers it with a bit of polyvinyl film, leaving a bit of CCD bloodless for reference. There’s an absolutely wild video of it in action here.

Don’t have a Blu-ray player handy? We’ve recently covered a promising attempt at building a homebrew scanning electron microscope which might be more your speed. It doesn’t even require any bodily fluids.

[Thanks jhart99]

Linear CCDs Make For Better Cameras

Digital cameras have been around for forty years or so, and the first ones were built around CCDs. These were two-dimensional CCDs, and if you’ve ever looked inside a copier, scanner, or one of those weird handheld scanners from the 90s, you’ll find something entirely unlike what you’d see in a digital camera. Linear CCDs are exactly what they sound like — a single line of pixels. It’s great if you’re into spectroscopy, but these linear CCDs also have the advantage of having some crazy resolutions. A four-inch wide linear CCD will have thousands of pixels, and if you could somehow drag a linear CCD across an image, you would have a fantastic camera.

Many have tried, few have succeeded, and [heye.everts]’ linear CCD camera is the best attempt at making a linear CCD camera yet. It took a fuzzy picture of a tree, which is good enough for a proof of concept.

The linear CCD used in this project works something like an analog shift register. With a differential clock, you simply push values out of the CCD and feed them into an ADC. The driver board for this CCD uses a lot of current and the timings are a bit tricky but it does work with a Teensy 3.6. But that’s only one line of an image, you need to move that CCD too. For that, this project uses something resembling a homebrew CD drive. There’s a tiny stepper motor and a leadscrew dragging the CCD across the image plane. All of this is attached to the back of a Mamiya RZ67 camera body.

Does it work? Yes. Surprisingly yes. After a lot of work, an image of a tree was captured. This is an RGB CCD, and at the moment it’s only using one color channel, but it does work. It’s a proof of concept rendered in a 2000 x 3000 grayscale bitmap. The eventual goal is to build a 37.5 Megapixel medium format camera around this CCD, and the progress is looking great.

See Cells In A New Light With A DIY Fluorescence Microscope

Ever since a Dutch businessman peered into the microscopic world through his brass and glass contraption in the 1600s, microscopy has had a long, rich history of DIY innovation. This DIY fluorescence microscope is another step along that DIY path that might just open up a powerful imaging technique to amateur scientists and biohackers.

In fluorescence microscopy, cells are treated with various fluorescent dyes that can be excited with light at one wavelength and emit light at another. But as [Jonathan Bumstead] points out, fluorescence microscopes are generally priced out of the range of biohackers. His homebrew scope levels the playing field a bit. The trick is to use 3D-printed parts to kit out commonly available digital cameras – a USB microscope, a DSLR, or even a smartphone camera. Excitation is provided by a ring of Nexopixel LEDs, while a movable rack holds a filter that blocks the excitation wavelength but allows the emission wavelength to pass through to the camera. He demonstrates the technique by staining some threads with fluorescent ink from a highlighter marker and placing them on a sheet of tissue paper; in conventional bright-field mode, the threads all but disappear into the background, but jump right out under fluorescence.

Ith’s true that the optics are not exactly lab quality, and the microscope is currently only set up to do reflectance imaging as opposed to the more typical transmissive mode where the light passes through the sample. That’s an easy fix, though, and reflectance mode is still useful. We’ve seen fluorescence microscopy get quite complex before, but this simple scope might be enough to get a biohacker started.

Continue reading “See Cells In A New Light With A DIY Fluorescence Microscope”