Do you know Morse code already? Or are you maybe trying to learn so you can be an old school ham? Either way, you could have a lot of fun with [felix]’s great little entry into the 2024 Tiny Games Contest — Morse Quest.
This minimalist text-based adventure game is played entirely in Morse code. That is, the story line, all the clues, and the challenges along the way are presented by a blinking LED. In turn, commands like LOOK, TAKE, and INVENTORY are entered with the slim key on the lower right side. A wee potentiometer allows the player to adjust the blink rate of the LED, so it’s fun for all experience levels. Of course, one could always keep a Morse chart handy.
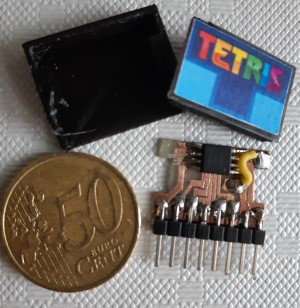
The brains of this operation is an Arduino Nano, and there’s really not much more to the BOM than that. It runs on a 9 V, so theoretically it could be taken anywhere you want to escape reality for a while. Be sure to check out the demo video after the break.
Continue reading “2024 Tiny Games Contest: Morse Quest Goes Where You Do”