KanaChord Is A Macro Pad For Japanese Input

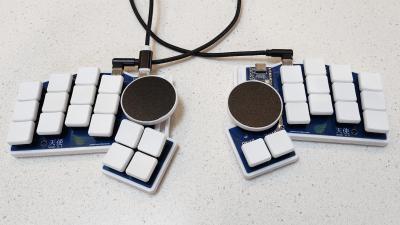
There are various situations that warrant additional keyboards on your desk, and inputting a second language is definitely a good one. That’s the idea behind KanaChord, which generates Unicode macros to render Japanese Kana characters using chords — pressing multiple keys at once as you would on a piano.

The Japanese writing system is made up of Kanji (Chinese characters), Hirigana, and Katakana. Without going into it too much, just know that Hirigana and Katakana are collectively known as the Kana, and there’s a table that lays out the pairing of vowels and consonants. To [Mac Cody], the layout of the Kana table inspired this chording keyboard.

Continue reading “KanaChord Is A Macro Pad For Japanese Input”

Hackaday Podcast Episode 265: Behind The Epic SSH Hack, 1980s Cyber Butler, The Story Of Season 7

This week, Editor-in-Chief Elliot Williams and Kristina Panos convened once again to give the lowdown on this week’s best hacks. First up in the news — it’s giga-sunset time for Gigaset IoT devices, which simultaneously became paperweights on March 29th. And all that Flipper Zero panic? It has spread to Australia, but still remains exactly that: panic.

Then it’s on to What’s That Sound. Kristina failed again, although she was in the right neighborhood. Can you get it? Can you figure it out? Can you guess what’s making that sound? If you can, and your number comes up, you get a special Hackaday Podcast t-shirt.

Then it’s on to the hacks, beginning with the terrifying news of an xz backdoor. From there, we marvel at a 1980s ‘butler in a box’ — a voice-activated home automation system — and at the idea of LoRa transmissions without a radio. Finally, we discuss why you don’t want to piss off Trekkies, and whether AI has any place in tech support.

Check out the links below if you want to follow along, and as always, tell us what you think about this episode in the comments!

Download and savor at your leisure.

Continue reading “Hackaday Podcast Episode 265: Behind The Epic SSH Hack, 1980s Cyber Butler, The Story Of Season 7”

Illustrated Kristina with an IBM Model M keyboard floating between her hands.

Keebin’ With Kristina: The One With The Pickle Pi

Image by [jefmer] via Hackaday.IO
The unstoppable [jefmer] wrote in to alert me to Pickle Pi, their latest Keebin’-friendly creation. Why “Pickle Pi”? Well, the Pi part should be obvious, but the rest comes from the Gherkin 30% ortholinear keyboard [jefmer] built with Gateron Yellows and, unfortunately, second-choice XDA keycaps, as the first batch were stolen off of the porch.

If you’re wondering where the rest of the keys are, they are accessible by holding various keys rather than tapping them. Shift is Shift when tapped held, but becomes Enter when tapped. [jefmer] wrote out their entire project description on the thing in order to break in the Gherkin.

The brains of this acrylic sandwich tablet is a Pi Zero 2, with a Pro Micro for the keyboard controller. Although programs like Ghostwriter and Thonny work fine, Chromium is “painfully slow” due to the RAM limitations of the Pi Zero 2. On the upside, battery life is 7-8 hours depending on usage. Even so, [jefmer] might replace it with a Pi 4 — the current battery pack won’t support a Pi 5.
Continue reading “Keebin’ With Kristina: The One With The Pickle Pi”

a DIY smoke grenade pours out smoke from a vape pen assembly

R/C Smoke Grenade Rolls With The Changes

[Davis DeWitt] gets to do something that many of us only dream of — build cool working props for movies. This time, the director asked for a realistic smoke grenade that can roll up to a mark and stop on it every take, pouring out smoke the entire time.

The innards of a DIY remote control smoke grenade.

[Davis] decided on a hamster ball-esque design that uses a pair of motors that he can control remotely, plus the innards from a vape pen and a tiny fan to distribute the smoke. The motors spin 3D printed wheels using printed gears attached to the shafts, which drive the whole assembly forward or backward.

In order to get everything to fit inside the printed canister, [Davis] had to use the smallest components he could find, like the Seeed Xiao SAMD21 and the DRV8833 motor driver. The whole thing is powered by a pair of 18650s, which, as you might imagine, really factored into the weight distribution scheme. In this case, the batteries act as a pendulum and keep the inner assembly level and not spinning wildly inside the canister.

Finally, it was time for the smoke grenade aesthetics. After what seemed like endless sanding, priming, and masking, [Davis] had a really good-looking smoke grenade that just needed some vinyl lettering and fake wear-and-tear to be complete. Be sure to check it out in action after the break.

We don’t see a lot of grenades around here, but when we do, they’re often keyboards.

Continue reading “R/C Smoke Grenade Rolls With The Changes”

Left: a DIY chording keyboard with seven keys Right: the guts of said keyboard

Chording Keyboard Leaves Your Mouse Hand Free

[akmnos22] was getting tired of moving one hand to the mouse and back to the keyboard. Rather than integrating mouse controls into a keyboard, they decided to really lean in and create a chording keyboard — one that creates characters with combinations of key presses, like playing chords on a piano.

This project was inspired in part by the Infogrip BAT, which has graced these pages before. Much like the BAT, this uses a total of seven Cherry MX switches: one for each finger, and three for the thumb. In order to get the placement just right for you, [akmnos22] suggests laying your hand in a comfortable position on a piece of paper and marking where your fingers naturally rest, then importing these markings into CAD software to decide where the key switch holes should be.

The brains of this operation is a Raspberry Pi Pico, which provides more than enough GPIO pins to do the job. [akmnos22] does a nice job of explaining exactly how to put one of these together, from the design concept through the programming process and how to actually chord on the thing.

Would you rather chord with two hands? It might be even faster.

Magnetic Power Cable Makes Mobility Scooter Much Better

Sometimes, you have to wonder what major manufacturers of assistive tech are thinking when they design their products. [Niklas Frost]’s father has MS and uses an electric mobility scooter to get around. It’s a good solution to a terrible problem, except it stops short of the most important part — the charging scheme. Because of the aforementioned mobility issues, [Niklas]’s father can’t plug and unplug it without assistance. So much for independence.

And so [Niklas] gave it some thought and came up with an incredibly easy way that Dad can charge his scooter. It’s even non-intrusive — all it took was a handful of off-the-shelf components and some 3D printed parts to make what’s essentially an extension cord between the charger and the scooter. Really, there’s nothing more to it than three 10 A magnetic connectors, an XLR female port, an XLR male connector, and some very helpful plastic.

Something interesting to note: [Niklas] spent a year or so tinkering with a robot that could drive the plug over to the charger and plug it in. A book on the subject made him destroy that robot, however, when he realized that he was being driven more by cool technologies than solving the problem at hand. Within a few days of changing course, [Niklas]’ dad was charging his own scooter.

Now, if [Niklas] wants to see about making the scooter move a whole lot faster, we have just the thing.

five 100% recycled keycaps, spaced out

These Keycaps Are 100% Recycled Plastic

Artisan keycaps are generally meant to replace your Escape key, though they can be used anywhere you like (as long as they fit, of course). Keycap maker [tellybelly] of jankycaps has been experimenting with making keycaps out of 100% recycled plastic, and offers an interesting post detailing their development and production process.

Animation of injection molding flow into a set of four keycaps.What do you do when normal injection molding tooling is out of your budget, and silicone molds simply won’t do? You turn to 3D printing if you can. In this case, [tellybelly] and company found a resin designed to withstand high temperatures.

[tellybelly] was able to design the mold using a plethora of online resources, and even verified the flow using a special program. Although the first two versions worked, they had some flaws. Third time’s the charm, though, and then it was time to sort plastic and fire up the shredder.

After heating up the shreds to 200 °C or so, it was time to start the injecting. This part isn’t exactly a cakewalk — mixing different plastics together can vary the workable temperature range that doesn’t degrade the plastic. Although it sounds like the end, [tellybelly] reports that they spent just as much time here as they did at the drawing board, experimenting with pressure on the mold, various cool-down methods, and how long to wait before opening the mold.

Via reddit