Nixie Clock Without A PCB

Looking for an artistic way to build circuits? Don’t want to design a PCB? The Lethal Nixie Tube Clock is a free form circuit that gives you the time one digit at a time. It uses a IN-1 Nixie tube to display the digits. This is driven by ten MPSA42 high voltage transistors. A IRF520 N-FET, inductor, and a diode are used as a switching power supply that generates the high voltage needed to drive the Nixie tube. It’s probably not lethal, but there are exposed high voltages in the cube. You’d definitely regret touching it.

An ATMega8 is used to control the clock. It drives the various digits of the Nixie tube, and generates a PWM output to switch the high voltage supply. Unfortunately, the schematic has been lost. If you’re interested in the switching supply, it’s likely similar to the one explained here.

Check out a video of the clock after the break.

Via Dangerous Prototypes

Continue reading “Nixie Clock Without A PCB”

Motivating Engineering Students With Microcontrollers

We see a lot of microcontroller based hacks around here, and it’s not hard to see why learning how to use microcontrollers is valuable to prospective engineeer. Unfortunately, microcontroller courses are dreaded by students since they focus on theory instead of application. In The First Lecure, [Colin] talks to a class of engineering students about how to get practical with microcontrollers.

He starts with an overview of a bomb countdown project that he used to learn the basics of microcontrollers. This started as a 555 based timer, but he ended up using a PIC18 after having issues with timing and reliability. Next, he discusses a paintball sentry gun inspired by a Hackaday post.  He finishes off some advice and gives the students some hardware: a Pickit2 programmer and a Saleae Logic Analyzer.

It’s easy to lose motivation due to the heavy focus on theory in engineering. [Colin]’s advice to start building stuff will hopefully motivate these students to take an interest in microcontrollers. We also like how he advises students to read Hackaday. Check out the full video of the lecture after the break.

Continue reading “Motivating Engineering Students With Microcontrollers”

LEGO Record Player

Some people claim that the sound of vinyl is superior to digital playback. While this hack wont win any awards for audio quality, [Ryan]’s LEGO Record Player is a unique use of one of our favorite toys. Most of the components including the tone arm, counterweight, and base, are built entirely of LEGO. A large gear from an educational construction set is used for the platter. Unfortunately, the rotation isn’t terribly smooth, and the playback is rather distorted.

The turntable uses a standard cartridge and stylus, which should allow it to be connected to any receiver with a phono preamplifier. Using these off the shelf parts, it’s possible to build the mechanical components a turntable out of a variety of things. As the video demonstrates, getting the platter to turn correctly is a bit of a challenge.

Check out a video of the wobbly playback featuring Cindy and Bert after the break.

Via Make

Continue reading “LEGO Record Player”

Wiper Motor Motion Simulator

[DERIY] set out to create a two degrees of freedom motion simulator for driving simulation. After four months, he’s completed this impressive simulator for about $400. The simulator receives driving data from the game and actuates the seat to provide tactile feedback to the driver.

To keep the costs low, he decided to use wiper motors for actuating the seat. The system is controlled by the Thanos AMC Motion Controller. This AVR based system connects over USB and controls the motor drivers. There’s also a collection of software for calibrating the system, including tuning the PID control and setting up the feedback potentiometers. An LCD display provides some information on the system status during operation.

If you’ve ever wanted to build a motion simulator, this is a good example of how to get started. The open source hardware for this makes controlling the system easier, and using readily available components can lower the build cost.

Check out a video of the simulator in action after the break.

Continue reading “Wiper Motor Motion Simulator”

StarGate Eggbeater

[Jason] used a strip of 142 Adafruit LPD8806 Addressable RGB LEDs to create the StarGate Eggbeater persistence of vision display. The LED strips are controlled by an Arduino Mega, which is used to control the strip and provides 21 bit color control for each LED. The strip is housed into a ring-shaped tube which is mounted onto a rod and bearing to allow it to spin. A 1/4 HP motor is used to spin the ring at 250 RPM creating the POV effect.

One issue when controlling a spinning object is making electrical connections to a spinning object. The LPD8806 requires four connections: power, ground, clock, and data. To make the connections, [Jason] used a MOOG Slip Ring. This allows for the four connections to be made while the ring spins at 250 RPM.

Of course POV demos need videos, so check one out the “boss program” video after the break.

Via Adafruit

Continue reading “StarGate Eggbeater”

[ch00ftech] Visits A Shenzhen Market

On a business trip, [ch00ftech] visited a Shenzhen electronics market and documented the trip. Some of the attractions included multiple Apple stores of questionable authenticity, stores selling PC components with no manuals, drivers, or packaging, and a variety of LEDs and lasers.

[ch00ftech] showed off the loot from the trip, including breadboards, perf boards, LED matrices, and an RFID reader all for very low prices. There’s also the Class 4 laser pointer that cost about $120 and has a power output of “between 500 mW and 8000 mW.” Given the 500 mW power restriction on lasers sold in the US, it’s fair to say that this thing should be handled with care. Hopefully the included safety classes actually block the specific wavelength of the laser.

The staff in these stores were very knowledgeable and knew part numbers and inventories by memory. One of the biggest surprises was just how low the prices were.  While Radio Shack has started to carry some more parts for hackers, it seems that nothing stateside can compare these Chinese electronics markets.

Hacking The Peggy

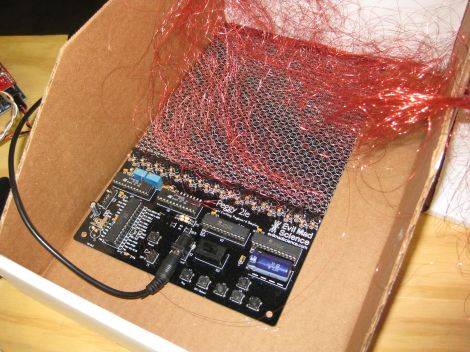
Evil Mad Scientist Laboratories received an email from someone who wanted to hack their Peggy kit. This LED matrix kit has been featured on Hack a Day in the past, and provides hardware to set up a 625 LED matrix.

This user built an external array of LEDs that they wanted to drive with the Peggy hardware. There are a few options for making this happen. The first one is to run wires from each of the 625 LED footprints on the board. Each has an anode and cathode, so that makes for a total of 1250 wires to run. It turns out that people have actually done this with the Peggy in the past, using very fine wire.

EMSL suggests wiring the rows and columns instead. This way, only one wire is needed for each row and column, allowing a 25×25 LED grid to use 50 wires instead of 1250. They also explain how to expand the grid to a 30×20 LED matrix. It’s a good explanation of how the kit works, and how it can be expanded.

Photo [oskay]