Infrared Following Robot Built As Proof-of-Concept For Autonomous Luggage

Once upon a time, the poor humans of the past had to lug around suitcases and trunks with their own arms. Then, some genius figured out that you could just put wheels on and make everyone’s life a million times easier. Now, what if you didn’t even have push, because your luggage could just follow you instead? Well, students [Yuqiang Ge] and [Yiyang Zhao] have figured out a proof of concept for how that could work.

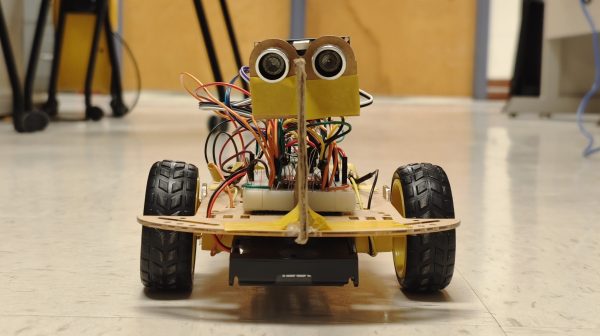
Their build is a small robotic platform that they assembled for their ECE5730 final project. The tiny wheeled robot is programmed to rotate on the spot until its infrared sensors pick up a signal. In turn, the user is intended to carry an infared beacon for it to lock onto. A pair of sensors are used on the robot platform, separated by a board to serve as a blind. The robot determines the relative signal strength from each sensor, and uses that to vary PWM signals to the two DC drive motors to steer the robot platform to seek and follow the infrared beacon.

It’s a neat idea, and looks to work pretty well in a university corridor. It even has an ultrasonic range sensor to (ideally) stop when it gets too close to the user. Whether it would survive the tumult of a crowded airport is another thing entirely, but that’s what the engineering process is about. Indeed, the very concept has been commercialized already!

Following-robots are a common student project, and one well worth exploring if you’re new to the robotic field.

Continue reading “Infrared Following Robot Built As Proof-of-Concept For Autonomous Luggage”

Digital Bike Horn Will Play Custom Sounds, Please Be Tasteful

When you’re out riding your bike, a horn can be a useful warning device to other road users and pedestrians alike. It can also be a source of fun and amusement, or annoyance, depending on the sounds it makes and how you use it. For the ultimate flexibility, you might like this digital bicycle horn that offers customizable sounds, as developed by [gokux].

The build has attractive two-tone components, consisting of a button pad for playing four sounds, and a sound module with a 3 watt speaker and battery pack. A Seeed Studio XIAO SAMD21 is the heart of the operation, with the microcontroller paired with a DFPlayer Mini which handles sound duties. When one of the four buttons is pressed, the microcontroller loads the relevant sound off an SD card, and plays it out over the speaker. For power, the build uses a lithium rechargeable battery with a healthy 1200 mAh capacity, which can be readily recharged thanks to a TP4056 charger module with a USB-C port.

It’s a nifty little build, and we love the Metal Gear Solid sounds. Though, we do wonder just how audible that 3 watt speaker is. If it proves inadequate, you could always step up to a much larger driver paired with a hefty audio amp if you so desire.

Continue reading “Digital Bike Horn Will Play Custom Sounds, Please Be Tasteful”

Raspberry Pi Pico Becomes MIDI-Compatible Synth

ECE 4760 is a microcontroller course that runs at Cornell every year, and it gives students a wide remit to pursue various kinds of microcontroller projects. [Pelham Bergesen] took the class and built himself a MIDI-controllable synthesizer out of a Raspberry Pi Pico.

[Pelham] coded a library to parse MIDI messages on the Pico, with the microcontroller’s UART charged with receiving the input data. MIDI is basically just serial at a baud rate of 31.25k, with a set message structure, after all. From there, the Pico takes the note data and plays the relevant frequencies by synthesizing square waves using a PWM output. A second PWM channel can also be blended with the first to generate more complex tones.  The synthesizer is designed to be used with a source of MIDI note data such as a keyboard controller; [Pelham] demonstrates the project in use with a Roland JD-XI. It’s a fairly basic synthesizer, but [Pelham] does a good job of explaining all the steps required to get this far. If you’ve never done an audio or MIDI project before, you might find his guide very helpful for the way it steps through the basics.

[Pelham] didn’t get to implement fancier features like direct digital synthesis (DDS) or analog audio effects before the class closed out. However, that would be an excellent project for anyone else developing their own Pico synthesizer. If you whip up something that sounds good, or even just interesting, be sure to notify us on the tipsline. Video after the break.

Continue reading “Raspberry Pi Pico Becomes MIDI-Compatible Synth”

$30 Guitar Build Shows What You Can Do With Amazon Parts

Most guitarists buy their axes fully assembled from big names like Fender, Gibson, and… maybe Yamaha? Sure. But there are a dedicated set that relish in mixing and matching parts and even building and assembling their own instruments. [Danny Lewis] decided to see what he could do with the cheapest guitar parts from Amazon and a body of his own design, and he put together something pretty passable for just $30.

The wood for the body was cut on a bandsaw, and was essentially free scrap sourced from old furniture. [Danny] went for an unconventional design using a roughly Telecaster outline and large cutouts either side of the bridge. The neck was free, by virtue of being an old Harmony neck sourced off Craigslist. We’d have preferred to see what could be done with a cheap Amazon neck, but it nonetheless fits the vibe of the build.

The guitar then received a $9.99 pickup and controls, an $8.80 solidtail bridge, and $11 tuning machines for the headstock. Strung up, it actually sounds passable. We’d want to throw it on a proper amp and give the whole thing a setup before fully assessing it, but hey, for $30, it’s hard to go wrong.

We do love some hacky guitars around here; we’ve even featured some with surprise effects gear built into the bodies. Video after the break.

Continue reading “$30 Guitar Build Shows What You Can Do With Amazon Parts”

Ultra-Basic Thermal Camera Built Using Arduino Uno

Thermal cameras can cost well into the five-figure range if you’re buying high-resolution models with good feature sets. New models can be so advanced that their export and use is heavily controlled by certain countries, including the USA. If you just want to tinker at the low end, though, you don’t have to spend a lot of scratch. You can even build yourself something simple based on an Arduino Uno!

The build uses Panasonic’s cheap “Grid-EYE” infrared array as the thermal sensor, in this case, a model with an 8×8 array of thermopiles. It’s not going to get you any fancy images, especially at long range, but you can use it to get a very blocky kind of Predator-vision of the thermal radiation environment. It’s a simple matter of hooking up the Grid-EYE sensor to the Arduino Uno over I2C, and then spitting out the sensor’s data in a nice visual form on a cheap TFT screen.

It’s a great introduction to the world of thermal imaging. There’s no better way to learn how something works by building a working example yourself. We’ve featured a few similar projects before, too; it’s all thanks to the fact that thermal sensors are getting cheaper and more accessible than ever!

Giant Demonstrator Explains How DLP Projectors Work

Texas Instruments developed digital mirror devices, and the subsequent digital light processing (DLP) projector, starting in the late 1980s. The technology is a wondrous and fanciful application of micro-scale electronics and optics. Most of us that have tangled with these devices have had to learn their mode of operation from diagrams and our own imagination. But what if you just built one at a large enough scale that you could see how it worked? Well, [jbumstead] did just that!

A real Digital Micromirror Device (DMD) consists of hundreds of thousands of mirrors, which would be impractical to recreate. This build settles for a simpler 5×5 array made using half-inch square mirrors. It uses solenoids to move each individual mirror between a flat and angled position to create the display. The solenoids are all under the command of an Arduino Mega which controls the overall state of the display and shows various patterns.

It’s not perfect, with the mirrors not quite matching in angles at all times, but it demonstrates the concept perfectly well. When you see it in action with light bouncing off it, you can easily understand how this could be used to make a display of many thousands of pixels in a projector arrangement. We’ve featured some other DLP hacks before, too, so dive in if you’re interested.

Continue reading “Giant Demonstrator Explains How DLP Projectors Work”

VU Meter Built With Neat Graphical VFD Display

VFD displays are beloved for their eerie glow that sits somewhere just off what you’d call blue. [mircemk] used one of these displays to create an old-school VU meter that looks straight out of a 1970s laboratory. 

The build uses an Arduino Nano as the brains of the operation, which uses its analog inputs to process incoming audio into decibel levels for display on a VU meter. It’s then charged with driving a GP1287 VFD display. Unlike some VFDs that have preset segments that can be illuminated or switched off, this is a fully graphical dot matrix display that can be driven as desired. Thus, when it’s not acting as a bar graph VU meter, it can also emulate old-school moving-needle meters. Though, it bears noting, the slow updates the Arduino makes to the display means it’s kind of like those dodgy skeumorphic music apps of the 16-bit era; i.e. it’s quite visually jerky.

Overall, it’s a neat project that demonstrates how to work with audio, microcontrollers, and displays all in one. We’ve featured other projects from [mircemk] before, too, almost all of which appear in the same blue and grey project boxes. Video after the break.

Continue reading “VU Meter Built With Neat Graphical VFD Display”