A Transparent 7-Segment Display

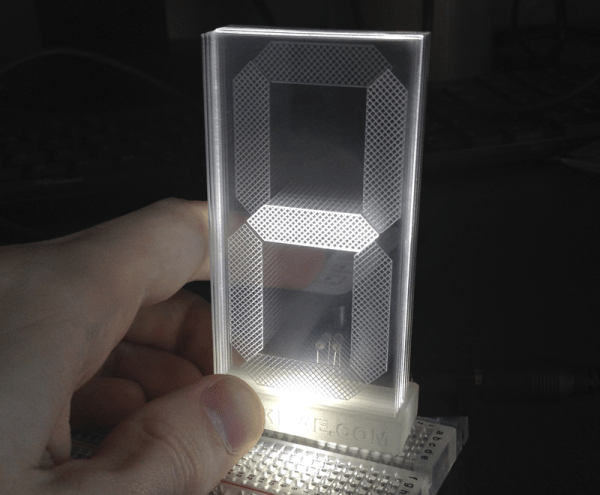
Though [Connor] labels it as a work in progress, we’re pretty impressed with how polished his transparent 7-segment display looks. It’s also deceptively simple.

The build uses a stack of seven different acrylic panes, one in front of the other, each with a different segment engraved onto its face. The assembly of panes sits on a small mount which is placed over seven rows of LEDs, with 5 LEDs per row. [Connor] left an air gap between each of the seven individual acrylic panes to clearly distinguish which was lit and to match the separation of the LED rows. To display a number, he simply illuminates the appropriate LED rows, which scatter light across the engraved part without spilling over into another pane.

You can find a brief overview and some schematics on [Connor’s] website, and stick around for the video demonstration below. We’ve featured [Connor’s] work before; if you missed his LCD data transfer hack you should check it out!

Continue reading “A Transparent 7-Segment Display”

A Blindingly Bright Larson Scanner

craylarsonscanner

This hulking monument to illumination is [DJJules’s] 6-foot-long Ultimate Larson Scanner. If you’re scratching your head in confusion, the Larson Scanner is the ever-popular scrolling LEDs seen on KITT (the car) from Knight Rider and on Cylons in Battlestar Galactica (1978), named after the creator of the series.

[DJJules’s] iteration consists of sixteen 10W LEDs, each mounted on a heat sink which bolt on to a 6′ long piece of angle aluminum sourced from a local hardware store. He used a basic MOSFET constant current driver for each LED, attaching the MOSFETS to the heat sink with 4-40 screws. Each LED module then connects to a TLC5940 LED driver breakout board from Sparkfun, which plugs into an Arduino Pro Mini.

Check out the Instructables page for the source code and other important details, including safely powering the build (the LEDs can draw around 1A each), then grab your sunglasses and stick around for a quick video below.

Continue reading “A Blindingly Bright Larson Scanner”

The Geek Group Installs Robot, Destroys CRT Monitor

GEEKSMASH

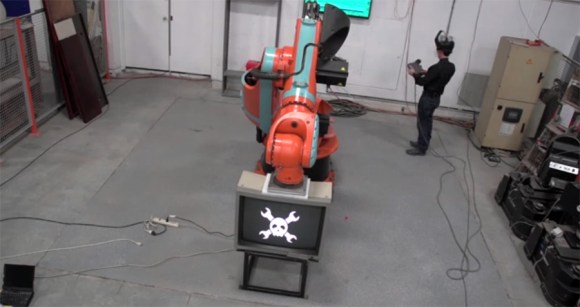
The Geek Group recently documented the process of overhauling part of their workspace to accommodate Project Jeff, a massive KUKA KR-350/1 industrial robot.

We don’t see many behind the scenes industrial-scale projects here at Hackaday, but we’re definitely impressed with the clever techniques employed to pull off this precision install. At around 5 inches deep, the original floor was far too thin to handle the weight and tortional loads imposed by Project Jeff, so The Geek Group carved out a 15′ square space of old concrete and dumped it piece by piece in the rubbish. They then dug a new hole to a depth of 2.5′ and filled it with a fresh pour that amounted to 67,500 pounds of concrete. Sheesh.

That concrete will inevitably expand and move around, which meant installing a pool-noodle-looking slip cover to protect a buried conduit from damage, as well as placing some gaskets around the edges to prevent cracking while maintaining a seal. Around 10 minutes into the video, they tackle the challenge of embedding bolts that connect to the robot’s base; it takes some patience and creative ladder positioning to fit the template in the correct position.

As an added treat, The Geek Group smashed a CRT monitor in our honor, and while they claim software limitations and a steel frame prevented Project Jeff from completely annihilating the monitor, we like to think the skull and cross-wrenches just refused to be destroyed. Because, you know, science. Videos after the break.

Continue reading “The Geek Group Installs Robot, Destroys CRT Monitor”

Hacking And Philosophy: Surveillance State

hnpss

If you don’t live under a rock (though you may want to now) you probably saw yesterday’s article from Spiegel that revealed the NSA has its own catalog for spy gadgets. Today they released an interactive graphic with the catalog’s contents, and even if you’re not a regular reader of Hacking & Philosophy, you’re going to want to take a look at it. I recommend glancing over IRATEMONK, in the “Computer Hardware” category. As the article explains, IRATEMONK is

An implant hidden in the firmware of hard drives from manufacturers including Western Digital, Seagate, Maxtor and Samsung that replaces the Master Boot Record (MBR).

It isn’t clear whether the manufacturers are complicit in implanting IRATEMONK in their hardware, or if the NSA has just developed it to work with those drives. Either way, it raises an important question: how do we know we can trust the hardware? The short answer is that we can’t. According to the text accompanying the graphic, the NSA

…[installs] hardware units on a targeted computer by, for example, intercepting the device when it’s first being delivered to its intended recipient, a process the NSA calls ‘interdiction.’

We’re interested to hear your responses to this: is the situation as bleak as it seems? How do you build a system that you know you can trust? Are there any alternatives that better guarantee you aren’t being spied on? Read on for more.

Continue reading “Hacking And Philosophy: Surveillance State”

Vibe Mirror

FLRGC76HP7M9BLI.LARGE

We love a good art-related project here at Hackaday, and [Wolfgang’s] vibrating mirror prototype is worth a look: into its distorting, reflective surface, of course.

[Wolfgang] began by laser cutting nine 1″ circles from an 8″ square mirror, then super glued a 1/4″ neoprene sheet to the back of the square, covering the holes. Each circular cutout received some custom acrylic backings, glued in place with a short piece of piano wire sticking out of the center. The resulting assemblage pushes through the neoprene backing like a giant thumbtack, thus holding all nine circular mirrors in place without restricting movement. The back end of the piano wire connects to yet another piece of acrylic, which is glued to a tiny vibrating motor.

He uses some shift registers and an Arduino Uno to control the motors, and although there’s no source code to glance it, we’re guessing [Wolfgang] simply designed the nine mirrors to buzz about in different patterns and create visually interesting compositions. Check out a quick video of the final effect after the break, and if you can help [Wolfgang] out with a name for his device, hit us up with your suggestions in the comments.

Continue reading “Vibe Mirror”

More Lights For Your Presents

presLights

Lights on the tree? Check. Presents under the tree? Check. Lights in the presents? Why not! If your gifts don’t look festive enough and you have a spare inductive charging system lying around the house—though, you could always build your own from scratch—you can brighten things up by installing a few LEDs in the packaging.

The Instructable takes advantage of those new-fangled LED Christmas lights, one strand of which typically draws under 1A and requires around 5V, putting it in the ballpark for popular induction systems used to charge cell phones such as the Powermat. In this particular example, the strand ran off 3 AA batteries, or 4.5V, which meant stepping down the voltage either with a power regulator or, more conveniently, a simple diode in series.

Some additional modifications to the packaging tidy up the installation, including carving out some of the cardboard to recess the receiver and securing everything with hot glue before wrapping it all in paper. You can see a quick demonstration video below.

Continue reading “More Lights For Your Presents”

Serializing Dickens To LEDs

ch00fmas12

[ch00f] managed to capture some holiday spirit this year by translating all of A Christmas Carol to scrolling text. Dickens’s work has long since entered public domain, which led [ch00f] to wire up a GeekCatch programmable display from Amazon. It has a low refresh rate, which means videos look a bit goofy, but it’s perfectly acceptable for text. [ch00f] ditched the remote control and instead used the display’s serial connection to program in the novella. Unfortunately, he could not find any documentation for the serial protocol, but he was able to reverse engineer it with some freeware applications found online.

It takes over six hours for the sign to spit out the entirety of A Christmas Carol, which easily surpassed the display’s limited text buffer. [ch00f] instead had to send text to the display one paragraph at a time via a custom Python script. This solution takes advantage of the sign’s fixed-width font to estimate the time it takes for each character to scroll by, then immediately feeds the sign a new line.

Check out the blog post for a quick teardown of the display itself and for a detailed description of the protocol in case you decide to use this display for a project. Stick around for a video below!

Continue reading “Serializing Dickens To LEDs”