A FPGA Controlled Reflow Oven

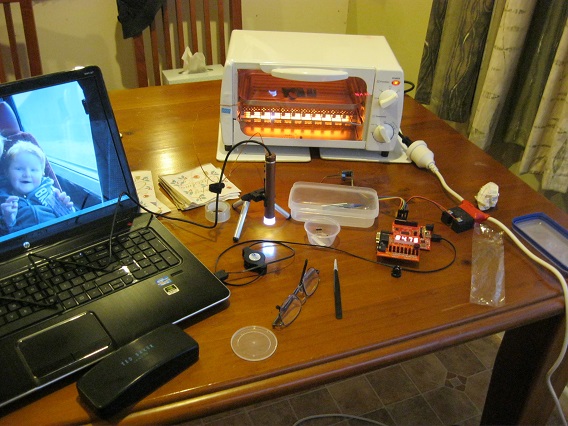
For Christmas, [Hamster]’s wife gave him a mini-oven. Later that day, he tore it apart and built this FPGA controlled reflow oven.

We’ve seen plenty of reflow oven builds in the past. Most of those projects use a microcontroller to do closed loop control, sensing the temperature and toggling the heating element to hit a set point. This build uses the Papilo One FPGA development board as a controller. It implements a state machine that meets the reflow profile of the solder paste, ensuring SMD components are soldered properly.

The oven uses a MAX31855 to read temperature from a thermocouple. This device provides amplification, cold junction compensation, and analog to digital conversion which spits out the temperature over SPI. To control the heater, a 40A solid state relay is used.

The VHDL code that drives this oven is linked in the writeup, and has some interesting bits for those looking to experiment with FPGAs. It includes an SPI interface, display driver, and the temperature state machine logic.

Fubarino Contest: Micro Voltmeter

recorte

This collection of hardware is a diy voltmeter. It can measure up to 17V with 1 microvolt resolution while taking seven samples per second. The LTC2400 ADC board is used to make the measurements, with the Arduino processing the output and taking care of the display and user input buttons.

In addition to showing off what the thing can do in the video after the break, [Luis] gives us a look at the easter egg he added to the project. When you have a source that is very precisely 12V, the meter will read out Hackaday.com!

Incidentally the display used in this hack is one we’ve seen before. Obviously this is a convenient way to add interactive controls to your projects.


This is an entry in the Fubarino Contest for a chance at one of the 20 Fubarino SD boards which Microchip has put up as prizes!

Continue reading “Fubarino Contest: Micro Voltmeter”

Vibe Mirror

FLRGC76HP7M9BLI.LARGE

We love a good art-related project here at Hackaday, and [Wolfgang’s] vibrating mirror prototype is worth a look: into its distorting, reflective surface, of course.

[Wolfgang] began by laser cutting nine 1″ circles from an 8″ square mirror, then super glued a 1/4″ neoprene sheet to the back of the square, covering the holes. Each circular cutout received some custom acrylic backings, glued in place with a short piece of piano wire sticking out of the center. The resulting assemblage pushes through the neoprene backing like a giant thumbtack, thus holding all nine circular mirrors in place without restricting movement. The back end of the piano wire connects to yet another piece of acrylic, which is glued to a tiny vibrating motor.

He uses some shift registers and an Arduino Uno to control the motors, and although there’s no source code to glance it, we’re guessing [Wolfgang] simply designed the nine mirrors to buzz about in different patterns and create visually interesting compositions. Check out a quick video of the final effect after the break, and if you can help [Wolfgang] out with a name for his device, hit us up with your suggestions in the comments.

Continue reading “Vibe Mirror”

Chameleon Emulates Contactless Smart Cards

chameleon

Researchers at Ruhr University of Bochum in Germany have been busy working with RFID and related devices for quite some time now. They call the fruit of their labors Chameleon, a versatile Contactless Smart Card Emulator. Contactless Smart Cards are RFID style devices that also contain a smart card style memory. These cards are often used for payment, replacing mag strip style credit cards. Philips MIFARE Classic cards are a common example of contactless smart cards. The Chameleon is set up to emulate any number of cards using the common 13.56MHz frequency band. Adding a new card is as simple as loading up a new CODEC  and application to the firmware. Currently Chameleon can emulate MIFARE cards using the ISO14443A.

The Chameleon is completely open source, and can be built for around $25 USD. The heart of the system is an Atmel ATxmega192A3 microcontroller. The 192 is a great microcontroller for this task because it contains hardware accelerators for both DES and AES-128. An FTDI USB interface chip is used to provide an optional communication link between a host computer and the ATxmega. The link can be used for debugging, as well as manipulating data in real-time. A host PC is not necessary for use though – the Chameleon will operate just fine as a stand alone unit. We definitely like this project – though we’re going to be doubling down on the shielding in our RF blocking wallets.

Making An ARM Powered MIDI Synthesizer

What you see in the picture above is a hand-made 4-oscillator synthesizer with MIDI input, multi-mode filter and a handful of modulation options. It was built by [Matt], an AVR accustomed electronics enthusiast who made an exception to his habits for this project. The core of the platform is a DIP packaged 32-bit Cortex-M0 ARM processor (LPC1114), stuffed with ‘hand’ written assembly code and compiled C functions. With a 50MHz clock speed, the microcontroller can output samples at 250kHz on the 12bit DAC while being powered by 3 AA batteries.

Reading [Matt]’s write-up, we discover that the firmware he created uses 4 oscillators (sawtooth or pulse shape) together with a low frequency oscillator (triangle, ramp, square, random shapes). It also includes a 2-pole state-variable filter and the ability to adjust the attack-release envelopes (among others). The system takes MIDI commands from a connected device. We embedded videos of his creation in action after the break.

Continue reading “Making An ARM Powered MIDI Synthesizer”

Fubarino Contest: Custom Mech Warrior Online Controller

fubarino-contest-mech-warrior-online-controller

Twenty-two keys, a push button, three flip-switches, and a touch screen all let [Dominic] take his Mech Warrior Online game to the next level. He found that there are so many key bindings in the game it ends up being a huge pain to try to adapt his behavior to a static keyboard layout. Not only does the controller give him a specialized keypad, but he designed the touch screen interface to act as on-the-fly remapping. It even looks like something that would be mounted in a Battle Mech cockpit! What we can’t understand is why he didn’t tell us about this sexy peripheral hack much sooner?

What finally prompted him to tip us off about his project was the Fubarino Contest. Above you can see the easter egg he added to the controller. When the bottom five buttons on the touch screen are mapped to “31337” (aka “elite) the Teensy 3.0 board that drives the controller will automatically load up Hackaday in his browser.


This is an entry in the Fubarino Contest for a chance at one of the 20 Fubarino SD boards which Microchip has put up as prizes!

Continue reading “Fubarino Contest: Custom Mech Warrior Online Controller”

The Magnetophone

The Magnetophone

The Magnetophone is the latest electro-acoustic instrument from [Aaron Sherwood]. This tower contains 14 strings, and 14 hand-wound electromagnets. By energizing each electromagnet with a square wave, the strings can be vibrated to create music.

The brains of the device consist of an Arduino Mega attached to the top of the tower. The microcontroller has 6 timers, which allows for 6 notes to play at the same time. An open source tone library was used to generate square waves at the correct frequencies. These square waves are amplified by LM386 based circuits, which provide enough power to the coil to oscillate the string. By using square waves at specific frequencies, overtones of strings can be created.

This isn’t the first time we’ve seen [Aaron] combine strings and electronics. His Glockentar used solenoids to strike strings. However, this project provides new possibilities by allowing the rate of oscillation to be controlled precisely. You can see the instrument in action after the break.

Continue reading “The Magnetophone”