At the Houston Museum of Natural Science they recently made a disturbing discovery: their Foucault pendulum had stopped swinging for the first time since its installation in the 1970s. (Video, embedded below.)
While some might take this as yet another sign of the end times, here it is simply a sign that the electromagnetic system that kicks the pendulum developed a fault and will need to be fixed.
Their explainer video of this Herzstein Foucault pendulum is also worth watching, as it explains both the underlying physics and this particular pendulum’s construction. Every 48 hours the 81.6 kg heavy pendulum completes a full rotation, like clockwork, with pins along the circumference being tipped over one by one as the pendulum precesses.
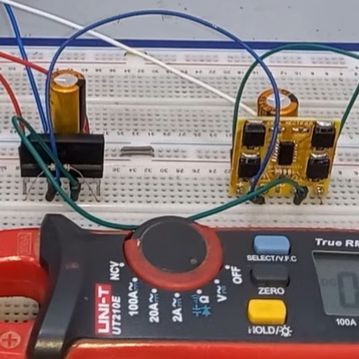
Everyone loves a full-wave bridge rectifier, but there’s no denying that they aren’t 100% efficient due to the diode voltage drop. Which isn’t to say that with some effort we cannot create an ideal bridge rectifier using active components, as demonstrated by [Mousa] with an active bridge circuit. This uses the NXP TEA2208T active bridge rectifier controller, along with the requisite four MOSFETs.
Comparing a diode bridge rectifier with an active bridge rectifier. (Credit: Mousa, YouTube)
Taking the circuit from the datasheet, a PCB was created featuring four FDD8N50NZ MOSFETs in addition to the controller IC. These were then compared to a diode-based bridge rectifier, showing the imperfections with the latter when analyzing the output using an oscilloscope.
As expected, the active rectifier’s output was also one volt higher than the diode bridge rectifier, which is another small boost to overall efficiency. According to NXP’s product page, there’s about a 1.4% efficiency gain at 90 VAC, with the chip being promoted for high-efficiency operations. When you consider that many designs like computer PSUs feature one or more diode bridge rectifiers often strapped to heatsinks, the appeal becomes apparent. As for [Mousa], he put this particular board in his laboratory PSU instead of the diode bridge rectifier, because why not.
Perhaps the biggest impediment to using an active rectifier is the cost, with the TEA2208T coming in at $4 on DigiKey for a quantity of 100, in addition to the MOSFETs, PCB, etc. If power efficiency isn’t the goal, then some wasted power and an aluminium heatsink is definitely cheaper.
Physics simulations using classical mechanics is something that’s fairly easily done on regular consumer hardware, with real-time approximations a common feature in video games. Moving things to the quantum realm gets more complex, though with equilibrium many-body systems still quite solvable. Where things get interesting is with nonequilibrium quantum systems.
These open systems are subject to energy gains and losses that disrupt its equilibrium. The truncated Wigner approximation (TWA) is used as a semi-classical method to solve these, but dissipative spin systems proved tricky. Now however [Hosseinabadi] et al. have put forward a TWA framework (PR article) for driven-dissipative many-body dynamics that works on consumer hardware.
Naturally, even with such optimizations there is still the issue that the TWA is only an approximation. This raises questions such as about how many interactions are required to get a sufficient level of accuracy.
Using classical computers to do these kind of quantum physics simulations has often been claimed to the ideal use of qubit-based quantum computers, but as has been proven repeatedly, you can get by with a regular tensor network or even a Commodore 64 if you’re in a pinch.
The brushless DC-powered compressor. (Credit: Hyperspace Pirate, YouTube)
When you think of air conditioners, you tend to think of rather bulky units, with the window-mounted appliances probably among the most compact. There’s however no real minimum size limit to these AC units, as long as you can get an appropriate compressor. If you also manage to pick up a small, DC-powered compressor like [Hyperspace Pirate] did, then you might be tempted to make a hand-portable, battery-powered AC unit.
At their core vapor-compression AC units are very simple, featuring the aforementioned compressor, a condensing coil, expansion valve and the evaporator coil. Or in other words, some radiators looted out of other devices, various plumbing supplies and the refrigerant gas to charge the AC unit with.
Since the compressor uses a BLDC motor, it has three terminals that a typical ESC connects to, along with two 2200 mAh Li-on battery packs that can keep the portable AC unit running for a while.
As for the refrigerant gas, although the compressor lists R134a, this is both quite expensive and illegal in parts of the world like the EU. Alternatives are butane (R600) as well as isobutane (R600a), but due to unfortunate circumstances the use of propane (R290) was forced. Fortunately this worked fine, and after some testing and running of numbers it was found that it had about 42 Watt cooling power, with a coefficient of performance (COP) of around 1.
Considering that most AC units have a COP of 3.5 – 5, this shows that there’s still some room for increased efficiency, but at the very least this portable, battery-powered AC unit provides cold air on one side, and hot air on the other while completely blowing Peltier thermocouples out of the water in terms of efficiency.
Optical Character Recognition (OCR) forms the bridge between the analog world of paper and the world of machines. The modern-day expectation is that when we point a smartphone camera at some characters it will flawlessly recognize and read them, but OCR technology predates such consumer technology by a considerable amount, with IBM producing OCR systems as early as the 1950s. In a 1960s promotional video on the always delightful Periscope Film channel on YouTube we can get an idea of how this worked back then, in particular the challenge of variable quality input.
What drove OCR was the need to process more paper-based data faster, as the amount of such data increased and computers got more capable. This led to the design of paper forms that made the recognition much easier, as can still be seen today on for example tax forms and on archaic paper payment methods like checks in countries that still use it. This means a paper form optimized for reflectivity, with clearly designated sections and lines, thus limiting the variability of the input forms to be OCR-ed. After that it’s just a matter of writing with clear block letters into the marked boxes, or using a typewriter with a nice fresh ink ribbon.
These days optical scanners are a lot more capable, of course, making many of such considerations no longer as relevant, even if human handwriting remains a challenge for OCR and human brains alike.
It’s no surprise that NVIDIA is gradually dropping support for older videocards, with the Pascal (GTX 10xx) GPUs most recently getting axed. What’s more surprising is the terrible way that this is being handled by certain Linux distributions, with Arch Linux currently a prime example.
On these systems, updating the OS with a Pascal, Maxwell or similarly unsupported GPU will result in the new driver failing to load and thus the user getting kicked back to the CLI to try and sort things back out there. This issue is summarized by [Brodie Robertson] in a recent video.
Here the ‘solution’ is to switch to a legacy option that comes from the Arch User Repository (AUR), which feels somewhat sketchy. Worse is that using this legacy option breaks Steam as it relies on official NVIDIA dependencies, which requires an additional series of hacks to hopefully restore this functionality. Fortunately the Arch Wiki provides a starting point on what to do.
It’s also worth noting that this legacy driver on the AUR is being maintained by [ventureo] of the CachyOS project, whose efforts are the sole reason why these older NVIDIA cards are still supported at all on Linux with the official drivers. While there’s also the Nouveau driver, this is effectively a reverse-engineering project with all of the problems that come with such an effort, even if it may be ‘good enough’ for older GPUs.
Perhaps the most beautiful aspect of mathematics is that it applies to literally everything, even things that do not exist in this Universe. In addition to this there are a number of alternative ways to represent reality, with Fourier space and its related transforms being one of the most well-known examples. An alternative to Euclidian vector space is called Hilbert space, as a real or complex inner product space, which is used in e.g. mathematical proofs. In relation to this, [Eli Bendersky] came up with the idea of treating programming language functions as vectors of a sort, so that linear algebra methods can be applied to them.
Of course, to get really nitpicky, by the time you take a function with its arguments and produce an output, it is no longer a vector, but a scalar of some description. Using real numbers as indices also somewhat defeats the whole point and claim of working in a vector space, never mind Hilbert space.
As with anything that touches upon mathematics there are sure to be many highly divisive views, so we’ll leave it at this and allow our esteemed readers to flex their intellectual muscles on this topic. Do you think that the claims made hold water? Does applying linear algebra to every day functions make sense in this manner, perhaps even hold some kind of benefit?