silver-ink-on-glass

DIY Conductive Ink Lets You Freehand Circuits On The Cheap

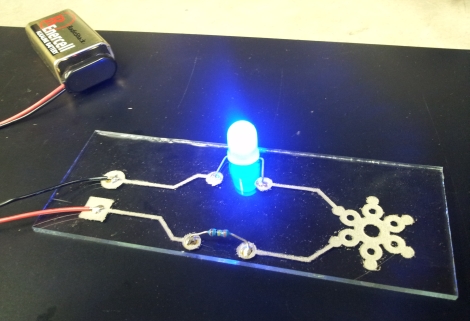
[Jordan] likes the flexibility that conductive inks offer (dead link, try Internet Archive) when putting together electronic circuits, but says that they are often too expensive to purchase in decent quantities, and that they usually require substrate-damaging temperatures to cure. After reading a UIUC Materials Research Lab article about making conductive ink that anneals at relatively low temperatures, he decided to give it a shot.

[Jordan] started out by picking up various chemicals and lab supplies online, setting up shop at Pumping Station: One. The process is pretty straightforward, and seems like something just about anyone who took high school chemistry can manage. That said, he does note that some of the chemicals, such as Formic Acid, can be quite painful if mishandled.

After just a few minutes of work and about 12 hours waiting time, [Jordan] had himself a decently-sized vial of conductive ink. He tried it out on a few different substrates with varying results, and in the end found that etched glass made the best circuits. He says that there are plenty of experiments to try, so expect even more helpful info from him in the near future.

[via Pumping Station: One]

Autonomous Metal Detector Lets You Sit Back, Get Rich

thunderbird7-autonomous-metal-detector

As a kid, metal detectors seemed like great fun. Every commercial I saw beckoned with tales of buried treasure “right in my own back yard” – a bounty hard for any kid to pass up. In reality, the process was both time consuming and tedious, with little reward to be had. [Gareth] liked the idea of scouring the Earth with a metal detector, but he liked sitting and relaxing even more. He decided he could easily partake in both activities if he built himself an autonomous metal detecting robot.

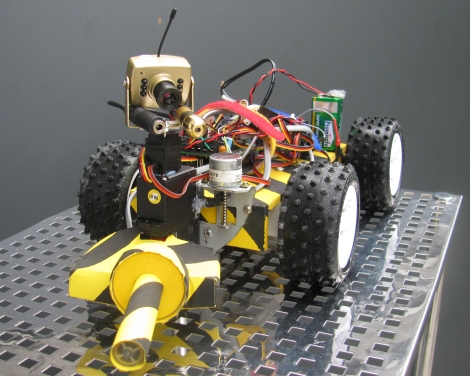
He stripped down a hand held metal detector, and installed the important bits on to the front of an R/C chassis. An Arduino controls the entire rig via a motor shield, allowing it to drive and steer the vehicle while simultaneously sweeping the metal detector over the ground. He fitted the top of the rover with a camera for remotely watching the action from the comfort of his patio, along with a laser which lets him pinpoint the location of his new found goods.

Continue reading to see a short video of the robot in action, and be sure to check out his site for more build details.

Continue reading “Autonomous Metal Detector Lets You Sit Back, Get Rich”

A TV-B-Gone With A PIC Twist

pic-tvbgone

[Kayvon] thought that the TV-B-Gone was a fun little device and wanted to build one, but he didn’t have an AVR programmer handy. Rather than picking up some AVR kit and simply building a replica, he decided to give his PIC skills a workout and build a Microchip derivative of his own.

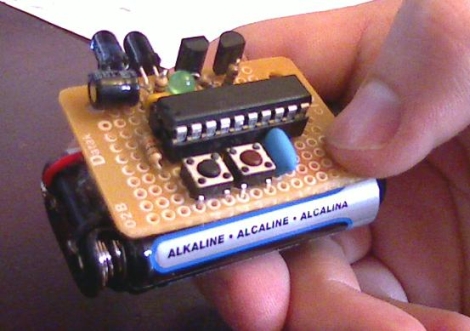
The PIC-based TV-B-Gone is pretty similar to its AVR-borne brethren, featuring a PIC24F08KA101 at the helm instead of an ATTiny. His version of the TV-B-Gone can be left on indefinitely, allowing him to situate the device in a convenient hiding place to wreak havoc for as long as he likes.

[Kayvon’s] TV-B-Gone does everything the original can at just under $7, which is quite a bit cheaper than the Adafruit kit. If you’re not averse to perfboard construction, be sure to check out the build thread over in the Adafruit forums. [Kayvon] has done most of the heavy lifting for you – all you need to do is build it.

Improving Your Flight Sim Experience With Hall Effect Sensors

hall-effect-controls

[Gene Buckle] built himself a nice custom cockpit for playing Flight Simulator, but during use he found that the gimbal he constructed for the pitch and roll controls was nearly unusable. He narrowed the problem down to the potentiometers he used to read the angle of the controls, so he set off to find a suitable and more stable replacement.

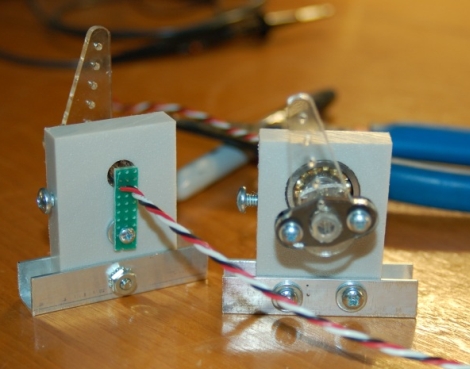
He figured that Hall effect sensors would be perfect for the job, so he picked up a pair of Allegro 1302 sensors and began fabricating his new control inputs. He mounted a small section of a pen into a bearing to use as an input shaft, attaching a small neodymium magnet to either side. Since he wanted to use these as a drop-in replacement for the pots, he had to fabricate a set of control arms to fit on the pen segments before installing them into his cockpit.

Once everything was set, he fired up his computer and started the Windows joystick calibration tool. His potentiometer-based controls used to show a constant jitter of +/- 200-400 at center, but now the utility displays a steady “0”. We consider that a pretty good result!

[Thanks, Keith]

Puncher Tracks Your Freelancing Hours, Time Spent In TSA Patdowns

freelance-puncher

[Raphael Abrams] does a lot of freelance work, but he has trouble accurately keeping track of the hours he has put in for his clients. After trying various applications and methods of logging his time, he finally decided to build a device that worked just the way he liked.

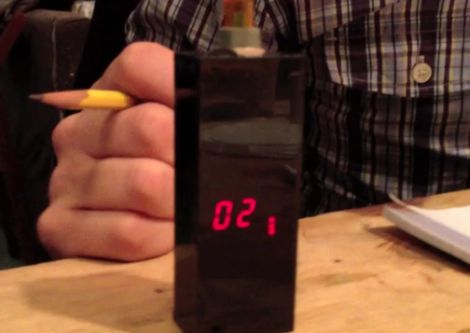
He calls his device the “Freelance Puncher”, though it already has been nicknamed the detonator, as it looks like something you would find in the hands of a [James Bond] villain. The device uses a PIC16LF1827 to track the time, saving his logged hours to the built-in EEPROM when powered off. A pair of 7-segment displays are used to display the accumulated hours upon power-on, and a set of seven SMT LEDs separated into two banks keep track of quarter and hundreds of hours worked.

[Raphael] has made his code and schematics available on Github, so you can easily replicate his work if you are looking for a better way to track your time. We think it looks great, though it could be the sort of thing that traveling freelancers might want to keep in their checked luggage, unless they want to spend some quality time with the TSA! Be sure to stick around to see a short video where [Raphael] shows off and explains how his Freelance Puncher works.

Continue reading “Puncher Tracks Your Freelancing Hours, Time Spent In TSA Patdowns”

Create PCBs In Just Minutes With This Awesome Spray Etching Machine

pcb-sprayer

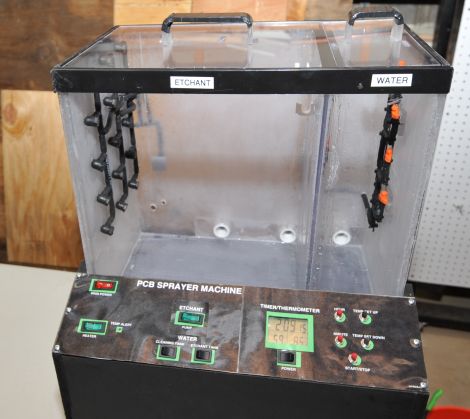
If you have ever produced your own PCBs at home, you know that it can be somewhat of a time consuming process. Spending 20 or so minutes manually agitating a board is a drag, and while aquarium bubbler setups improve the process, they are far from ideal. [Christian Reed] knew that if he really wanted to streamline his PCB production he had to emulate the big boys and build a PCB sprayer of his own.

His spray etcher is contained in a custom acrylic case built mostly of scraps from previous projects. It contains two compartments – one for spraying etchant on the PCBs, and another for rinsing the finished work. The system is impressive to say the least, featuring a maze of tubes and piping which allow him to etch boards and manage his chemicals with ease.

[Christian] says that although the parts list might seem daunting at first, it really is pretty easy to assemble the device. Seeing as he can etch and wash a board in about two minutes flat, we think that any amount of effort would be worth the results.

[Christian] points out that he was unable to find a guide for building this type of PCB sprayer anywhere online, so he documented the process in painstaking detail in order to make it as easy as possible to replicate his work. Be sure to check out the video below to see his etch tank in action – we’re pretty sure it will have you itching to build one this weekend.

Continue reading “Create PCBs In Just Minutes With This Awesome Spray Etching Machine”

ultimate-breadboard

The Ultimate Breadboard – A Prototyping Station That Has It All

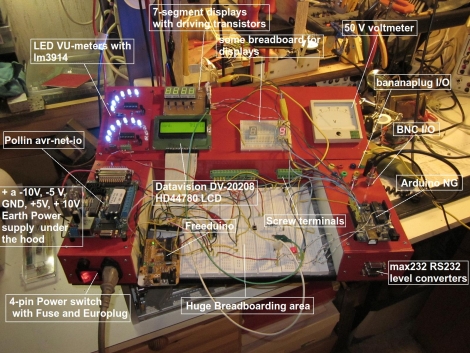
[Claudio] was working on a homebrew oscilloscope project when he started thinking about how unsuitable a standard breadboard is for a large-scale project. Rather than adding components on top of components until they became what he lovingly calls a “fragile, unforgiving crapstack”, he decided to build himself the Ultimate Breadboard.

He packed so much into his design, that it’s honestly hard to know where to begin describing it. Aside from an appropriately large breadboarding surface embedded in the center of the console, he added a power supply to the left hand side, which sits just below an Avr-Net-IO board. The right side of the console features an Arduino NG, and a pair of level converters. He also added some LED-based VU meters, a couple of 7-segment displays, an LCD display, an analog voltmeter, along with plenty of I/O connectors.

The Ultimate Breadboard might look a bit daunting at first, but it seems like an awesome setup on which to do any sort of prototyping. Be sure to check out the video below for more details and to see [Claudio] give a tour of the device.

Continue reading “The Ultimate Breadboard – A Prototyping Station That Has It All”