Securing Your Keurig With RFID

keurig-hacking

[Andrew Robinson] and his co-workers are lucky enough to have a Keurig coffee maker in their office, though they have a hard time keeping track of who owes what to the community coffee fund. Since K-Cups are more expensive than bulk coffee, [Andrew] decided that they needed a better way to log everyone’s drinking habits in order to know who needs to cough up the most cash at the end of the month.

He started by tearing down the Keurig B40, making note of the various PCBs inside while identifying the best way to go about hacking the device. The coffee maker is controlled by a PIC, and rather than try to re-engineer things from the bottom up, he left the core of the machine intact and focused on the control panel instead.

He disconnected all of the unit’s buttons from the control board, routing them through an Arduino before reconnecting them to the machine. This essentially rendered the machine inoperable unless triggered by the Arduino, giving [Andrew] control over the brewing process. He wired in an RFID reader from SparkFun, then got busy coding his security/inventory system. Now, when someone wants coffee, they merely need to swipe their office access card over the machine, which enables the use of its control panel.

As you can see in the video below the system seems to work well. If we were to offer some constructive criticism, we would suggest ditching the laptop and rolling the RFID reading/verification into the Arduino instead – other than that, we think it’s great.

Continue reading “Securing Your Keurig With RFID”

Portable Electronic Drum Kit Made From Plastic Bowls

portable-drum-kit

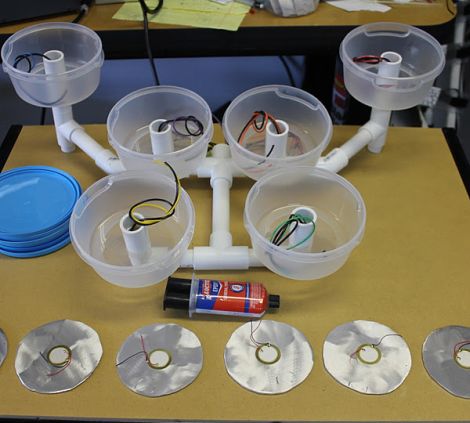
[Ian Cole’s] son is learning to play the drums on an electronic drum set, and he wanted a way to continue practicing during his frequent visits to his grandparents’ house. [Ian] had picked up a Spikenzielabs “Drum Kit Kit All-Inclusive” (DKKAI) earlier this summer, and set out to build an easily transportable drum set.

The DKKAI comes with an ATmega168-based board and a set of piezos that can be used to register hits. It was up to [Ian] to provide the rest of the kit, so he set off to IKEA in search of cheap, durable drum heads. He returned with a handful of 1/2 Liter plastic bowls, which he mounted on a PVC pipe drum stand.

The piezos were mounted on thin aluminum discs, which were in turn glued to the back side of the bowl lids. The piezos were wired to the DKKAI kit via the PVC tubing, with the signals ultimately fed into an iPad running Garage Band. [Ian] says that his portable drum set works quite well, and although there are some things that require changing, his son is very happy with his new practice set.

Check out the video below to see the portable drum kit in action.

Continue reading “Portable Electronic Drum Kit Made From Plastic Bowls”

Give Yourself A Sixth Sense On The Cheap

sixth-sense-magnetic-ring

Hackaday regular [Mikey Sklar] is no stranger to body modifications. He enjoys tweaking his body in ways that help him with day to day tasks, including a ruler tattoo on his arm and an RFID chip embedded in the web of his hand. Lately, he has been toying around with a less invasive means of getting a better feel for magnetic fields in his surroundings.

Turned on to magnetic rings by a friend, he now wears an epoxy-coated rare earth ring every day, changing the way he interacts with the world. He says that besides the obvious ability to tell when he’s near iron-heavy material, he can also feel cell phone calls, as the speaker draws the ring closer while producing sound.

He says that holding the electric cord of his tea kettle gave him the biggest start, making him feel as if he had been electrocuted, minus the actual shock.

While it’s not the most high-tech hack, [Mikey] is quite happy with the “sixth sense” this reasonably price ring has been able to provide – we just might have to try it out ourselves.

led-light-wall

Hackerspace Light Wall Plays Video At 30 Fps

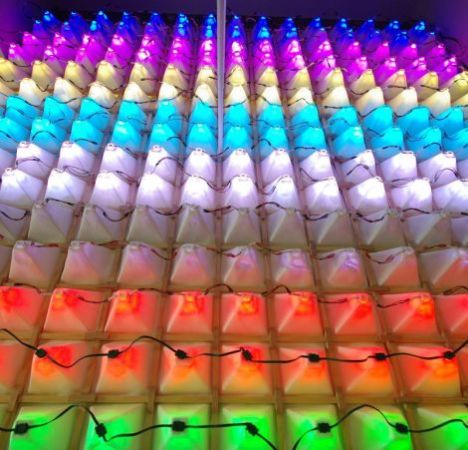
The folks at The Quad Cities Collaboration and Hackerspace (QC Co-Lab) were trying to find something to build for their first big project, and had to look no further than the wall for inspiration. The north end of their facility is home to a huge 15×17 glass block wall that happens to face a well-traveled roadway.

They decided that turning the wall into a huge LED display would be a great way to attract attention from passers-by, so they picked up some GE Color Effects lights and got down to business. Once they found out that the technical college next door was putting on an open house, the race was on to get the light display assembled as quickly as possible to maximize their exposure.

The team mounted the 255 LEDs in vacuum-formed reflective cones, which were attached to wooden frames before being installed behind the glass wall. An Arduino drives the entire display at a smooth 30 frames per second, a task they say tests the very limits of the board’s capabilities.

They finished the job in time for the open house, and as you can see in the video below, the display looks great.

Nice job QC-Co-Lab!

Continue reading “Hackerspace Light Wall Plays Video At 30 Fps”

A Very Detailed Reflow Oven Build

smd-solder-reflow-oven

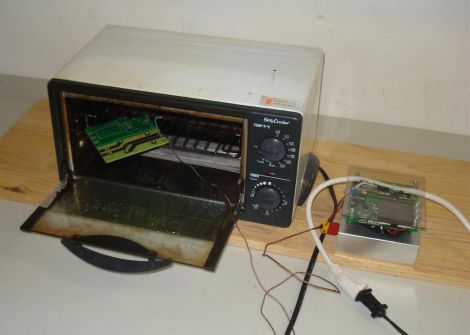
If you do a lot of SMD soldering, a reflow oven is the fastest and most efficient way to get all those tiny components attached to your PCB. [Frank Zhao] saw the reflow ovens we featured here over the last few weeks and figured he might as well show off his rig as well. We’re certainly glad he did, because his very thorough writeup is a great stepping stone for anyone looking to construct a reflow oven of their own.

Like many others, he started off with a used toaster oven, modifying it to be controlled directly via the power cable rather than the oven’s dials. He built a small PCB to regulate the oven, which features an ATmega32u4 and thermocouple to keep the temperature in check. Control of the heating element is done using a solid state relay, for which he built his own heatsink.

He studied the reflow profile of the solder he would be using, programming the microcontroller to regulate the heating/cooling process without requiring any user input, aside from turning the oven on.

Check out the video below to see a brief overview of his system, and be sure to swing by his writeup to take a look at all the build details. There are a handful of additional videos along with plenty of pictures there, walking through each step of the process.

Continue reading “A Very Detailed Reflow Oven Build”

Doomsday Keg Of Radness Helps Ring In The New Year

doomsday-keg

Lots of people buy noise makers for New Year’s eve, others opt to sing Auld Lang Syne – then there’s these guys.

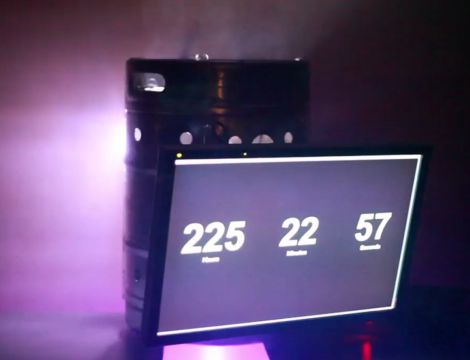
The crew at Stone Brewing Company throw an annual bash at their brewery in celebration of New Years, and while [Dino’s] countdown timer is great for intimate settings, they needed something bigger to wow the crowd. A busted half barrel was all the inspiration they needed to build the “Doomsday Keg of Radness”.

[Mike Palmer], the Creative Director at Stone handed the keg off to the maintenance crew for some remodeling, and got ready to fit it with all sorts of lights and other goodies. Holes drilled in the keg were fitted with bright pulsing LEDs, while additional LED light strips were laid out around the perimeter. The bottom was cut out to accommodate a Moonflower LED module, and a 24” monitor was strapped to the side in order to display a countdown timer. An old Macbook jammed inside the keg runs the video display, while the rest of the lighting is remotely controlled with an RF transmitter.

Now mind you this all went down last year, but since the display was such a hit, they will be busting it out again for the 2011 celebration.

Check out the short demo video below to get a look at the Doomsday Keg in action.

Continue reading “Doomsday Keg Of Radness Helps Ring In The New Year”

dinos-new-years-ball-drop

Build Your Own Mini Ball Drop For New Year’s Eve

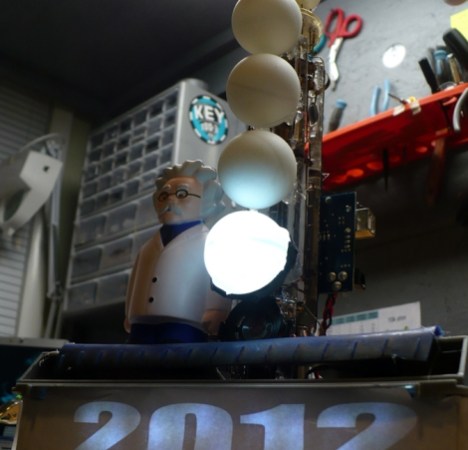
[Dino] wanted to make this New Year’s celebration a bit more interesting, but he can’t make it to New York for the ball drop. Instead, he decided to make his own mini display in his workshop. Obviously he’s working with a slightly smaller budget than the folks at Times Square, but we think his display is pretty neat. If anything, [Dino] can at least guarantee that his New Year’s is 100% Seacrest-free.

The ball drop is made up of five ping pong balls, each backlit by a 10mm LED. The LEDs and ping pong balls were mounted on the electron gun from a broken oscilloscope, giving it a cool look. The balls are lit one at a time by an Arduino, which illuminates each one for 15 seconds while the final minute of 2011 is counted down. Once midnight hits, a flashing “2012” sign illuminates while Auld Lang Syne plays from a tiny speaker.

The musical part of this build is something that [Dino] spent a lot of time on. He thoroughly explains how he translated the song from sheet music into its digital form, a process that would be helpful for beginners to watch.

Continue reading to see how the display was built, and if you’re just antsy to see the ball drop in action, a short demo can be found at 12:13.

Continue reading “Build Your Own Mini Ball Drop For New Year’s Eve”