Hackaday Prize Entry: Inexpensive Emergency Button

I’ve fallen and I can’t get up. We all remember it, and we all know what product we’re talking about. Now, with cheap microcontrollers, ubiquitous WiFi, and wearable electronics, there must be a simpler solution. [Jean Paradedel]’s emergency button project is designed to replace those wearable emergency buttons, which usually include an expensive call center plan.

[Jean]’s button is based off an ESP8266 module, which sends an email to a care provider if a button is pressed. The whole thing is powered by a CR2032 watch battery and the device’s case was 3D printed. The interface is simple — it’s just a wearable button, after all — and the form factor is small enough to be completely unobtrusive.

[Jean] reflashed the ESP8266 board with a simple sketch that runs the project. First, a button-press connects the device to WiFi and then blinks an LED so you know it’s connected. When the emergency button is pressed, an email is sent out letting a caregiver know that there’s a problem.

Check out the video below for a demo of this cheap emergency button in action.

Continue reading “Hackaday Prize Entry: Inexpensive Emergency Button”

Quick And Dirty Blimp Mount For A Shotgun Mike

Sometimes you don’t have the hardware you need, and you can either do without or let the project’s needs inspire you to create an alternative. That’s pretty sweet, and it’s even sweeter when you find a solution that’s dirt cheap.

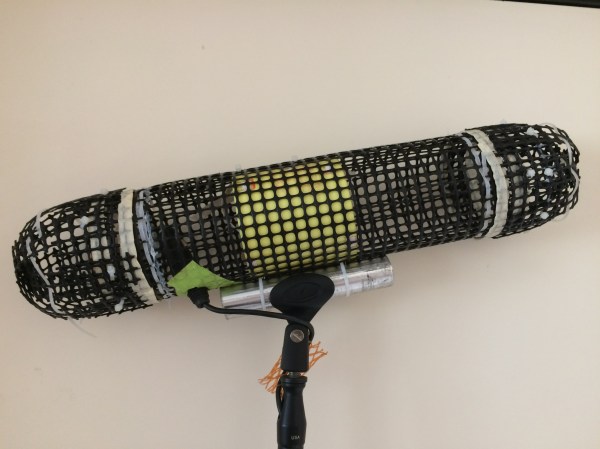
[Chu_st] created a sub-$10 blimp mount for his shotgun mike. It consists of a PVC pipe which attaches to the microphone’s shock mount. Plastic gardening grid is used for the shell, shaped by hand into the desired blimp shape and secured with zip ties and gaffer tape. [Chu_st] suggests using nylon stocking as a wind screen. The microphone itself attaches to a length of bicycle seat tube using a standard mic clamp.

For DIY microphone projects, we got you covered, with everything from a low noise floor microphone to one built out of a hard drive published previously.

Solar Tide Clock Keeps Track Of The Moon

Old fashioned tide clocks were an attempt to predict high tide by timing the rising and setting of the moon. When you looked at one you could see how many hours until the next high tide. [rabbitcreek] wanted to make his own version of the tide clock that does a better job of predicting the actual high tide than those old clocks, which were essentially glorified timers tuned to the moon’s phases.

[rabbitcreek] based his the tide prediction software off of [Luke Miller’s] Tide Clock, which applies location-specific adjustments to the standard lunar clock, taking into consideration such factors as the geographic features (basin depth, etc.) that modify the default timing. [Miller]’s Arduino code includes a library of common locations organized by NOAA station number.

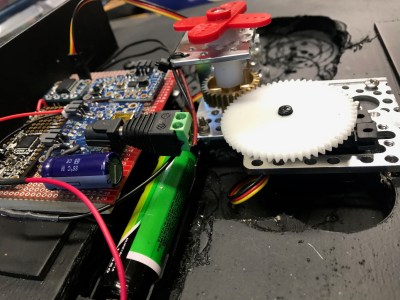
[rabbitcreek]’s project consists of a Adafruit Feather board hooked up to a DS3231 RTC breakout and a HS-225BB servo, which turns the clock’s hand. It’s an 180-degree servo, attached to a hacked-down Actobotics gearbox gearing the servo down 2:1 to permit 360 degrees of movement.

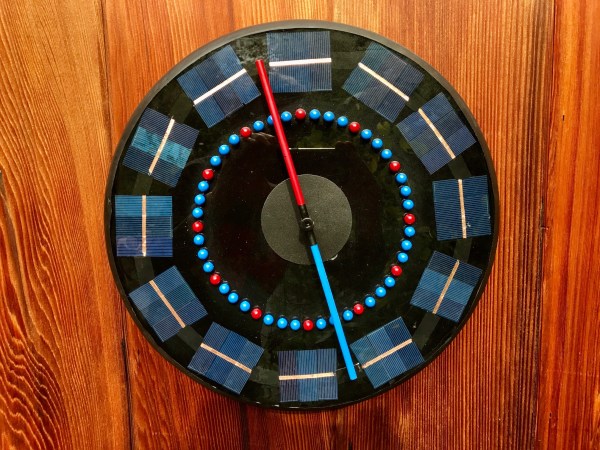
He also wanted his creation to be left to operate unattended for years, theoretically — so solar power was a natch. The face of the clock consists of individual wavers of solar panel glued into a huge clock-like array. The solar cells feed into an Adafruit PowerBoost 500, a TPL5111 low power timer breakout, and a LiPo battery for when it’s dark out.

If you’re looking for more solar clocks check out this one that uses capacitors as hour markers.

Hackaday Prize Entry: HaptiVision Creates A Net Of Vibration Motors

HaptiVision is a haptic feedback system for the blind that builds on a wide array of vibration belts and haptic vests. It’s a smart concept, giving the wearer a warning when an obstruction comes into sensor view.

The earliest research into haptic feedback wearables used ultrasonic sensors, and more recent developments used a Kinect. The project team for HaptiVision chose the Intel RealSense camera because of its svelte form factor. Part of the goal was to make the HaptiVision as discreet as possible, so fitting the whole rig under a shirt was part of the plan.

In addition to a RealSense camera, the team used an Intel Up board for the brains, mostly because it natively controlled the RealSense camera. It takes a 640×480 IR snapshot and selectively triggers the 128 vibration motors to tell you what’s close. The motors are controlled by 8 PCA9685-based PWM expander boards.

The project is based on David Antón Sánchez’s OpenVNAVI project, which also featured a 128-motor array. HaptiVision aims to create an easy to replicate haptic system. Everything is Open Source, and all of the wiring clips and motor mounts are 3D-printable.

Customizable PCB Business Card

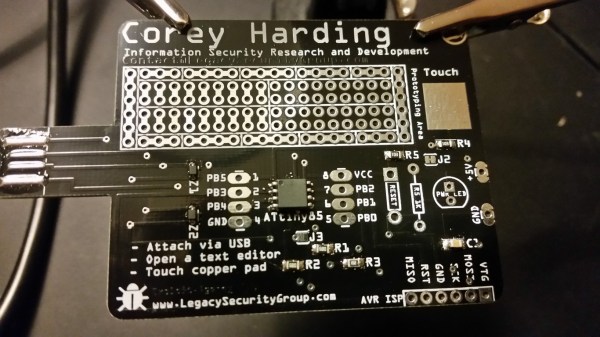
[Corey Harding] designed his business card as a USB-connectable demonstration of his skill. If potential manager inserts the card in a USB drive, open a text editor, then touches the copper pad on the PCB, [Corey]’s contact info pops up in the text box.

In addition to working as a business card, the PCB also works as a Tiny 85 development board, with a prototyping area for adding sensors and other components, and with additional capabilities broken out: you can add an LED, and there’s also room for a 1K resistor, a reset button, or break out the USB’s 5V for other uses. There’s an AVR ISP breakout for reflashing the chip.

Coolly, [Corey] intended for the card to be an Open Source resource for other people to make their own cards, and he’s providing the Fritzing files for the PCB. Fritzing is a great program for beginning and experienced hardware hackers to lay out quick and dirty circuits, make wiring diagrams, and even export PCB designs for fabrication. You can download [Corey]’s files from his GitHub repository.

For another business card project check out this full color business card we published last month.

Hackaday Prize Entry: MOLBED Braille Display

Electromechanical braille displays, where little pins pop up or drop down to represent various characters, can cost upwards of a thousand dollars. That’s where the Modular Low-cost Braille Electro Display, aka MOLBED, steps up. The project’s creator, [Madaeon] aims to create a DIY-friendly, 3D-printable,  and simple braille system. He’s working on a single character’s display, with the idea it could be expanded to cover a whole row or even offer multiple rows.

[Madeon]’s design involves using Flexinol actuator wire to control whether a pin sticks or not. He designed a “rocker” system consisting of a series of 6 pins that form the Braille display. Each pin is actuated by two Flexinol wires, one with current applied to it and one without, popping the pin up about a millimeter. Swap polarity and the pin pops down to be flush with the surface.

This project is actually [Madeon]’s second revision of the MOLBED system. The first version, an entry to the Hackaday Prize last year, used very small solenoids with two very small magnets at either end of the pole to hold the pin in place. The new system, while slightly more complex mechanically, should be easier to produce in a low-cost version, and has a much higher chance of bringing this technology to people who need it. It’s a great project, and a great entry to the Hackaday Prize.

The Narrowing Gap Between Amateur And Professional Fabrication

The other day I saw a plastic part that was so beautiful that I had to look twice to realize it hadn’t been cast — and no, it didn’t come out of a Stratysys or anything, just a 3D printer that probably cost $1,500. It struck me that someone who had paid an artisan to make a mold and cast that part might end up spending the same amount as that 3D printer. It also struck me that the little guys are starting to catch up with the big guys.

Haz Bridgeport, Will Mill

Sometimes it’s just a matter of getting a hold of the equipment. If you need a Bridgeport mill for your project, and you don’t have one, you have to pay for someone else to make the thing — no matter how simple. You’re paying for the operator’s education and expertise, as well as helping pay for the maintenance and support of the hardware and the shop it’s housed in.

I once worked in a packaging shop, and around 2004 we got in a prototype to use in developing the product box. This prototype was 3D printed and I was told it cost $12,000 to make. For the era it was mind blowing. The part itself was simplistic and few folks on Thingiverse circa 2017 would be impressed; the print quality was roughly on par with a Makerbot Cupcake. But because the company didn’t have a 3D printer, they had to pay someone who owned one a ton of cash to make the thing they wanted.

Unparalleled Access to Formerly Professional-Only Tools

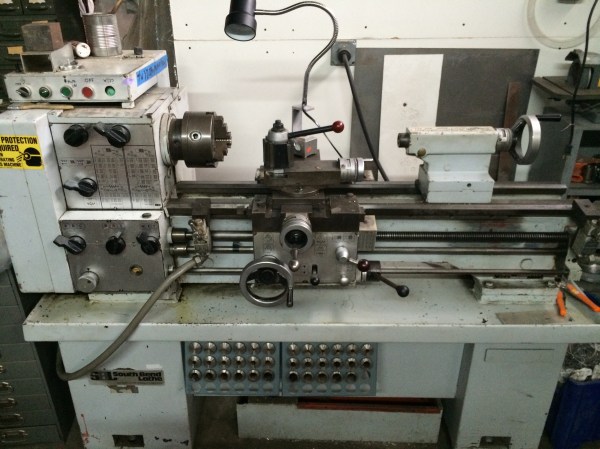
But access to high end tools has never been easier. Hackerspaces and tool libraries alone have revolutionized what it means to have access to those machines. There are four or five Bridgeports (or similar vertical mills) at my hackerspace and I believe they were all donated. For the cost of membership, plus the time to get trained in and checked out, you can mill that part for cheap. Repeat with above-average 3D printers, CNC mills, vinyl cutters, lasers. The space’s South Bend lathe (pictured) is another example of the stuff most people don’t have in their basement shops. This group ownership model may not necessarily grant you the same gear as the pros, but sometimes it’s pretty close.
Continue reading “The Narrowing Gap Between Amateur And Professional Fabrication”