Cheap, Full-Duplex Software Defined Radio With The LimeSDR

A few years ago, we saw the rise of software-defined radios with the HackRF One and the extraordinarily popular RTL-SDR USB TV tuner dongle. It’s been a few years, and technology is on a never-ending upwards crawl to smaller, cheaper, and more powerful widgets. Now, some of that innovation is making it to the world of software-defined radio. The LimeSDR Mini is out, and it’s the cheapest and most capable software defined radio yet. It’s available through a Crowd Supply campaign, with units shipping around the beginning of next year.

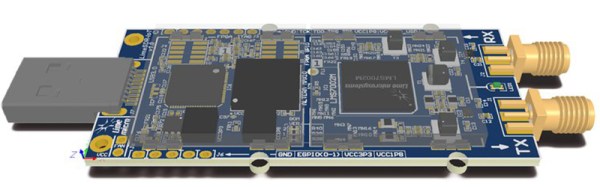
The specs for the LimeSDR mini are quite good, even when compared to kilobuck units from Ettus Research. The frequency range for the LimeSDR Mini is 10 MHz – 3.5 GHz, bandwidth is 30.72 MHz, with a 12-bit sample depth and 30.72 MSPS sample rate. The interface is USB 3.0 (the connector is male, and soldered to the board, but USB extension cables exist), and the LimeSDR is full duplex. That last bit is huge — the RTL-SDR can’t transmit at all, and even the HackRF is only half duplex. This enormous capability is thanks to the field programmable RF transceiver found in all of the LimeSDR boards. We first saw these a year or so ago, and now these boards are heading into the hands of hackers. Someone’s even building a femtocell out of a Lime board.

The major selling point for the LimeSDR is, of course, the price. The ‘early bird’ rewards for the Crowd Supply campaign disappeared quickly at $99, but there are still plenty available at $139. This is very inexpensive and very fun — on the Crowd Supply page, you can see a demo of a LimeSDR mini set up as an LTE base station, streaming video between two mobile phones. These are the golden days of hobbyist SDR.

8-Channel ADC For The Raspberry Pi

The Raspberry Pi is a powerful embedded computing platform. However, for all its Linux-based muscle, it lacks one thing that even the simplest 8-bit microcontrollers usually have – analog-to-digital conversion. There are a great many ways to rectify this shortcoming, and [Chris Burgess] has brought us another – with an 8-channel ADC for the Raspberry Pi.

For the ADC, [Chris] chose the MCP3008, for its low cost and availability. In this configuration it offers 10-bit resolution and a maximum sampling rate of 200 kilosamples per second. Adafruit has a great guide on working with the MCP3008, too. With such a useful resource to hand, [Chris] was able to spin up a PCB to interface the chip to the Raspberry Pi using SPI. [Chris] took care to try to make the board to the official HAT specifications. As far as the physical aspects go, the board is to spec, however [Chris] omitted the EEPROM required for auto-configuration purposes. That said, the pads are on the board if someone wants to take the initiative to install one.

It’s a tidy build that provides something sorely missing from the Raspberry Pi, for a reasonable cost. [Chris]’s goal was to build something that would enable the measurement of analog sensors for a robot project; we’d love to hear your ideas for potential uses in the comments!

Solar Tide Clock Keeps Track Of The Moon

Old fashioned tide clocks were an attempt to predict high tide by timing the rising and setting of the moon. When you looked at one you could see how many hours until the next high tide. [rabbitcreek] wanted to make his own version of the tide clock that does a better job of predicting the actual high tide than those old clocks, which were essentially glorified timers tuned to the moon’s phases.

[rabbitcreek] based his the tide prediction software off of [Luke Miller’s] Tide Clock, which applies location-specific adjustments to the standard lunar clock, taking into consideration such factors as the geographic features (basin depth, etc.) that modify the default timing. [Miller]’s Arduino code includes a library of common locations organized by NOAA station number.

[rabbitcreek]’s project consists of a Adafruit Feather board hooked up to a DS3231 RTC breakout and a HS-225BB servo, which turns the clock’s hand. It’s an 180-degree servo, attached to a hacked-down Actobotics gearbox gearing the servo down 2:1 to permit 360 degrees of movement.

He also wanted his creation to be left to operate unattended for years, theoretically — so solar power was a natch. The face of the clock consists of individual wavers of solar panel glued into a huge clock-like array. The solar cells feed into an Adafruit PowerBoost 500, a TPL5111 low power timer breakout, and a LiPo battery for when it’s dark out.

If you’re looking for more solar clocks check out this one that uses capacitors as hour markers.

Making A Gun Without A 3D Printer

Around four years ago the world was up in arms over the first gun to be 3D printed. The hype was largely due to the fact that most people don’t understand how easy it is to build a gun without a 3D printer. To that end, you don’t even need access to metal stock, as [FarmCraft101] shows us with this gun made out of melted aluminum cans.

The build starts off by melting over 200 cans down into metal ingots, and then constructing a mold for the gun’s lower. This is the part that is legally regulated (at least in the US), and all other parts of a gun can be purchased without any special considerations. Once the aluminum is poured into the mold, the rough receiver heads over to the machine shop for finishing.

This build is fascinating, both from a machinist’s and blacksmith’s point-of-view and also as a reality check for how easy it is to build a firearm from scratch provided the correct tools are available. Of course, we don’t need to worry about the world being taken over by hoards of angry machinists wielding unlicensed firearms. There’s a lot of time and effort that goes into these builds and even then they won’t all be of the highest quality. Even the first 3D printed guns only fired a handful of times before becoming unusable, so it seems like any homemade firearm, regardless of manufacturing method, has substantial drawbacks.

Thanks to [Rey] for the tip!

Continue reading “Making A Gun Without A 3D Printer”

Hackaday Prize Entry: HaptiVision Creates A Net Of Vibration Motors

HaptiVision is a haptic feedback system for the blind that builds on a wide array of vibration belts and haptic vests. It’s a smart concept, giving the wearer a warning when an obstruction comes into sensor view.

The earliest research into haptic feedback wearables used ultrasonic sensors, and more recent developments used a Kinect. The project team for HaptiVision chose the Intel RealSense camera because of its svelte form factor. Part of the goal was to make the HaptiVision as discreet as possible, so fitting the whole rig under a shirt was part of the plan.

In addition to a RealSense camera, the team used an Intel Up board for the brains, mostly because it natively controlled the RealSense camera. It takes a 640×480 IR snapshot and selectively triggers the 128 vibration motors to tell you what’s close. The motors are controlled by 8 PCA9685-based PWM expander boards.

The project is based on David Antón Sánchez’s OpenVNAVI project, which also featured a 128-motor array. HaptiVision aims to create an easy to replicate haptic system. Everything is Open Source, and all of the wiring clips and motor mounts are 3D-printable.

Ask Hackaday: Security Questions And Questionable Securities

Your first school. Your mother’s maiden name. Your favorite color. These are the questions we’re so used to answering when we’ve forgotten a password and need to get back into an account. They’re not a password, yet in many cases have just as much power. Despite this, they’re often based on incredibly insecure information.

Sarah Palin’s Yahoo account is perhaps the best example of this. In September 2008, a Google search netted a birthdate, ZIP code, and where the politician met her spouse. This was enough to reset the account’s password and gain full access to the emails inside.

While we’re not all public figures with our life stories splashed across news articles online, these sort of questions aren’t exactly difficult to answer. Birthdays are celebrated across social media, and the average online quiz would net plenty of other answers. The problem is that these questions offer the same control over an account that a password does, but the answers are not guarded in the same way a password is.

For this reason, I have always used complete gibberish when filling in security questions. Whenever I did forget a password, I was generally lucky enough to solve the problem through a recovery e-mail. Recently, however, my good luck ran out. It was a Thursday evening, and I logged on to check my forex trading account. I realised I hadn’t updated my phone number, which had recently changed.

Upon clicking my way into the account settings, I quickly found that this detail could only be changed by a phone call. I grabbed my phone and dialed, answering the usual name and date of birth questions. I was all set to complete this simple administrative task! I was so excited.

“Thanks Lewin, I’ll just need you to answer your security question.”

“Oh no.”

“The question is… Chutney butler?”

“Yes. Yes it is. Uh…”

“…would you like to guess?”

Needless to say, I didn’t get it.

I was beginning to sweat at this point. To their credit, the call center staffer was particularly helpful, highlighting a number of ways to recover access to the account. Mostly involving a stack of identification documents and a visit to the nearest office. If anything, it was a little reassuring that my account details required such effort to change. Perhaps the cellular carriers of the world could learn a thing or two.

In the end, I realised that I could change my security question with my regular password, and then change the phone number with the new security question. All’s well that ends well.

How do You Deal with Security Questions?

I want to continue taking a high-security approach to my security questions. But as this anecdote shows, you do occasionally need to use them. With that in mind, we’d love to hear your best practices for security questions on accounts that you care about.

Do you store your answers in a similar way to your passwords, using high entropy to best security? When you are forced to use preselected questions do you answer honestly or make up nonsensical answers (and how do you remember what you answered from one account to the next)? When given the option to choose your own questions, what is your simple trick that ensures it all makes sense to you at a later date?

We’d love to hear your best-practice solutions in the comments. While you ponder those questions, one mystery will remain, however — the answer to the question that nobody knows: Chutney butler?

Customizable PCB Business Card

[Corey Harding] designed his business card as a USB-connectable demonstration of his skill. If potential manager inserts the card in a USB drive, open a text editor, then touches the copper pad on the PCB, [Corey]’s contact info pops up in the text box.

In addition to working as a business card, the PCB also works as a Tiny 85 development board, with a prototyping area for adding sensors and other components, and with additional capabilities broken out: you can add an LED, and there’s also room for a 1K resistor, a reset button, or break out the USB’s 5V for other uses. There’s an AVR ISP breakout for reflashing the chip.

Coolly, [Corey] intended for the card to be an Open Source resource for other people to make their own cards, and he’s providing the Fritzing files for the PCB. Fritzing is a great program for beginning and experienced hardware hackers to lay out quick and dirty circuits, make wiring diagrams, and even export PCB designs for fabrication. You can download [Corey]’s files from his GitHub repository.

For another business card project check out this full color business card we published last month.