CNC Plasma Cutter Build Presented In Excruciating Detail

If you have been wondering what it takes to build a CNC Plasma Cutter then get ready to look no further. [Desert Fabworks] has documented the trials and tribulations of their CNC Plasma Cutter build. Saying it is extremely detailed would be an understatement. They cover everything from choosing components to machine setup.

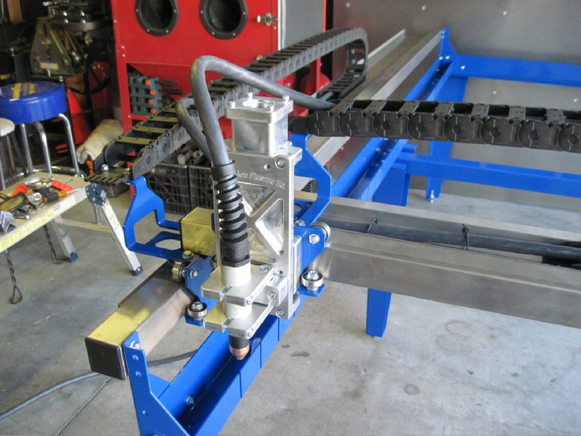
The group already had a CNC Plasma Cutter that they have outgrown. To justify the new purchase the replacement machine would have to have a few non-negotiable features: 4×8 ft cutting area, torch height control, water table, cutting up to 1/2″ steel and be easy to operate and maintain. For the frame and gantry, they settled on a Precision Plasma kit as they felt it was the best value that met their requirements. The electronics package was separate from the frame kit and was provided by CandCNC. Among other things, this package included the power supply, stepper motors, stepper drivers and the torch height controller. For the plasma cutter itself [Desert Fabworks] chose a Hypertherm Powermax65 which can cut up to an inch thick of mild steel and has swappable torches so the main unit can be used for both the CNC table and hand cuts.

Continue reading “CNC Plasma Cutter Build Presented In Excruciating Detail”

Cold Call Pop-In To The FreeSide Atlanta Hackerspace

Freeside Atlanta

I was recently in Georgia for a for a non-HaD reason. This was my first trip to Georgia and it was hot, really hot, something I’m not too accustomed too. They also have nice condition roads there, something else I’m not accustomed too. I did have some free time while down there so I hopped on hackerspaces.org to see what was around. There were several spaces that were within driving distance but Freeside Atlanta was the only one that had an open event while I was available. That was the sole reason for my decision to stop in and I’m glad that happened because I had a great time.

Freeside AtlantaNot long after entering I was greeted by a member, my new pal [Steven], who turned out to be the president of the group. After a quick exchange of pleasantries [Steven] started showing me around. My first impression was that the place was inviting. It seemed pretty big and there was little clutter. There were plenty of tables for working on your project and shelves with parts and components. These spare parts were not piled all over the shelves but were in boxes labeled with what was inside. I liked this because it was neat, tidy and it would be easy to find exactly what you were looking for. I know from experience that keeping this level of organization is hard in a community workshop environment.

Freeside AtlantaGetting back to the tour, I was shown a separate dedicated classroom that holds 16 students, complete with dry erase boards. I passed a bunch of open work areas and tables as we continued into the space. A little further down there was a lounge area with couches and a huge projection screen next to the kitchen where I enjoyed some member-baked cookies. At that point I thought I had seen the entire space, but I was wrong, there was another door along what I thought was the back wall. That is the entrance to the shop area.

The front part of the space was pretty big, the shop was at least as large. I later found out that the entire place is about 5500 sqft. They have a pretty capable wood shop with work benches, a table saw, miter saw, planner, etc, not to mention plenty of hand and power tools. Moving a little further back there is a metal shop complete with mills, lathes and welders. There’s also a little CNC Router for cutting out parts. If this wasn’t enough so far, there’s a CO2 laser cutter, which was my favorite part of the tour….

Continue reading “Cold Call Pop-In To The FreeSide Atlanta Hackerspace”

Adding Spindle Direction And Coolant Control To Your CNC Machine

CNC3020 spindle direction control and coolant system

[Peter] is back at it, again modding his CNC3020 router. This time he’s adding a coolant system and spindle direction control. If you have ever tried cutting plexiglass using a mill, router or even a band saw, then you know it is common for those plastic chips to melt together and form a crusty trail of goobers directly behind the cutting tool. Turning down the spindle speed helps a little but the intent of the coolant system is to eliminate the globular mess all together.

It appears the coolant flow is open loop, meaning the initial coolant reservoir is not replenished automatically. The coolant starts in a container and is moved via a pump through a silicone hose. At the end of the hose there is a nozzle mounted to the Z axis which points the coolant stream at the tool bit. The nozzle is plastic and made from a re-purposed and modified flux application container. [Peter] took advantage of the machine’s bed being made of slotted extruded aluminum. The bed catches the coolant which then travels down the channels to the front of the machine where it is collected in a custom made bin. The parts of this plexi bin were actually cut out using this machine! Gravity then drains the contents of this bin into another container residing at a lower altitude.

Continue reading “Adding Spindle Direction And Coolant Control To Your CNC Machine”

Miter Saw Stop Saves Time And Aggravation

V Wheel Adjustable Miter Saw Stop

Miter saws are great tools for cutting pieces of wood at a variety of angles. If you have ever cut a really long piece on a miter saw there is no doubt you’ve either propped up the extended end on a pile of scrap wood or asked someone to hold the dangling piece so you could get an accurate cut. Doing either is a little hokey and is a general pain in the butt.

[Kram242] started a project that could eliminate these problems and also provides a solution to consistent length cuts of multiple pieces. It’s an adjustable stop that is sure to make miter saw cuts much less annoying.

The rig is extremely simple and consists of a piece of aluminum extrusion, v-wheel carriage and lever-actuated clamp. The movable carriage lets the operator quickly position the stop to ensure the wood is cut at the appropriate location. This stop also makes it easy to cut several pieces of wood to the exact same length.

If we had to make any suggestions for improvements it would be to add supports to the carriage that emulate the saw bed and backstop as well as an adhesive measuring tape guide.

V Wheel Adjustable Miter Saw Stop

ATtiny84 Powered Minimalist LED Clock

LED Clock ATtiny84

We feature a lot of clock builds on HaD, and the reason is that they are cool. Even simple ones are cool. Not everyone can say they built a clock. [Chris] took a ride on the DIY Clock train and came up with this LED-based clock that is controlled by an ATtiny84 chip.

The clock has 24 LEDs total, 1 for each hour and 1 for every 5 minute increment. The 24 LEDs are arranged in 2 concentric rings. To display the hour, both LEDs at the same angle are lit up. To show the minutes, just the inner LED is lit. The main image above shows 6:40.

If you are familiar with the ATtiny84 you know that it only has 12 in/out pins, which is significantly less than the amount of LEDs that need controlling. [Chris] decided to use some 74HC595 shift registers to increase the IO pins on the ATtiny. The entire build is installed on a protoboard with quite a bit of point-to-point wiring. A simple tinted plastic case finishes the project and gives it a modern look.

[Chris] made the code for his clock available in case any readers are interested in making one.

LED Clock ATtiny84

Home Made Miter Saw Is Not Completely Dangerous

Home Made Miter Saw

If the term ‘home made miter saw’ instantly instills frightening images of severed limbs into your head, you’re not alone. A quick internet search will yield some pretty hokey tool builds, we’ve even featured a few here on hackaday. This saw is different. [Pekka] made a pretty cool saw for cutting very accurate angles in wood.

This saw was purpose built with one goal in mind: cutting wood that will be glued together for use in segmented turning. Segmented turning is shaping a piece of wood stock that is composed of many different types of wood. This results in a very visually interesting product.

Home Made Miter Saw
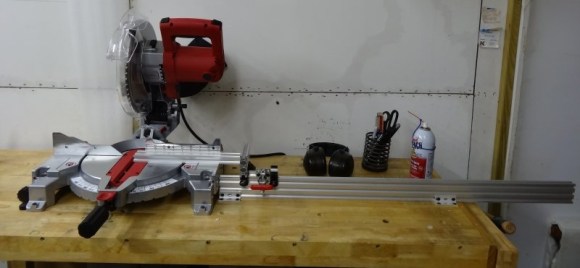
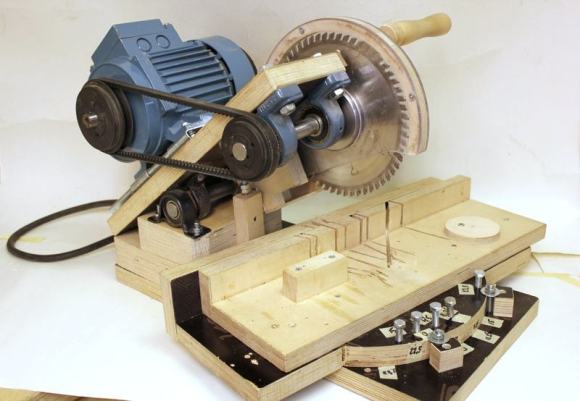
Most of the saw is made from plywood. The hinge and supports for the arbor are beefy off-the-shelf pillow blocks. A 3-phase motor with speed control transmits power to the arbor via a belt. Belt tension is adjusted by sliding the motor further back along the motor mount base. [Pekka] took care so that the entire pivoting assembly was nearly balanced adding to the ease of use.Typical miter saws rotate the blade to achieve different angles of cuts. This design rotates the saw fence.

For safety there are a pair of polycarbonate blade guards and a micro switch on the handle that won’t let the saw start unless it is depressed. The micro switch has a secondary function also, when let go it applies an electronic brake to the motor so that the spinning blade does not touch the work piece when lifting the blade back up.

Tempo Keeping Drummer Leaves Viking Ship, Now Inspires Pedallers

Bike Controlled Drum Machine

[Serdef] wrote in to tell us about a project he has recently created. It’s a drum beat generator that changes tempo depending on how fast you pedal your bike. This flies directly in the face of using music to keep your pedal timing consistent and up to speed.

The project started out with a tap-tempo drum rhythm pedal that [Serdef] had previously built. This device will generate a drum beat at a tempo corosponding with the time between 2 input signals. This type of device allows someone, say a guitarist, to quickly and easily specify the speed of the drumbeat that they are playing along with.

With the meat and potatoes of the project already figured out, the next part was to make the speed of the bike trigger the tempo of the drum beat. For the signal input, a magnet mounted on the wheel triggers a reed switch mounted on the bike fork once per wheel revolution. This is the same method of information gathering that a bicycle speedometer/odometer uses.

The business part of this project includes an Arduino that measures the speed of the wheel via the magnetic switch, adjusts the speed of the drum beat, and then sends the drum beat to a synthesizer via MIDI protocol. The synthesizer converts the MIDI signal into drum sounds amplified through a powered speaker that the rider can hear. The entire system is powered by a 9v battery and housed in a project box strapped to the bike’s handlebars.

All of the design files and Arduino code are available via [Serdef’s] excellent write up on hackaday.io in case you’re interested in making one for yourself.