Hard Drive Clock Is Simple And Elegant

Binary hard drive clock

[Aaron] has been wanting to build his own binary desk clock for a while now. This was his first clock project, so he decided to keep it simple and have it simply display the time. No alarms, bells, or whistles.

The electronics are relatively simple. [Aaron] decided to use on of the ATMega328 chips he had lying around that already had the Arduino boot loader burned into them. He first built his own Arduino board on a breadboard and then re-built it on a piece of protoboard as a more permanent solution. The Arduino gets the time from a real-time clock (RTC) module and then displays it using an array of blue and green LED’s. The whole thing is powered using a spare 9V wall wort power supply.

[Aaron] chose to use the DS1307 RTC module to keep time. This will ensure that the time is kept accurately over along period of time. The RTC module has its own built-in battery, which means that if [Aaron’s] clock should ever lose power the clock will still remember the time. The RTC battery can theoretically last for up to ten years.

[Aaron] got creative for his clock enclosure, upcycling an old hard drive. All of the hard drive guts were removed and replaced with his own electronics. The front cover had 13 holes drilled out for the LED’s. There are six green LED’s to display the hour, and seven blue LED’s for the minute. The LED’s were wired up as common cathode. Since the hard drive cover is conductive, [Aaron] covered both sides of his circuit board with electrical tape and hot glue to prevent any short circuits. The end result is an elegant binary clock that any geek would be proud of.

The Small & Cheap MiniSpartan6+

FPGA

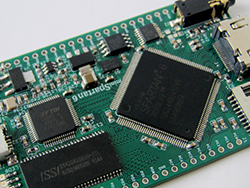
There have been quite a few boards put out in recent months with an FPGA, some RAM, Flash, and a bunch of I/O, the working theory being FPGAs are the new hotness, ready to steal the crown from Arduino and put a programmable logic development board in the hands of millions. We’re not so sure that’s going to happen. but Scarab Hardware’s miniSpartan6+ board does look pretty nice, and has more than enough on board to serve as anyone’s first FPGA platform. It’s also one of the first FPGA boards we’ve seen that is breadboard friendly. Nice touch.

This tiny board features a Spartan6 LX9 FPGA, with just under 10,000 logic cells. An FPGA platform is useless without some sort of IDE, so the Scarab Hardware folks have taken the Mojo IDE, improved the GUI, added a few libraries, and rolled everything up into a ‘not the Arduino IDE, but as simple and better’ platform.

Right now, the crowdfunding campaign for the miniSpartan6+ is well over 200% funded with a little less than a month to go. The stretch goals the team have in mind – a very likely probability, given what they’re asking – include a faster FPGA, a higher resolution ADC, and support for HDMI input and output. That last bit – HDMI input – will allow anyone to do some cool things like overlaying video with HDMI for a pretty reasonable cost.

Tennis Ball Launcher Has Puppies Running The 100m Dash

Launching Tennis Balls with Ease

[Brian] from 24 Hour Engineer has a friend with arthritis who can’t easily play ball with his new puppy — so [Brian] stepped in and built him this awesome tennis ball launcher.

You see, most tennis ball launchers require a solid flick of the wrist, and since just plain old throwing it is out of the question too, [Brian] had to make him something powerful and easy to use. After sketching out some designs he came up with the basic concept that eventually became what is pictured above.

The frame is made of 2″ PVC pipe, which serves two purposes, support, and safety. The bungee cord launching system is actually contained within the pipe, keeping it out of the way, and free from catching on anything during firing. A pair of pulleys mounted at the cord opening ensure the cord doesn’t wear out.

What we really like is the trigger mechanism [Brian] made out of some carefully cut wood,  a steel corner brace and a few nuts and bolts. It’s a simple mechanism that provides leverage and an easy way to release the bungee cord.  Continue reading “Tennis Ball Launcher Has Puppies Running The 100m Dash”

High Voltage Monitor Power Supply Conversion

Repurpose An Old CRT Computer Monitor As A High Voltage Science Project Power Supply

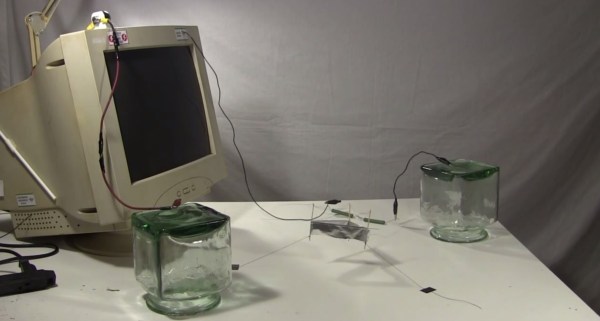
Finally somebody has found a good use for all those old CRT computer monitors finding their way to the landfills. [Steven Dufresne] from Rimstar.org steps us through a very simple conversion of a CRT computer monitor into a high-voltage power supply. Sure you can make a few small sparks but this conversion is also useful for many science projects. [Steve] uses the monitor power supply to demonstrate powering an ionocraft in his video, a classic science experiment using high voltage.

The conversion is just as simple as you would think. You need to safely discharge the TV tube, cut the cup off the high voltage anode cable and reroute it to a mounting bracket outside the monitor. The system needs to be earth grounded so [Steve] connects up a couple of ground cables. One ground cable for the project and one for a safety discharge rod. It’s really that simple and once wired up to a science project you have 25kV volts at your disposal by simply turning on the monitor. You don’t want to produce a lot of large sparks with this conversion because it will destroy the parts inside the monitor. The 240K Ohm 2 watt resistor [Steve] added will help keep those discharges to a minimum and protect the monitor from being destroyed.

Yes this is dangerous but when you’re working with high-voltage science experiments danger is something you deal with correctly. This isn’t the safest way to get high-voltage but if you have to hack something together for a project this will get you there and [Steve] is quite cautious including warning people of the dangers and how to safely discharge your experiment and the power supply after every use. This isn’t the first high-voltage power supply that [Steve] has constructed; we featured his home-built 30kV power supply in the past, which is a more conventional way to build a HV power supply using a doubler or tripler circuit. Join us after the break to watch the video.

Continue reading “Repurpose An Old CRT Computer Monitor As A High Voltage Science Project Power Supply”

The Worst E-Reader Ever

oled

Over on the Projects site, [Jaromir] has created a tiny device with an OLED display, three buttons, and a USB port for storing text files, be it for saving a shopping list, a cheat sheet, or the most unusable e-reader ever made.

The front of the device is simply a 96×32 pixel OLED and three buttons for ‘up’, ‘down’, and ‘open/close’. The reverse side is where the magic happens with a PIC24 microcontroller that sets up a file system on the chip, allowing [Jaromir] to write 64kB of data on what is actually a Flash drive with a pitiful capacity. Text files are viewable on the OLED, with the video below showing the front page of Wikipedia being displayed in a glorious 16×4 text mode.

It’s not a very useful device by any means, but for some reason it’s garnered a lot of skulls and followers over on Hackaday Projects. In response to that, [Jaromir] is working on version two with a new PCB and a design for a 3D printed case. Not bad for what [Jaromir] himself describes as worse than just about any phone or tablet.

Continue reading “The Worst E-Reader Ever”

The first Radar Arduino Shield

The First Arduino Radar Shield

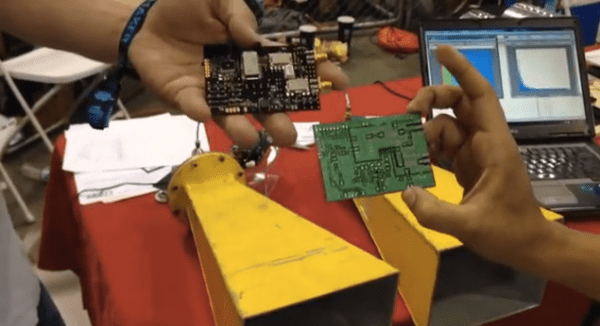
The very first fully operational radar Arduino shield was recently demonstrated at Bay area Maker Faire. It was built by [Daniel] and [David], both undergrads at UC Davis.

Many have talked about doing this, some have even prototyped pieces of it, but these undergrad college students pulled it off. This is the result from Prof. ‘Leo’ Liu’s full-semester senior design course based on the MIT Coffee Can radar short course, which has been going on for 2 years now. Next year this course will have 30 students, showing the world the interest and market-for project based learning.

Check out the high res ranging demo, where a wider band chirp was used to amazing results. Video below.
Continue reading “The First Arduino Radar Shield”

Home Made Miter Saw Is Not Completely Dangerous

Home Made Miter Saw

If the term ‘home made miter saw’ instantly instills frightening images of severed limbs into your head, you’re not alone. A quick internet search will yield some pretty hokey tool builds, we’ve even featured a few here on hackaday. This saw is different. [Pekka] made a pretty cool saw for cutting very accurate angles in wood.

This saw was purpose built with one goal in mind: cutting wood that will be glued together for use in segmented turning. Segmented turning is shaping a piece of wood stock that is composed of many different types of wood. This results in a very visually interesting product.

Home Made Miter SawMost of the saw is made from plywood. The hinge and supports for the arbor are beefy off-the-shelf pillow blocks. A 3-phase motor with speed control transmits power to the arbor via a belt. Belt tension is adjusted by sliding the motor further back along the motor mount base. [Pekka] took care so that the entire pivoting assembly was nearly balanced adding to the ease of use.Typical miter saws rotate the blade to achieve different angles of cuts. This design rotates the saw fence.

For safety there are a pair of polycarbonate blade guards and a micro switch on the handle that won’t let the saw start unless it is depressed. The micro switch has a secondary function also, when let go it applies an electronic brake to the motor so that the spinning blade does not touch the work piece when lifting the blade back up.