Do You Have Any Idea How Fast Your Blender Was Going?

blenderSpeed 
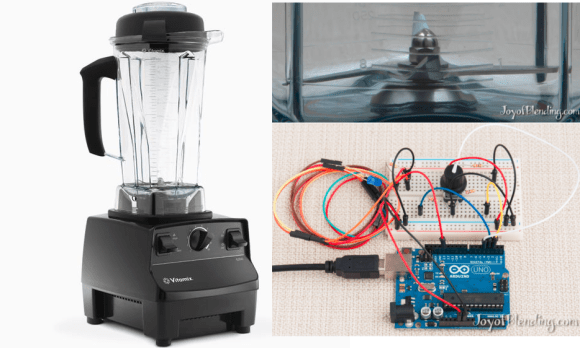
Some people really love their smoothies. We mean really, really, love smoothies and everything about making them, especially the blenders. [Adam] is a big fan of blenders, and wanted to verify that his Vitamix blenders ran as fast as the manufacturer claimed. So he built not one, but two speed measuring setups. Scientific blender measurement method requires one to cross check their results to be sure, right?

Measuring the speed of a blender is all about the RPM. Appropriately, [Adam’s] first measurement tool was an LED based stroboscope. Stroboscopes have been around for hundreds of years, and are a great way to measure how fast an object is rotating. Just adjust the speed of a flashing light until the rotating object appears frozen. The number of blinks per second is then equal to the Rotations Per Second (RPS) of the object being measured.Multiply by 60 seconds, and you’ve got RPM. [Adam] used an Arduino as the brains behind his stroboscope. He wired a dial up on his breadboard, and used it to adjust the flash rate of an LED. Since this was a quick hack, [Adam] skipped the display and just used the Arduino’s USB output to display speed measurements on his laptop.

There are possibilities for error with stroboscopes. [Adam] discovered that if the stroboscope was flashing at a multiple of the blade’s rotation speed, the blades would appear frozen, and he’d get an erroneous RPM value. Thankfully, [Adam’s] Vitamix had asymmetric blades, which made the test a bit easier. He calculated his blades to be spinning at 380 RPS, or 23,000 RPM. Not satisfied with his results, [Adam] brought out Audacity, and ran a spectral analysis of the blender in operation. He found a peak at 378Hz, which was pretty darn close to his previous measurement. Since the blender has a 4 inch blade this all works out to a blade tip speed right around the claimed value of 270 MPH. We’re glad [Adam] found an answer to his blender questions, but our personal favorite blender hack still has to be the V8 blender created by the Top Gear crew.   [via HackerNews]

Finally, Someone Has Found The Any Key


keyboard and any key device

“Where’s the any key?” Well, it’s right here. After running into trouble with the STM platform, [lukasz.iwaszkiewicz] went with the Texas Instrument C Series Launchpad to construct his “Any Key” HID device. He was able to make use of the TI TM4C123G LaunchPad’s extensive USB library which is laid out into four tiers – the very top tier being Device Class API. This gives the programmer the ability to implement simple devices with just a few lines of code. [lukasz.iwaszkiewicz] points out that ST does not have this option available.

The Any Key uses a host PC program that allows the user to enter keystrokes into a virtual keyboard. This information is then passed to the Any Key device. When it is pressed, it will push the recorded keystrokes back to the host PC. Simple, but effective!

The project is completely open source, and all files and code are available. Be sure to check out the video after the break demonstrating the Any Key in action.

Continue reading “Finally, Someone Has Found The Any Key”

Faster Benchmarks With Slower Hardware

hardware

The Bus Pirate is a cheap, simple, Swiss army knife of electronic prototyping, capable of programming FPGAs, and writing to Flash memory. The uISP is possibly the most minimal way of programming Atmel chips over USB, using less than $5 in components. Although the uISP is using a slower chip and bit-banging the USB protocol, it turns out it’s actually faster when operating as a programmer for SPI Flash memories.

Most of [Necromancer]’s work involves flashing routers and the like, and he found the Bus Pirate was far too slow for his liking – he was spending the better part of four minutes to write a 2 MiB SPI Flash. Figuring he couldn’t do much worse, he wrote two firmwares for the uISP to put some data on a Flash chip, one a serial programmer, the other a much more optimized version.

Although the ATMega in the uISP is running at about half the speed as the PIC in the Bus Pirate, [Necromancer] found the optimized firmware takes nearly half the time to write to an 8 MiB Flash chip than the Bus Pirate.

It’s an impressive accomplishment, considering the Bus Pirate has a dedicated USB to serial chip, the uISP is bitbanging its USB connection, and the BP is running with a much faster clock. [Necro] thinks the problem with the Bus Pirate is the fact the bandwidth is capped to 115200 bps, or a maximum throughput of 14 kiB/s. Getting rid of this handicap and optimizing the delay loop makes the cheaper device faster.

Tempo Keeping Drummer Leaves Viking Ship, Now Inspires Pedallers

Bike Controlled Drum Machine

[Serdef] wrote in to tell us about a project he has recently created. It’s a drum beat generator that changes tempo depending on how fast you pedal your bike. This flies directly in the face of using music to keep your pedal timing consistent and up to speed.

The project started out with a tap-tempo drum rhythm pedal that [Serdef] had previously built. This device will generate a drum beat at a tempo corosponding with the time between 2 input signals. This type of device allows someone, say a guitarist, to quickly and easily specify the speed of the drumbeat that they are playing along with.

With the meat and potatoes of the project already figured out, the next part was to make the speed of the bike trigger the tempo of the drum beat. For the signal input, a magnet mounted on the wheel triggers a reed switch mounted on the bike fork once per wheel revolution. This is the same method of information gathering that a bicycle speedometer/odometer uses.

The business part of this project includes an Arduino that measures the speed of the wheel via the magnetic switch, adjusts the speed of the drum beat, and then sends the drum beat to a synthesizer via MIDI protocol. The synthesizer converts the MIDI signal into drum sounds amplified through a powered speaker that the rider can hear. The entire system is powered by a 9v battery and housed in a project box strapped to the bike’s handlebars.

All of the design files and Arduino code are available via [Serdef’s] excellent write up on hackaday.io in case you’re interested in making one for yourself.

Home Made Oculus Rift

OpenVR: Building An Oculus Rift For Only $150

The Oculus Rift is a really cool piece of kit, but with its future held in the grasp of Facebook, who knows what it’ll become now. So why not just build your own? When the Oculus first came out [Ahmet] was instantly intrigued — he began researching virtual reality and the experience offered by the Oculus — but curiosity alone wasn’t enough for the $300 price tag. He held off until he had a useful purpose for it, and as it turns out he did — he builds and flies multicopters, for which an FPV setup would be super handy!

Other FPV setups cost close to $300 as well, so getting a device with more features just makes sense. Promptly after realizing this, he faced the Maker’s Dilemma: Buy it, or build it? To test the waters, he decided to order some aspheric lenses to do some quick tests with a smart phone and a ghetto cardboard box setup — the results were surprisingly good. No turning back now!
The hardware consists of:

  • 5.6″ 1280×800 LCD
  • 3D printed enclosure
  • 12V power adapter
  • USB to TTL
  • 50mm aspheric lenses (5X zoom)
  • Arduino Mini Pro
  • GY-85 9DOF IMU
  • Various wires, foam padding, and glue

The majority of the cost here is in the LCD, with everything else being pretty inexpensive. Once it’s all built (details on his blog), it is time to get the software, downloaded right off of GitHub. The rest is pretty self-explanatory — just take a look at the results! We’re even tempted to build one now. Videos below.

Continue reading “OpenVR: Building An Oculus Rift For Only $150”

NYC Resistor Heats Up The Big Apple With The 2014 Interactive Show


TitleNYCRBehind a nondescript loading dock in Brooklyn stands a normal looking brick building. Go up 3 narrow flights of stairs – you’ll find yourself at the door to the awesome known as NYC Resistor. Last Saturday, NYC Resistor held their 5th Interactive Show, and Hackaday was there! Much like the city it calls home, the Interactive Show is a melting pot. This particular pot is filled with NYC Resistor members (and the public) showing off their projects, NYU’s Tish School ITP students displaying their interactive art, and a good heaping portion of old fashioned hacker partying.

Continue reading “NYC Resistor Heats Up The Big Apple With The 2014 Interactive Show”

THP Entry: SatNOGS

NOGS Here’s an interesting thought: it’s possible to build a cubesat for perhaps ten thousand dollars, and hitch a ride on a launch for free thanks to a NASA outreach program. Tracking that satellite along its entire orbit would require dozens of ground stations, all equipped with antennas, USB TV tuners, and a connection to the Internet. It’s actually more expensive to build and launch a cubesat than it costs to build a network of ground stations to get reasonably real-time telemetry from a cubesat. The future is awesome and weird, it seems.

This is the observation the guys behind SatNOGS have made. They’re developing a platform for a completely open source ground station network, with the idea being people an institutions along every longitude and latitude would build a simple satellite tracking antenna mount, connect it to the Internet, and become part of an open source Near Space Network, capable of receiving telemetry from any one of the small cubesats whizzing around in low earth orbit.

Despite being what is probably one of the most ambitious and far-reaching projects in open source hardware, the design of the system is relatively simple: the hardware is a 3D printed alt-az mount, capable of pointing a pair of antennas anywhere in the sky. The stepper motor driver board is based on the Arduino, and the computer running each antenna node is powered by a BeagleBone Black or a WR703N router. The antenna receiver is, of course, an RTL-SDR dongle, capable of listening to all the common cubesat bands. Even the software is derived from open source projects. Tracking a satellite across the sky can be calculated with GPredict, and the team is working on an observation scheduling and management system that combines multiple ground stations for coverage across the globe.

It’s a great idea, crowdsourcing satellite tracking from people around the globe, and something that could be used by hundreds of institutions lucky enough to launch a small cube of electronics into orbit.


SpaceWrencherThe project featured in this post is an entry in The Hackaday Prize. Build something awesome and win a trip to space or hundreds of other prizes.