A Look Back At Computer Displays

These days, our video cards are actually as powerful as yesterday’s supercomputer and our monitors are bigger than the TVs most of us had as kids. But how did we get there? [RetroBytes] covers computer displays starting with the Colossus computer to today.

Back in the days of Colossus, of course, a display was actually a TeleType-like device printing on a roll of paper. The Manchester Baby actually had a crude display which was actually a Williams tube (no relation) that used phosphor persistence to store data. You could physically see memory on the tube or monitor it on a parallel tube — an early form of memory-mapped display.

Continue reading “A Look Back At Computer Displays”

Easy Graphene Production With A Laser Engraver

Graphene isn’t easy to produce at scale. But making small batches of graphene is doable in a few ways. [Robert Murray-Smith] decided to try producing “flash graphene.” This requires a big capacitor bank that is moderately expensive, so he decided to explain a different technique he read about using an ordinary laser cutter. Check it out in the video below.

We were a little disappointed that he didn’t actually make any graphene this time. He has, however, used other methods in other videos to create some type of graphene. In fact, he has many similar videos going back quite a ways as well as applications with concrete, capacitors, and more. We understand that this method doesn’t produce monolayer graphene, but actually creates a graphene “foam” with interesting properties. [Robert] talks about recent papers that show you can grow graphene on things other than Kapton tape using this method.

Continue reading “Easy Graphene Production With A Laser Engraver”

Hexed Home Assistant Monitors 3D Printers

You can babysit your 3D printer 100% of the time, or you can cross your fingers and hope it all works. Some monitor their printers using webcams, but [Simit] has a more stylish method of keeping tabs on six 3D printers.

The idea is to use a 3D printed hex LED display found online. Adding an ESP32 and Home Assistant allows remote control of the display. The printers use Klipper and can report their status using an API called Moonraker. Each hexagon shows the status of one printer. You can tell if the printer is online, paused, printing, or in other states based on the color and amount of LEDs lit. For example, a hex turns totally green when printing is complete.

Once you have a web API and some network-controlled LEDs, it is relatively straightforward to link it together with Home Automation. Of course, you could do it other ways, too, but if you already have Home Automation running for other reasons, why not?

We have seen other ways to do this, of course. If you need an easy monitor, the eyes have it. If you don’t use Klipper, OctoPrint can pull a similar stunt.

3D Printing Blueprints And Other Wall Art

Today if you want to reproduce a big schematic or a mechanical drawing, you just ask it to print or plot from the CAD model. But back in the day, you drew on big sheets at a drafting table. How do you make copies? Sure, there were a few large-format copiers, but they were expensive. A more common method was to use a heliographic copier which, often but not always, resulted in a blueprint — that is a blue page with white lines or vice versa. These days, you are more likely to see a blueprint as an artistic wall hanging, and since [Basement Creations] wanted some, he figured out how to make them with a 3D printer.

These prints aren’t really blueprints. They use the printer as a plotter and deposit white ink on a blue page. In the video below, he shows a number of ways to use a printer to create interesting wall art, even if you want it to be bigger than the print bed. Some of the wall art uses multiple 3D printed parts, and others use the printer as a plotter.

Continue reading “3D Printing Blueprints And Other Wall Art”

Inside A Current Probe

[The Signal Path] had two Tektronix AC/DC current probes that didn’t work. Of course, that’s a great excuse to tear them open and try to get at least one working. You can see how it went in the video below. The symptoms differed between the two units, and along the way, the theory behind these probes needs some exploration.

The basic idea is simple, but, of course, the devil is in the details. A simple transformer doesn’t work well at high frequencies and won’t work at all at DC. The solution is to use a hall effect sensor to measure DC and also to feed it back to cancel coil saturation.

Continue reading “Inside A Current Probe”

Cornering The Antenna Market

Sometimes antennas can seem like black magic. However, when you see things like a dish antenna, it sort of makes sense, right? Just like a mirror focuses light, the parabola of a dish focuses RF energy. But [IMSAI Guy] shows another common-sense antenna arrangement: a corner reflector dipole. He had built one years ago and decided to do a bit of research and make another one.

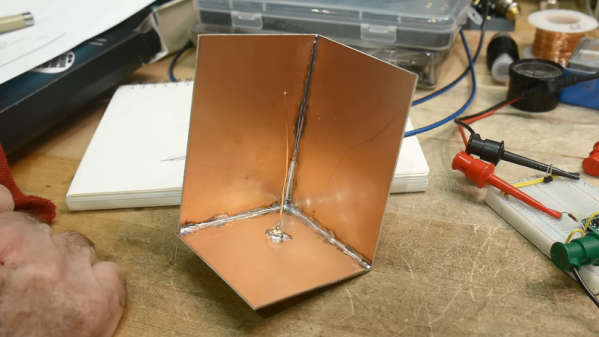
In a clever use of copper-clad board, he was able to make a reasonable reflector by soldering together three boards and an RF connector. A single wire makes the “driven element,” and by bending it to just the right position, you can change the characteristic impedance for matching.

The antenna, in this case, is essentially a quarter-wave antenna with a ground plane and reflector arrangement. After the obligatory chalk talk, he breaks out the vector network analyzer and shows how well it matches. He didn’t, however, measure the gain or directional selectivity due to the reflector.

Intuitively, you’d think this kind of antenna would be good for direction finding purposes. In fact, hams that use handy talkies for direction finding often use their bodies to block signals, much like these reflectors should.

The [IMSAI Guy] reflector is pretty small, but you can easily make bigger ones. Using PCB material for antennas isn’t anything new, either, but we still enjoyed this simple corner reflector build.

Continue reading “Cornering The Antenna Market”

Two Stage Refrigerator Is Chill

Every time we check in with [Hyperspace Pirate] he’s trying to make things cold. Really cold. His recent two-part video shows a propane vapor compression system that can go down to -37° C as well as a two-stage system using homemade ethylene that can get to -83° C. He’s trying to get to -100°, so he’s close, and we have no doubt he’ll get there.

The video explains that using two different refrigerants makes the design more practical. At the low temperatures involved, you have to deal with compressor oil freezing. There is a lot of theory required to design an efficient cooler and a lot of know-how required to make gas-tight connections with all the different materials involved.

Using propane in both stages did provide a little additional cooling. But using ethylene in the second stage didn’t work as expected. There were two issues to work through. Part of it was the average temperature of the system, and also, the homemade ethylene needed purification. The ethylene purification setup was almost as complex as the main system and also reminded us, for some reason, of the movie Darkstar. It didn’t work as well as he wanted, which means we have to wait for part two to see it all actually working.

We’ve seen this same guy make dry ice. He’s also tried to make liquid nitrogen, too.

Continue reading “Two Stage Refrigerator Is Chill”