Build a $35 400 MHz Logic Analyzer

Build A 400 MHz Logic Analyzer For $35

What do you do when you’re a starving student and you need a 400 MHz logic analyzer for your digital circuit investigations? As [nanofix] shows in a recent video, you find one that’s available as an open hardware project and build it yourself.

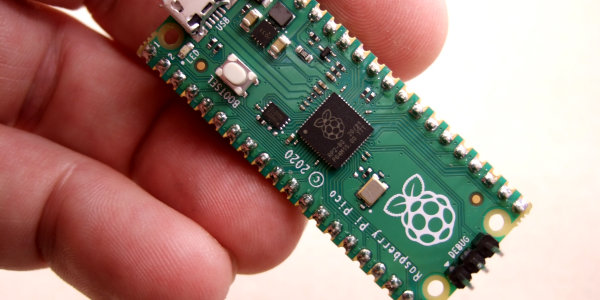
The project, aptly named LogicAnalyzer was developed by [Dr. Gusman] a few years back, and has actually graced these pages in the past. In the video below, [nanofix] concentrates on the mechanics of actually putting the board together with a focus on soldering. The back of the build is the Raspberry Pi Pico 2 and the TXU0104 level shifters.

If you’d like to follow along at home, all the build instructions and design files are  available on GitHub. For your convenience the Gerber files have been shared at PCBWay

Of course we have heaps of material here at Hackaday covering logic analyzers. If you’re interested in budget options check out $13 Scope And Logic Analyzer Hits 18 Msps or how to build one using a ZX Spectrum! If you’re just getting started with logic analyzers (or if you’re not sure why you should) check out Logic Analyzers: Tapping Into Raspberry Pi Secrets.

Continue reading “Build A 400 MHz Logic Analyzer For $35”

Build Customized Raspberry Pi OS Images With Rpi-image-gen

Recently Raspberry Pi publicly announced the release of their new rpi-image-gen tool, which is advertised as making custom Raspberry Pi OS (i.e. Debian for specific Broadcom SoCs) images in a much more streamlined fashion than with the existing rpi-gen tool, or with third-party solutions. The general idea seems to be that the user fetches the tool from the GitHub project page, before running the build.sh script with parameters defining the configuration file and other options.

The main advantage of this tool is said to be that it uses binary packages rather than (cross-)compiling, while providing a range of profiles and configuration layers to target specific hardware & requirements. Two examples are provided in the GitHub project, one for a ‘slim’ project, the other for a ‘webkiosk‘ configuration that runs a browser in a restricted (Cage) environment, with required packages installed in the final image.

Looking at the basic ‘slim’ example, it defines the INI-style configuration in config/pi5-slim.cfg, but even when browsing through the main README it’s still somewhat obtuse. Under device it references the mypi5 subfolder which contains its own shell script, plus a cmdline.txt and fstab file. Under image it references the compact subfolder with another bunch of files in it. Although this will no doubt make a lot more sense after taking a few days to prod & poke at this, it’s clear that this is not a tool for casual users who just want to quickly put a custom image together.

This is also reflected in the Raspberry Pi blog post, which strongly insinuates that this is targeting commercial & industrial customers, rather than hobbyists.

Pico Gets A Speed Bump

The release notes for the 2.1.1 Raspberry Pi Pico SDK have a late holiday present: The RP2040 chip is now certified to run at 200 MHz if you use at least 1.15V as the supply voltage.

Previously, the certified speed was 125 MHz, although it was well-known you could overclock the device. By default, the 125 MHz figure is still what you’ll get, though. If you want a higher frequency, you need to set SYS_CLK_MHZ to 200 before doing a build. Continue reading “Pico Gets A Speed Bump”

All The Attacks On The RP2350

Raspberry Pi’s new microcontroller, the RP2350, has a small section of memory that is meant for storing secrets. It’s protected by anti-glitching and other countermeasures, and the Raspberries wanted to test it. So this summer, they gave them out, pre-programmed with a secret string, as part of the badge for DEFCON attendees. The results of the cracking efforts are in, and it’s fair to say that the hackers have won.

First place went to [Aedan Cullen], who also gave a great talk about how he did it at 38C3. One of the coolest features of the RP2350, from a hacker perspective, is that it has dual ARM and dual RISC-V cores onboard, and they can be swapped out by multiplexers. The security module has a critical register that has disable bits for both of these processors, but it turns out that the ARM disable bits have priority. When [Aedan] glitched the security module just right, it disabled the ARM cores but left the RISC-V cores running in the secure context, with full debug(!), and the game was over. As of yet, there is no mitigation for this one, because it’s baked into the secure boot module’s silicon.

[Marius Muench] managed to pre-load malicious code into RAM and glitch a reboot-out-of-secure-mode on the USB module. This one is possibly fixable by checking other reboot flags. [Kévin Courdesses] has a sweet laser fault-injection rig that’s based on the 3D-printable OpenFlexure Delta Stage, which we’ve seen used for microscopy purposes, but here he’s bypassing the anti-glitching circuitry by exposing the die and hitting it hard with photons.

Finally, [Andrew Zonenberg] and a team from IOActive went at the RP2350 with a focused ion beam and just read the memory, or at least the pairwise-OR of neighboring bits. Pulling this attack off isn’t cheap, and it’s a more general property of all anti-fuse memory cells that they can be read out this way. Chalk this up as a mostly-win for the offense in this case.

If you want to read up on voltage glitching attacks yourself, and we promise we won’t judge, [Matthew Alt] has a great writeup on the topic. And ironically enough, one of his tools of choice is [Colin O’Flynn]’s RP2040-based Chip Shouter EMP glitcher, which he showed us how to make and use in this 2021 Remoticon talk.

Old BBC Micro Gets Some Disk Help From A Raspberry Pi

[Peter Mount] had a simple problem. He’d treated himself to a retro purchase in the form of a BBC Master 128—a faster sequel to the BBC Micro Model B. The only problem was he needed a way to get software on to it. Cue a creative hack using a Raspberry Pi Zero W.

When [Peter] received the machine, it already had a GoTek floppy emulator, which pulled disk images off a USB drive. However, he wanted an easier and quicker way to get disk images to and from the machine for development purposes. Swapping the USB drive to and from another machine seemed too tedious.

Instead, he decided to swap in a Pi Zero W for this purpose, setting it up to emulate a flash drive by following instructions from MagPi Magazine. This would allow him to use the SCP tool to copy disk images over to the Pi Zero W via its WiFi connection. Basically, the Pi Zero W was acting as a wirelessly-updated storage device hooked up to the GoTek floppy emulator.

It’s a nifty way of doing things. [Peter] could have set about creating his own floppy emulator from scratch with wireless capability included. However, there was no need. He just needed a wirelessly-accessible USB drive, and the Pi Zero W was more than happy to act in that role.

The BBC Micro is a beloved machine of many in the British Isles, and it had rather an extended family. If you’ve pulled off your own nifty hack on this classic machine, be sure to hit us up on the tipsline!

The added 3.3v rail on the Raspberry Pi 500 PCB. (Credit: Samuel Hedrick)

Enabling NVMe On The Raspberry Pi 500 With A Handful Of Parts

With the recent teardown of the Raspberry Pi 500, there were immediately questions raised about the unpopulated M.2 pad and related traces hiding inside. As it turns out, with the right parts and a steady hand it only takes a bit of work before an NVMe drive can be used with the RP500, as [Jeff Geerling] obtained proof of. This contrasts with [Jeff]’s own attempt involving the soldering on of an M.2 slot, which saw the NVMe drive not getting any power.

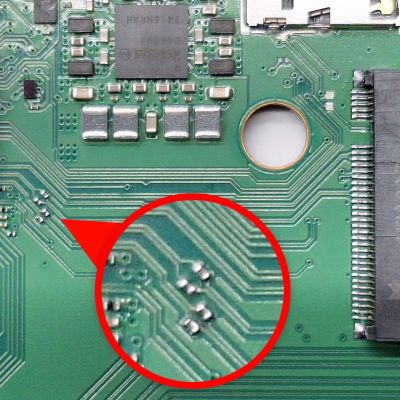
The four tiny coupling capacitors on the RP500’s PCIe traces. (Source: Jeff Geerling)

The missing ingredients turned out to be four PCIe coupling capacitors on the top of the board, as well as a source of 3.3 V. In a pinch you can make it work with a bench power supply connected to the pads on the bottom, but using the bottom pads for the intended circuitry would be much neater.

This is what [Samuel Hedrick] pulled off with the same AP3441SHE-7B as is used on the Compute Module 5 IO board. The required BOM for this section which he provides is nothing excessive either, effectively just this one IC and required external parts to make it produce 3.3V.

With the added cost to the BOM being quite minimal, this raises many questions about why this feature (and the PoE+ feature) were left unpopulated on the PCB.

Featured image: The added 3.3 V rail on the Raspberry Pi 500 PCB. (Credit: Samuel Hedrick)

Raspberry Pi 500 And The Case Of The Missing M.2 Slot

Raspberry Pi just dropped the new Raspberry Pi 500, which like its predecessor puts the similarly named SBC into a keyboard. In a detailed review and teardown video, [Jeff Geerling] goes over all the details, and what there is to like and not like about this new product.

The new Raspberry Pi 500 with the new Raspberry Pi Monitor. (Credit: Jeff Geerling)

Most of the changes relative to the RP400 are as expected, with the change to the same BCM2712 SoC as on the Raspberry Pi 5, while doubling the RAM to 8 GB and of course you get the soft power button. As [Jeff] discovers with the teardown, the odd thing is that the RP500 PCB has the footprints for an M.2 slot, as seen on the above image, but none of the components are populated.

Naturally, [Jeff] ordered up some parts off Digikey to populate these footprints, but without luck. After asking Raspberry Pi, he was told that these footprints as well as those for a PoE feature are there for ‘flexibility to reuse the PCB in other contexts’. Sadly, it seems that these unpopulated parts of the board will have to remain just that, with no M.2 NVMe slot option built-in. With the price bump to $90 from the RP400’s $70 you’ll have to do your own math on whether the better SoC and more RAM is worth it.

In addition to the RP500 itself, [Jeff] also looks at the newly launched Raspberry Pi Monitor, a 15.6″ IPS display for $100. This unit comes with built-in speakers and VESA mount, but as [Jeff] notes in his review, using this VESA mount also means that you’re blocking all the ports, so you have to take the monitor off said VESA mount if you want to plug in or out any cables.

Continue reading “Raspberry Pi 500 And The Case Of The Missing M.2 Slot”