
Adafruit Industries just announced their next kit: a SIM card reader. Using the kit, you can read or write any SIM card. You could use this for fun things like recovering deleted contacts and SMS messages. The kit looks like a very straight forward design (based on [Dejan]’s work); the only chip is a hex inverter and the board is powered by a regulated 9V battery. With all through-hole components, it should be easy to assemble. You can talk to it using the board mounted serial port or connect to the extra pin header using an FTDI USB cable just like the Boarduino. The FTDI option is bus powered, so you won’t need the battery. [ladyada] has collected some resources in case you want to learn more about smart cards.
Cramming Dual SIMs & A Micro SD Card Into Your Phone
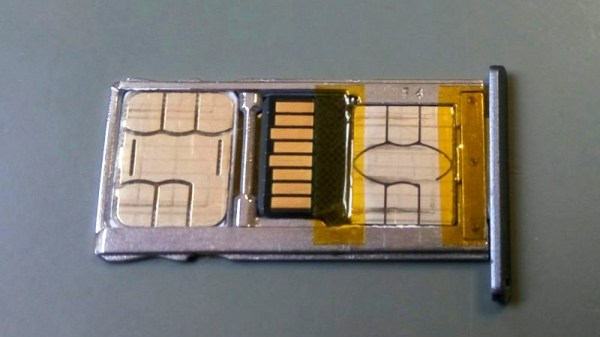
There are plenty of dual SIM phones on the market these days, but most of them are a hamstrung by packaging issues. Despite their dual SIM capability, this usually comes at the expense of the microSD card slot. Of course, hackers don’t accept such nonsense, and [Tweepy] went about crafting a solution. Sadly the make and model of phone aren’t clear.
It’s a simple case of very carefully shaving both the microSD card and the nano-SIM down until both can fit in the card tray. The SIM is slimmed down with the application of a heat gun helping to remove its plastic backing, saving precious fractions of a millimeter. The SD card is then filed down to make just enough space for the SIM to fit in underneath. Thanks to the springiness of the contacts in the phone, it’s just barely possible to squeeze both in, along with some Kapton tape to hold everything in place.
Your mileage may vary, depending on the construction of your SD card. Overall though, it’s a tidy hack that should prove useful to anyone with a dual SIM phone and limited storage. We saw a similar hack a few years ago, too.
[Thanks to Timothy for the tip!]
A Simple POV Business Card
The business card is an odd survivor from the past, when you think about it. When a salesman in a Mad Men style suit stepped out of his Studebaker and walked past a room full of typists to the boss’s wood-paneled office, he would have handed over a card as a matter of course. It would get filed away in the Rolodex.
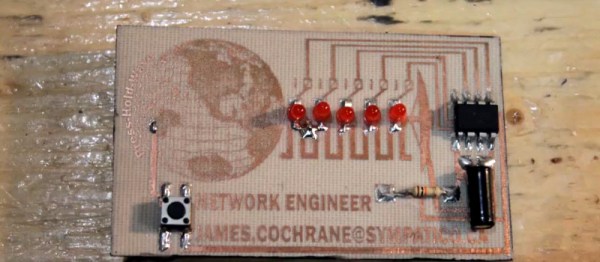
These days, making your card stand out from the crowd of print-shop specials has become an art form. In our community this extends to cards with integrated electronics, such as this one with a persistence-of-vision display driven by an ATtiny from [James Cochrane], shown in the video below. It’s by no means the first such card, but he takes us through its design and construction in great detail which makes the video below the break worth a look. If you have never made a toner transfer PCB for example, you can see how his was made.
He makes the point that while a POV spinner needs only to display in one direction, a card has to be waved back and forth. Thus it needs to change the direction of its display, and needs a tilt sensor to activate this. His construction method uses through-hole components, but is surface mount in that they are soldered to the top surface of the board. The result is a rather attractive POV card that maybe isn’t something you’d hand out to all and sundry, but perhaps that’s not the point.
A Business Card That Plays Simon Says
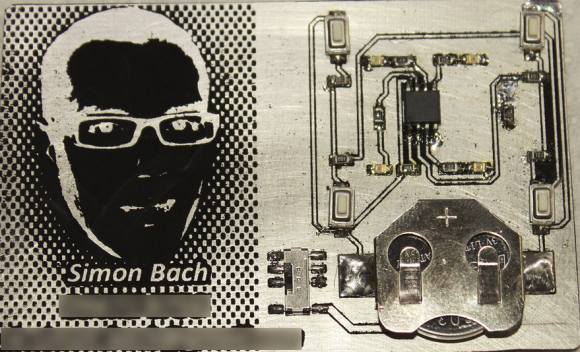
When your name is Simon and you want to build your own circuit board business card, it makes perfect sense to incorporate a game of Simon Says, and that’s exactly what [Simon] did with his Business Card.
You may see a resemblance to the Engineer’s Emergency Business Card; that’s because [Simon] took inspiration from that card to build his own. The game of Simon Says is played via 4 low-profile pushbuttons and 4 0805 LEDs. The microcontroller of choice to run the game is an ATtiny45 set up to work with the Arduino IDE. But with only 5 pins available for I/O, [Simon] had to give up 4 pins to the LEDs and configure the remaining pin as an analog input. The buttons are tied into a voltage divider that feeds the analog input, so depending which button is pressed, a different voltage is read in, thus a value from 0 to 1023 determines which button was pressed.
One of the great things about this write-up is that it goes through the process of etching PCBs at home using the toner-transfer method. We’re not sure how many home-etched business cards he’s willing to pass out, but surely whoever does get the card, will never forget his name.
Surprisingly Simple Magnetic Card Spoofer

[Craig’s] magnetic card spoofer is both simple and brilliant. There are two parts to spoofing these cards and he took care of both of them. The first part is getting the actual card data. He designed the spoofer board with a header that connects to a card reader for doing this. The second part is the spoofing itself, which is done with an electromagnet. As with past spoofers, he wrapped a shim with enamel-coated magnet wire. An old knife blade was picked for its thickness and ferromagnetism. This magnet is driven by an ATtiny2313 which stores the data, and is protected by a transistor driving the coil. There were a few design flaws in his board, but [Craig] was able to get the same track data out of the spoof as the original card despite the LED being used as a protection diode and an ‘aftermarket’ resistor on the transistor base.

The 2024 Business Card Challenge Starts Now
If you want to make circuits for a living, what better way to impress a future employer than to hand them a piece of your work to take home? But even if you’re just hacking for fun, you can still turn your calling into your calling card.
We are inviting you to submit your coolest business card hacks for us all to admire, and the top three entries will win a $150 DigiKey shopping spree. If your work can fit on a business card, create a project page for it over on Hackaday.io and enter it in the 2024 Business Card Contest. Share your tiny hacks!
To enter, create a project for your hacked business card over at Hackaday IO, and then enter it into the 2024 Business Card Challenge by selecting the pulldown on the left. It’s that easy.
Continue reading “The 2024 Business Card Challenge Starts Now”
Retrogadgets: The Ageia PhysX Card
Old computers meant for big jobs often had an external unit to crunch data in specific ways. A computer doing weather prediction, for example, might have an SIMD (single instruction multiple data) vector unit that could multiply a bunch of numbers by a constant in one swoop. These days, there are many computers crunching physics equations so you can play your favorite high-end computer game. Instead of vector processors, we have video cards. These cards have many processing units that can execute “kernels” or small programs on large groups of data at once.
Awkward Years
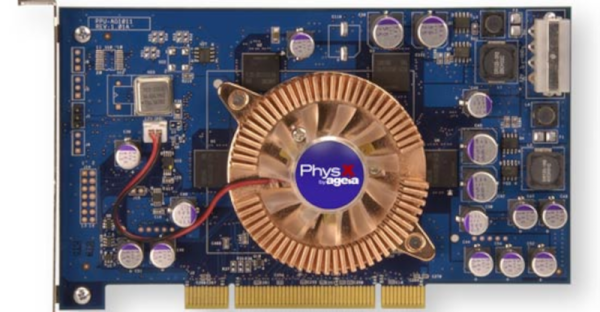
However, there was that awkward in-between stage when personal computers needed fast physics simulation, but it wasn’t feasible to put array processing and video graphics on the same board. Around 2006, a company called Ageia produced the PhysX card, which promised to give PCs the ability to do sophisticated physics simulations without relying on a video card.
Keep in mind that when this was built, multi-core CPUs were an expensive oddity and games were struggling to manage everything they needed to with limited memory and compute resources. The PhysX card was a “PPU” or Physics Processor Unit and used the PCI bus. Like many companies, Ageia made the chips and expected other companies — notably Asus — to make the actual board you’d plug into your computer.


