Bet You Didn’t Know Arduinos Are Psychic

Are you running out of ways to entertain yourself and your family? If you’ve read all the books and watched all the movies, it might be time to explore the psychic abilities of silicon. [Hari Wiguna] has just the trick to keep them guessing for a good long time.

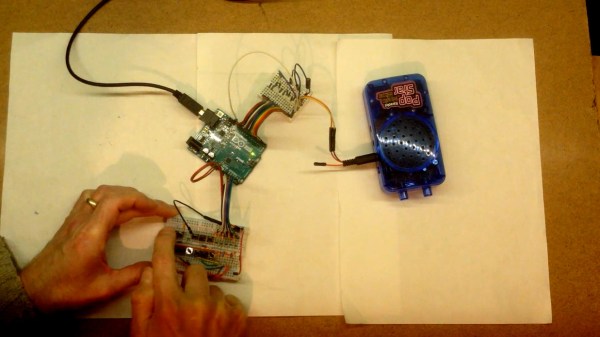
This trick doesn’t take much, just a couple of Arduinos, some momentary buttons, a number pad, and a large helping of math. As you can see in the demo after the break, there is nothing connecting the two, not even 802.11(n). On the randomizer Arduino, [Hari] generates random numbers with the push of a button until the audience sees one they like. Then [Hari] locks in the number with the other button.

What happens next is key: the randomizer generates another random number, but uses it as a hint to set a sentinel digit. The randomizer Arduino subtracts the larger of the two digits in the number from nine and stores the result as the flag. When the next number comes up that has the flag digit in the correct place, the number after that will be the random number chosen at the beginning.

The psychic Arduino’s secret is that it knows the first guess it receives is special. It does the same sentinel digit math as the randomizer, so when the guesser enters the guess with the sentinel digit, it knows the next number entered is the winner. Clear as mud? Check out the second video below where [Hari] explains the trick, a new take on a magic classic.

Looking for a more exciting way to generate random numbers? Try using fish tanks, lava lamps, or muons from outer space.

Continue reading “Bet You Didn’t Know Arduinos Are Psychic”

Arduino And Wire Detects Metal

Our old math teacher famously said, “You have to take what you know and use it find what you don’t know.” The same holds true for a lot of microcontroller designs including [rgco’s] clever metal detector that uses very little other than an Arduino. The principle of operation is simple. An Arduino can measure time, a coil and a resistor will create a delay proportional to the circuit values, and metal around the coil will change the coil’s inductance. As the inductance changes, so does the delay and, thus, the Arduino can sense metal, as you can see in the video below.

The simple principle is also simple in practice. Besides the Arduino and the coil, there’s a single resistor. You want a small coil since larger coils won’t detect smaller objects. If you don’t want to wind your own coil, [rgco] suggests using a roll of hookup wire as long as the resistance is under 10 ohms.

Continue reading “Arduino And Wire Detects Metal”

Arduino Bobbin Winding Machine Is Freaky Fast

One of the worst things about sewing is finding out that your bobbin — that’s the smaller spool that works together with the needle and the larger spool to make a complete stitch — ran out of thread several stitches ago. If you’re lucky, the machine has a viewing window on the bobbin so you can easily tell when it’s getting dangerously close to running out, but many machines (ours included) must be taken halfway apart and the bobbin removed before it can be checked.

Having spare bobbins ready to go is definitely the answer. We would venture to guess that most (if not all) machines have a built-in bobbin winder, but using them involves de-threading the machine and setting it up to wind bobbins instead of sew. If you have a whole lot of sewing to do and can afford it, an automatic bobbin winder is a godsend. If you’re [Mr. Innovative], you build one yourself out of acrylic, aluminium, and Arduinos.

Here’s how it works: load up the clever little acrylic slide with up to twelve empty bobbins, then dial in the speed percentage and press the start button. The bobbins load one at a time onto a drill chuck that’s on the output shaft of a beefy 775 DC motor. The motor spins ridiculously fast, loading up the bobbin in a few seconds. Then the bobbin falls down a ramp and into a rack, and the thread is severed by a piece of nichrome wire.

An important part of winding bobbins is making sure the thread stays in place at the start of the wind. We love the way [Mr. Innovative] handled this part of the problem — a little foam doughnut around a bearing holds the thread in place just long enough to get the winding started. The schematic, BOM, and CAD files are available if you’d like to make one of these amazing machines for yourself. In the meantime, check out the demo/build video after the break.

Still not convinced that sewing is cool enough to learn? Our own [Jenny List] may be able to convert you. If that doesn’t get you, you might like to know that some sewing machines are hackable — this old girl has a second life as a computerized embroidery machine. If those don’t do it, consider that sewing machines can give you a second life, too.

Continue reading “Arduino Bobbin Winding Machine Is Freaky Fast”

Arduino Gets Old PC Booted And Back Into Action

How many people still have a PS/2 keyboard kicking around in 2020? Admittedly asking such a question of the Hackaday audience is probably cheating (there’s a decent chance one of you will type a comment on one just to prove a point), but even the most pedantic reader has to admit that it’s a long dead standard. So we’re hardly surprised to hear that [Turbaned Engineer] didn’t have one handy when he tried to boot a motherboard so old that he couldn’t access the BIOS with a USB keyboard.

But rather than waiting for an adapter to show up in the mail, he decided to rig up an Arduino Nano to mimic a PS/2 keyboard just long enough for him to navigate the system configuration. Since that basically meant he only needed the arrow keys and Enter, he was able to rig up a handful of momentary buttons to serve as input. We wouldn’t recommend typing out your memoirs with such a spartan board, but it’s certainly good enough to juggle around the order of boot devices.

The fun didn’t stop there, though. [Turbaned Engineer] also had to clean some corrosion and fix a blown resistor on a bank of RAM to drag this old soldier over the finish line. He didn’t have a case handy, so he made a free-form one using the polycarbonate packaging that ICs ship in. The final machine isn’t exactly a sleeper, but it’s good enough to play Super Mario Bros. 3 on the TV.

At the end of the day, the minimal input device [Turbaned Engineer] put together isn’t so far removed from other homebrew keyboards we’ve seen recently. It seems that QMK even has some basic support for the PS/2 interface. Not that it would come up very often, but a “retro” mode might be an interesting addition to your next custom keyboard build.

Greeking Out With Arduinos

Learning a new language is hard work, but they say that the best way to learn something is to teach it. [Angeliki Beyko] is learning Greek, and what better way to teach than to build a vocabulary flash-card game from Arduinos, color screens, 1602 text screens, and arcade buttons? After the break, we have a video from the creator talking about how to play, the hardware she chose, and what to expect in the next version.

Pegboard holds most of the hardware except the color screens, which are finicky when it comes to their power source. The project is like someone raided our collective junk drawers and picked out the coolest bits to make a game. Around the perimeter are over one hundred NeoPixels to display the game progress and draw people like a midway game. Once invested, you select a category on the four colored arcade buttons by looking at the adjacent LCD screens’ titles. An onboard MP3 shield reads a pseudo-random Greek word and displays it on the top-right 1602 screen in English phonetics. After that, it is multiple choice with your options displaying in full-color on four TFT monitors. A correct choice awards you a point and moves to the next word, but any excuse to mash on arcade buttons is good enough for us.

[Angeliki] does something we see more often than before, she’s covering what she learned, struggled with, would do differently, and how she wants to improve. We think this is a vital sign that the hacker community is showcasing what we already knew; hackers love to share their knowledge and improve themselves.

Typing Greek with a modern keyboard will have you reaching for an alt-code table unless you make a shortcut keyboard, and if you learn Greek, maybe you can figure out what armor they wore to battle.

Continue reading “Greeking Out With Arduinos”

TV Output From Arduino — 1980s Style!

We’ll admit it, we’re all spoiled. A few bucks can now buy a computer that would have been the envy of everyone back in the late 1970s or early 1980s. So it’s no surprise that [krallja] was able to use an old-style video output chip to drive a TV with an Arduino. The TMS9918A is a venerable output device, and if the old computers could drive it then it makes sense that a modern computer could too. You can see a video of the whole experiment, below.

The Internet has also spoiled us, in that it’s dead simple to find datasheets for nearly anything, even these old chips. The only real problem with such aged silicon is that they typically expect a processor with a data and address bus, but most microcontrollers now keep all of that internal. But with enough fast I/O you can simulate a bus just fine. For now, the experiment just cycles through the color output.

Continue reading “TV Output From Arduino — 1980s Style!”

Arduino Takes Control Of Dead Business Card Cutter

It’s a common enough situation, that when an older piece of equipment dies, and nobody wants to spend the money to repair it. Why fix the old one, when the newer version with all the latest bells and whistles isn’t much more expensive? We all understand the decision from a business standpoint, but as hackers, it always feels a bit wrong.

Which is exactly why [tommycoolman] decided to rebuild the office’s recently deceased Duplo CC-330 heavy duty business card cutter. It sounds like nobody really knows what happened to the machine in the first place, but since the majority of the internals were cooked, some kind of power surge seems likely. Whatever the reason, almost none of the original electronics were reused. From the buttons on the front panel to the motor drivers, everything has been implemented from scratch.

An Arduino Mega 2560 clone is used to control four TB6600 stepper motor drivers, with a common OLED display module installed where the original display went. The keypad next to the screen has been replaced with 10 arcade-style buttons soldered to a scrap of perfboard, though in the end [tommycoolman] covers them with a very professional looking printed vinyl sheet. There’s also a 24 V power supply onboard, with the expected assortment of step up and step down converters necessary to feed the various electronics their intended voltages.

In the end, [tommycoolman] estimates it took about $200 and 30 hours of work to get the card cutter up and running again. The argument could be made that the value of his time needs to be factored into the repair bill as well, but even still, it sounds like a bargain to us; these machines have a four-figure price tag on them when new.

Stories like this one are important reminders of the all wondrous things you can find hiding in the trash. Any time a machine like this can be rescued from the junkyard, it’s an accomplishment worthy of praise in our book.