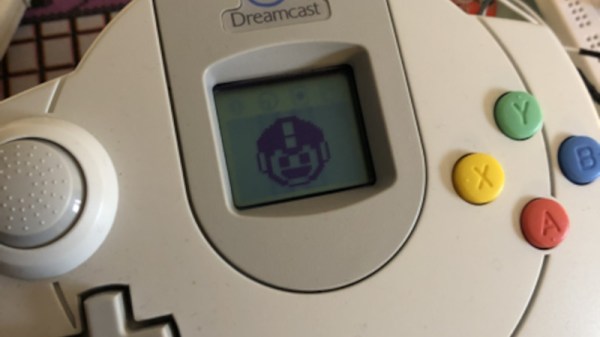
A little under 25 years ago, a particularly bizarre game was released for Sega’s Dreamcast. In actually, calling it a “game” might be something of a stretch. It was more of a pet simulator, where you need to feed and care for a virtual animal as it grows. Except rather than something like a dog or a rabbit, your pet is a talking fish with a human face that doesn’t seem to like you very much. Oh, and Leonard Nimoy is there too for some reason.
Most people in the world don’t even know this game ever existed, and frankly, their lives are all the better for it. But for those who lovingly cared for (or intentionally killed) one of these rude creatures back in the early 2000s, it’s an experience that sticks with you. Which we assume is why [Robert Prest] decided to build this incredibly faithful physical recreation of Seaman.
The Dreamcast is a somewhat forgotten console today, but for a shining minute in the late 1990s, it was possible to believe Sega were still in the fight. Regardless, their hardware lives on, lovingly preserved by collectors and enthusiasts. [Nicholas FitzRoy-Dale] is one such enthusiast, and set about interfacing the old console’s controllers to an Arduino.
Initial work involved getting the Arduino (presumably a basic 16 Mhz Uno) to read the controller’s buttons, and spitting the data out over serial. The Dreamcast’s Maple bus is fast, which presented some challenges, but it was simple enough. [Nicholas] then moved on to interfacing the VMU, the Dreamcast’s fancy controller-mounted memory card. After initial attempts were shaky and unstable, he redoubled his efforts. Research indicated that the VMU can vary the speed of the bus when it’s in control, so he updated his code to suit. It’s full of great hacks, like connecting the Dreamcast’s two data pins to four input pins on the Arduino, to save a handful of cycles by not having to shift incoming data.
The work is a great read for anyone into assembly-level optimisation of interfaces, as well as proper use of limited resources. Obviously, it’s easy to just throw a faster, more expensive microcontroller at the problem, but then nobody would have learned anything. We’ve featured a great many Dreamcast hacks over the years; [Nicholas]’s work here builds upon [Dmitry]’s work in 2017. We can’t wait to see what comes next out of the underground Sega hacking scene!
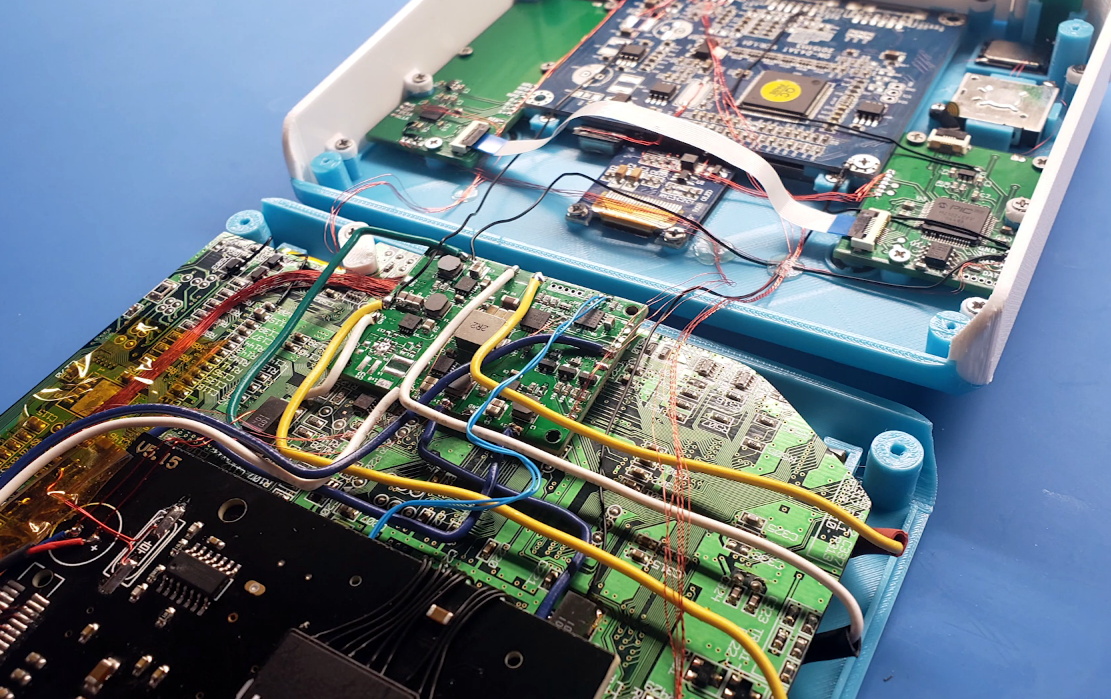
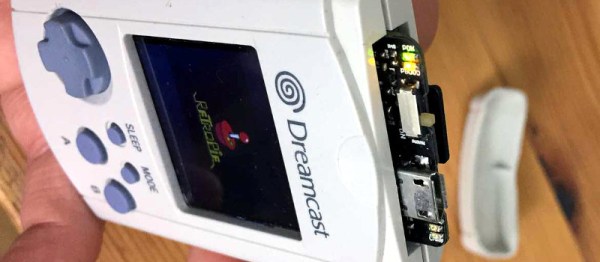
In the last year or so we’ve been seeing an array of portable game system builds based around “trimmed” Wii motherboards which have literally been cut down to a fraction of their original size. It turns out that most of the board is dedicated to non-essential functions, with the core Wii system contained within one specific area that can be isolated with a steady hand. But as [Gman] shows in his latest build, the same concept can also be applied to the Sega Dreamcast.
But of course, there’s a bit more to it than just taking a hacksaw to a Dreamcast motherboard. [Gman] had to supplement the trimmed system with quite a bit of additional hardware, such as a power management board he originally designed for portable Wii projects.
Other components were specifically built for this project. For example there’s a custom PCB that handles emulating the Dreamcast controller using a PIC32MZ microcontroller. He’s also using a LM49450 to pull digital audio from the motherboard over I2S, completely bypassing the analog output.
While not currently functioning, [Gman] also included an SPI OLED display and the hardware necessary to emulate basic functionality of the system’s unique Visual Memory Unit (VMU) right in the front of the system. We’re looking forward to seeing him revisit this feature in the future when he’s got the software side of things worked out.
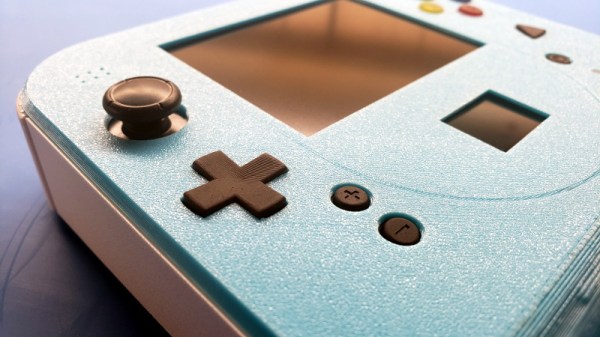
The Nintendo 2DS inspired enclosure is completely 3D printed. A Prusa i3 with textured PEI bed was used to achieve the gorgeous dappled look on the system’s front panel, while the buttons were done on a Form 2 SLA printer. With a mold made from the printed buttons, [Gman] was able to cast the final pieces using a variety of colors until he found a combination he was happy with.
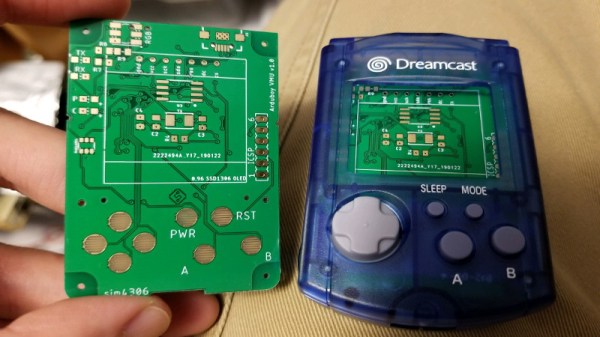
The Dreamcast VMU was a curious piece of hardware. Part memory card, part low-end LCD gaming toy, its fate was sealed once SEGA abandoned the console platform on January 31, 2001. With a limited market penetration and no major killer app, the VMU is a largely forgotten piece of ephemera from a past era. All the more reason to refit one with an Arduboy, instead.
[sjm4306] has taken the Arduboy and repurposed it into a VMU-friendly form factor. The PCB is designed to fit snug inside the plastic case, with conductive traces for the original rubber membrane buttons already in place on the main board. There are some minor fit and finish issues with the first prototype – problems with drill sizes, and connectors that don’t quite fit flush with the housing. Mistakes like these are familiar to any maker who has built a custom PCB or two in their time, and [sjm4306] is confident the bugs will be worked out in the second revision.
It’s a fun project that brings some fun gaming action to an otherwise forgotten platform. If an Arduboy isn’t enough, you could always try to fit a Pi Zero instead. And if you don’t have a VMU, you can always emulate one. Video after the break.
Since the Raspberry Pi range of boards first appeared back in 2012, we’ve seen them cleverly integrated into a host of inventive form factors. Today we bring you the latest offering in this space, [Kite]’s Raspberry Pi Zero W installed in the case of a Sega Dreamcast VMU. The result is a particularly nicely executed build in which the Pi with a few of its more bulky components removed or replaced with low-profile alternatives sits on the opposite side of a custom PCB from a small LCD display.
The PCB contains the relevant buttons, audio, and power supply circuitry, and when installed in a VMU shell makes for a truly professional quality tiny handheld console. In a particularly nice touch the Pi’s USB connectivity is brought out alongside the SD card on the end of the Zero, under the cap that would have originally protected the VMU’s connector. Some minimal paring away of Sega plastic was required but the case is surprisingly unmodified, and there is plenty of space for a decent-sized battery.
The VMU, or Visual Memory Unit, makes an interesting choice for an enclosure, because it is a relic of one of console gaming’s dead ends. It was the memory card for Sega’s last foray into the console market, the Dreamcast, and unlike those of its competitors it formed a tiny handheld console in its own right. Small games for the VMU platform were bundled with full titles, and there was a simple multiplayer system in which VMUs could be linked together. Sadly the Dreamcast lost the console war of the late 1990s and early 2000s to Sony’s PlayStation 2, but it remains a console of note.
If you’ve got a SEGA Dreamcast kicking around in a closet somewhere, and you still have the underutilized add-on Visual Memory Unit (VMU), you’re in for a treat today. If not, but you enjoy incredibly detailed hacks into the depths of slightly aged silicon, you’ll be even more excited. Because [Dmitry Grinberg] has a VMU hack that will awe you with its completeness. With all the bits in place, the hacking tally is a new MAME emulator, an IDA plugin, a never-before ROM dump, and an emulator for an ARM chip that doesn’t exist, running Flappy Bird. All in a month’s work!
The VMU was a Dreamcast add-on that primarily stored game data in its flash memory, but it also had a small LCD display, a D-pad, and inter-VMU communications functions. It also had room for a standalone game which could interact with the main Dreamcast games in limited ways. [Dmitry] wanted to see what else he could do with it. Basically everything.
We can’t do this hack justice in a short write-up, but the outline is that he starts out with the datasheet for the VMU’s CPU, and goes looking for interesting instructions. Then he started reverse engineering the ROM that comes with the SDK, which was only trivially obfuscated. Along the way, he wrote his own IDA plugin for the chip. Discovery of two ROP gadgets allowed him to dump the ROM to flash, where it could be easily read out. Those of you in the VMU community will appreciate the first-ever ROM dump.
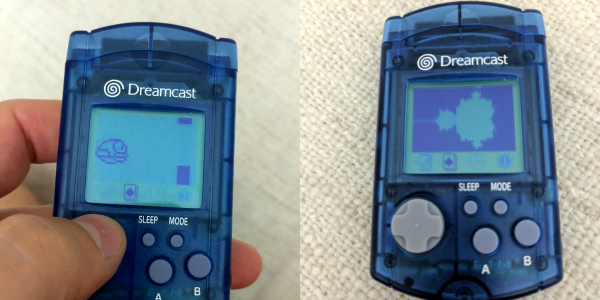
On to doing something useful with the device! [Dmitry]’s definition of useful is to have it emulate a modern CPU so that it’s a lot easier to program for. Of course, nobody writes an emulator for modern hardware directly on obsolete hardware — you emulate the obsolete hardware on your laptop to get a debug environment first. So [Dmitry] ported the emulator for the VMU’s CPU that he found in MAME from C++ to C (for reasons that we understand) and customized it for the VMU’s hardware.
Within the emulated VMU, [Dmitry] then wrote the ARM Cortex emulator that it would soon run. But what ARM Cortex to emulate? The Cortex-M0 would have been good enough, but it lacked some instructions that [Dmitry] liked, so he ended up writing an emulator of the not-available-in-silicon Cortex-M23, which had the features he wanted. Load up the Cortex emulator in the VMU, and you can write games for it in C. [Dmitry] provides two demos, naturally: a Mandlebrot set grapher, and Flappy Bird.
Amazed? Yeah, we were as well. But then this is the same guy emulated an ARM chip on the AVR architecture, just to run Linux on an ATMega1284p.
We’d bet you never had a Dreamcast Visual Memory Unit, but if you can find one now it can be turned into an iPod (translated). The VMU was originally a memory card for the not-so-popular gaming console that put an LCD screen right in your controller. When you weren’t at home you could take it with you and play mini-games. This version lacks its original guts, which have been replaced with a 6th generation iPod nano. The screen is just a bit small for the opening so a frame of white tape was applied as a bezel. The sleep button has been extended through the cover for the VMU connector. It seems there’s a gaping hole in the back of the case, but after seeing the ultrasonic knife used to cut away the plastic we don’t care. We’ve embedded video of that tool after the break.