Hacking An NVIDIA CMP 170HX Crypto GPU For EM Sim Work

A few years back NVIDIA created a dedicated cryptocurrency mining GPU, the CMP 170HX. This was a heavily restricted version of its flagship A100 datacenter accelerator, using the same GA100 chip. It was intended for accelerating Ethash, the Etherium proof-of-work algorithm, and nothing else. [niconiconi] bought one to use for accelerating PCB electromagnetic simulations and put a lot of effort into repairing the card, converting it to water-cooling, and figuring out how best to use this nobbled GPU.

Typically, the GA100 silicon sits in the center of the mighty A100 GPU card and would be found in a server rack, cooled by forced air. This was not an option at home, so an off-the-shelf water-cooling block was wedged in. During this process, [niconconi] found that the board wouldn’t power on, so they went on a deep dive into the power supply tree with the help of a leaked A100 schematic. The repair and modifications can be found in the appendix, right down to the end of the article. It is a long read to get there.

Continue reading “Hacking An NVIDIA CMP 170HX Crypto GPU For EM Sim Work”

Cheap DIY Button Pad Uses Neat Punchcard Trick

A StreamDeck is effectively a really cool box full of colorful buttons that activate various things on your PC. They’re fun and cool but they’re also something you can build yourself if you’re so inclined. [Jason] did just that for his sim racing setup, and he included some nifty old-school tech as well.

An ESP32 is at the core of the build, listening to button presses and communicating with the PC. However, the build doesn’t actually use regular buttons. Instead, it uses infrared sensors wired up in a matrix. This was an intentional choice, because [Jason] wanted the device to be reconfigurable with different paper card overlays. There are ways to do this with regular buttons too, but it works particularly well with the infrared technique. Plus, each button also gets a Neopixel allowing its color to be changed to suit different button maps.

What’s really neat is that the button maps change instantly when a different overlay card is inserted. [Jason] achieved this with an extra row of infrared sensors to detect punched holes in the bottom of the overlay cards.

Once upon a time, even building your own keyboard was an uphill battle. Today, it’s easier than ever to whip up fun and unique interface devices that suit your own exact needs. That’s a good thing! Video after the break.

Continue reading “Cheap DIY Button Pad Uses Neat Punchcard Trick”

Congratulations To The 2024 Business Card Challenge Winners!

When you ask a Hackaday crowd to design a business card, you should expect to be surprised by what you get. But still, we were surprised by the breadth of entries! Our judges wracked their brains to pick their top ten, and then we compared notes, and three projects rose to the top, but honestly the top ten could have all won. It was a tight field. But only three of the entries get to take home the $150 DigiKey gift certificates, so without further ado…

Continue reading “Congratulations To The 2024 Business Card Challenge Winners!”

Making SD Cards More Nostalgic With More Cartridge-ness

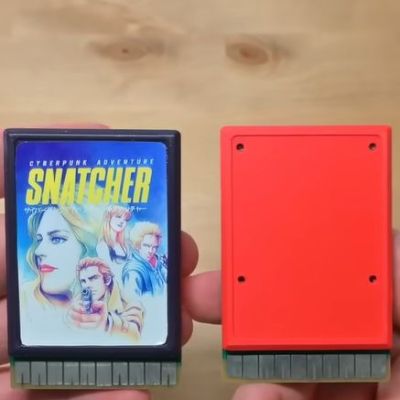
As practical SD cards are, they lack much of what made floppy disks and cartridges so awesome: room for art and a list of contents, as well as the ability to not be lost in shaggy carpet or down a pet’s gullet. In a fit of righteous nostalgia, [Abe] decided that he’d turn SD cards into cartridges in the best way possible, and amazingly managed to not only finish the project after two years, but also make it look snazzy enough to have come straight out of the 1980s. The resulting cartridges come both with fixed (256 MB) and removable micro SD card storage, which are mounted on a PCB that passively connects to pogo pins in the custom, 3D printed reader.

Front of an SD-card-turned-cartridge with adn without decal. (Credit: Abe's Projects, YouTube)
Front of an SD-card-turned-cartridge with and without decal. (Credit: Abe’s Projects, YouTube)

The inspiration for this project kicked in while [Abe] was working on a floppy drive conversion project called the Floppy8, which crammed an MCU into an external floppy drive along with a rough version of these SD card-based cartridges that used the physical card’s edge connector to connect with a micro SD slot inside the converted floppy drive. The problem with this setup was that alignment was terrible, and micro SD cards would break, along with a range of other quality of life issues.

Next, the SD card was put into a slot on the carrier PCB that featured its own edge connector. This improved matters, but the overly complicated (moving) read head in the reader turned out to be very unreliable, in addition to FDM printed parts having general tolerance and durability issues. Eventually a simplified design which takes these limitations in mind was created that so far seems to work just fine.

Although SD cards in cartridges are not a new idea, using them purely as a data carrier is far less common. One could argue about the practicality of turning a fingernail-sized micro SD card into something much larger, but in terms of aesthetics and handleability it definitely gets an A+.

Continue reading “Making SD Cards More Nostalgic With More Cartridge-ness”

A bunch of unpopulated PCB business cards with rad dead rat artwork.

2024 Business Card Challenge: A Very Annoying Business Card, Indeed

Usually the business card itself is the reminder to get in contact with whoever gave it to you. But this is Hackaday, after all. This solar-powered card reminds the recipient to send [Dead Rat Productions] an email by beeping about every two hours, although the gist of that email may simply be begging them to make it stop, provided they didn’t just toss the thing in the garbage.

The full-on, working version of the card is not intended for everyone — mostly serious-looking A-list types that ooze wealth. Most of [Dead Rat Productions]’ pub mates will get an unpopulated version, which could be a fun afternoon for the right kind of recipient, of course.

That person would need a Seeed Studio Xiao SAMD21, a solar panel, plus some other components, like an energy-harvesting chip to keep the battery topped up. Of note, there is a coin cell holder that requires prying with a screwdriver to get the battery out, so there’s really no escaping the beeping without some work on their part. We rather like the artwork on this one, especially the fact that the coin cell sits inside the rat’s stomach. That’s a nice touch.

2024 Business Card Challenge: Integrated Game Card

[Dan Schnur] has a simple strategy to ensure their business card stays on the client’s desk and doesn’t just get lobbed in a drawer: make it into a simple gaming platform. This entry into the 2024 Business Card Challenge is based around the tinyjoypad project, integrating an SSD1306 OLED display, joypad, and push button.

Powered by the superstar ATTiny85, the electronics are really not all that much, just a sprinkling of passives to support the display and the six switch inputs from the joystick and push button. Or at least, that’s how much we can glean from the PCB images, as the PCB design files are not provided in the project GitHub.

Leaving the heavy lifting of the software to the tinyjoypad project, the designer can concentrate on the actual job at hand and the reason the business card exists to stay at the forefront of the client’s mind. In the meantime, the card can be a useful distraction for those idle moments. A few such distractions include a tiny version of Missile Command (as shown above), tiny tris, and a very cut-down Q-bert.  Sadly, that last game isn’t quite the same without that distinctive sound.

2024 Business Card Challenge: BAUDI/O For The Audio Hacker

[Simon B] enters our 2024 Business Card Challenge with BAUDI/O, a genuinely useful audio output device. The device is based around the PCM2706 DAC, which handles all the USB interfacing and audio stack for you, needing only a reference crystal and the usual sprinkling of passives. This isn’t just a DAC board, though; it’s more of an audio experimentation tool with two microcontrollers to play with.

The first ATTiny AT1614 is hooked up to a simple LED vu-meter, and the second is connected to the onboard AD5252 digipot, which together allows one to custom program the response to the digital inputs to suit the user. The power supply is taken from the USB connection. A pair of ganged LM2663 charge-pump inverters allow inversion of the 5V rail to provide the necessary -5 V for the output amplifiers.  This is then fed to the LM4562-based CMoy-type headphone amplifier.  This design has a few extra stages, so with a bit of soldering, you can adjust the output filtering to suit. An LM1117 derives 3.3 V from the USB input to provide another power rail,  mostly for the DAC.

There’s not much more to say other than this is a nice, clean audio design, with everything broken out so you can tinker with it and get exactly the audio experience you want.