Dispensing Solder Paste With A 3D Printer

There’s a strange middle ground in PCB production when it comes to making a few boards. Dispensing solder paste onto one board is easy enough with a syringe or toothpick, but when pasting up even a handful of boards, this method gets tiresome. Solder paste stencils speed up the process when you’re doing dozens or hundreds of boards, but making a stencil for just a few boards is a waste. The solution for this strange middle ground is, of course, to retrofit a 3D printer to dispense solder paste.

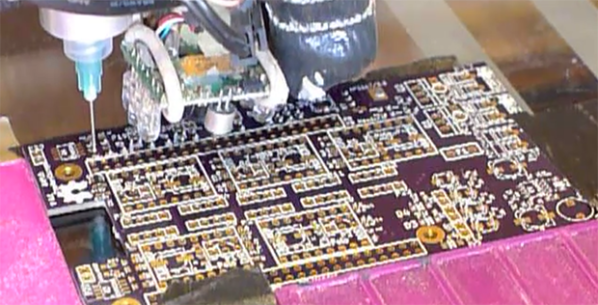
This project was a collaboration between [Jake] and [hzeller] to transform KiCAD files to G Code for dispensing solder paste directly onto a board. The machine they used was a Type A Machines printer with a solder paste dispenser in place of an extruder. The dispenser is hooked up to the fan output of the controller board, and from the looks of the video, they’re getting pretty good results for something that’s still very experimental.

All the code to turn KiCAD files into G Code are up on [hzeller]’s github. If you’re wondering, the board they’re pasting up is a stepper driver board for the BeagleBone named Bumps.

Videos below.

Continue reading “Dispensing Solder Paste With A 3D Printer”

Fast And Easy Solder Paste Stencils

If you’re making your own boards with SMD parts, you might want to get a solder paste stencil. Usually made of laser-cut mylar or extremely thin steel, these stencils allow you to squeegee solder paste onto your board’s pads and make assembly a whole lot easier. [Rochey] needed a stencil for a board he was working on, and lacking a laser cutter he turned to what he had available – a few bits of plastic and a CNC machine.

[Rochey] began making his stencils out of laminating pouches and an xacto knife. This worked well, but it was time-consuming, and a bit fiddly when cutting 1 mm square holes. To speed up the process, [Rochey] put one of these laminating pouches on his CNC machine, exported the ‘Top Cream’ layer in Eagle to the CNC software of his choice, and had his machine attack the plastic with a 1 mm drill bit.

To [Rochey]’s surprise, everything went as planned; in five minutes, he had a stencil with perfectly accurate holes that masked off everything but the SMD pads.

Thanks [Fabien] for sending this one in.

How To Etch Your Own Solder Paste Stencils

We’re kind of surprised we haven’t covered this concept before since it only uses techniques that are commonly avaialable for home PCB fabrication. [Ray] made this solder paste stencil out of a sheet of copper using the same etching techniques you would for a circuit board. He designed and printed a resist pattern, with toner everywhere except the places where there should be holes in the stencil. He transferred the toner to the copper using an iron.

The difference here should be obvious; this a thin copper sheet with no substrate. Because of that, you must protect the copper surface before etching. he covered the entire thing, both sides, in packing tape. After that it’s into the Cupric Chloride bath to dissolve the exposed parts. Once the tape and toner has been removed you can scree a precise amount of solder paste onto your boards.

This isn’t for everyone, but if you’re assembling many boards it’s not a bad approach. If the stencil is no longer used it can be recycled, but we do wonder how corrosion on the copper will affect the stencil’s performance.

The idea for this technique came to [Ray] from a guide that’s been around for years.

Solder Paste Dispenser Hacked To Run Off Compressed Air Cans

solder_paste_dispenser_air_can_hack

[John] got a shiny new solder paste dispenser for a steal, and before he hooked up the tool, he decided to take a look inside to make sure everything was on the up and up. Aside from a few questionable wiring practices he didn’t approve of, everything else looked to be in good working order.

The only thing that was bothering [John] is that he wasn’t too keen on keeping his noisy and large air compressor in his workshop, so he set off to find a different way to provide compressed air to the device. He settled on air dusters like those used for cleaning the crumbs out of your keyboard, but he needed to find a way to reliably get the air to his solder dispenser. He heated the air can’s nozzle until he was able to screw his dispenser’s hose barb into it, creating a tight seal. The modified nozzle was reattached to the can and placed in a simple jig that keeps the nozzle held down continuously.

[John] fired up his dispenser, and the 80 psi coming from the duster was plenty to get the solder paste flowing. Sure the rig might not be the most high tech solution, but we think it’s a pretty good means of getting quiet compressed air anywhere you need it.

Solder Paste How-to Tutorial

The application of Solder Paste is an essential part of short run manufacturing and prototyping. After getting back bare boards from a PCB shop, its time to get down to business and populate those boards. This new tutorial set assumes you have access to things such as stencils for your boards, but does mention a couple of resources on commercially available ways to purchase stencils. Of course, if you have a laser cutter, we can help you out. After getting your solder paste chops down, make sure you check out our guide to toaster oven reflowing.

[Thanks to P. Torrone]

QFN Or MLF Soldering Without Solder Paste

[youtube=http://www.youtube.com/v/c_Qt5CtUlqY&hl=en_US&fs=1&]

Take a few minutes to watch this amazingly informative video on how to solder QFN or MLF components without solder paste.  The quality of the video and the information within is quite nice. Even if you don’t intend to work with these parts, you could pick up some tips for soldering with hot air.

SparkFun Stencil And Solder Paste Class Notes

stencil

Hobby electronics manufacturer SparkFun has started offering various classes at their Boulder, CO facility. [Landon] has been attending as many as possible and posted about his experience during their Stencil and Solder Paste class. Solder paste is used when manufacturing boards with a reflow oven. He took quite a few pictures of the process and posted notes and audio. He says it’s definitely something you’d have to learn hands-on, but his numerous photos give you an idea of what’s involved. Below, you can watch a video of the paste clean-up pass and stencil removal.

Continue reading “SparkFun Stencil And Solder Paste Class Notes”