Dispensing Solder Paste Automatically

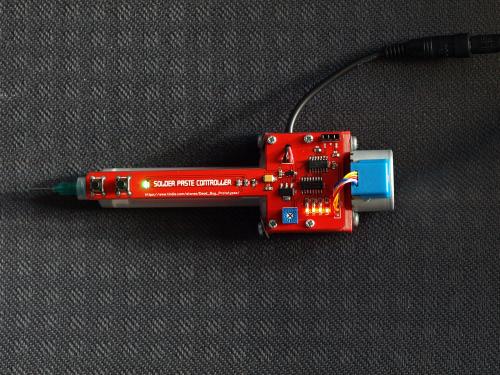
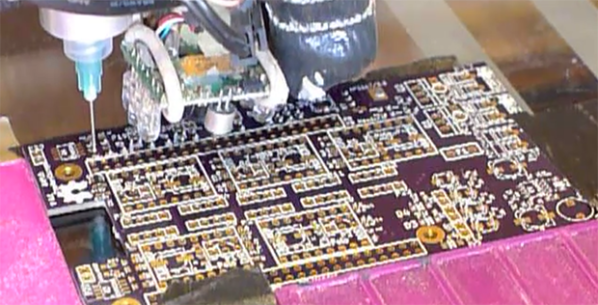
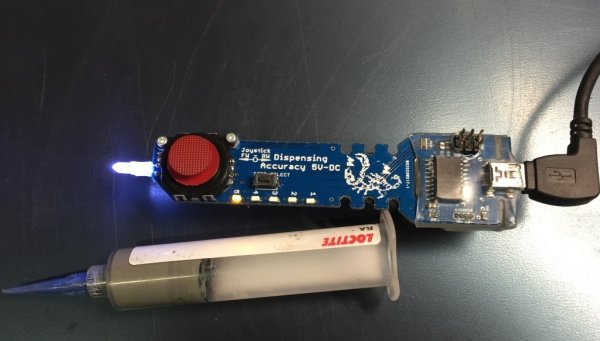
Through-hole chips are slowly falling by the wayside, and if you want to build something with new parts you will be using surface mount components. This means spreading paste and throwing it in the toaster oven. Of course, if you don’t want to take the time to get a stencil for your solder paste, you can always lay it down by hand. For that, [owhite] has created a tiny, handheld, robotic solder paste dispenser. It’s a robotic pen that dispenses just the right amount of solder paste on your pads.

The design of this solder paste dispenser is basically a syringe filled with paste and a stepper motor to push the plunger down. Devices like this already exist, and the i-extruder can be had for somewhere around two hundred bucks. Why buy when you can build, so [owhite] set out to create his own.

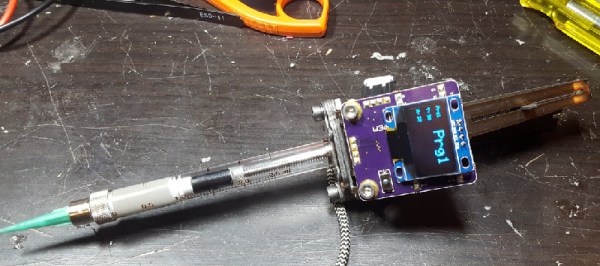
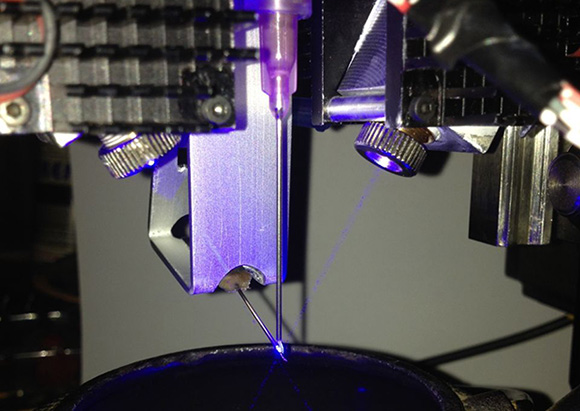
The key to a successful solder paste pen, it seems, is driving the plunger with a small NEMA 8 stepper motor, using a very fine pitch on the threads of the gears pushing the plunger down, and surprisingly finding a small-diameter syringe. [owhite] found the last bit in the form of a gas-tight syringe with a nylon gasket. The electronics consist of just a Teensy 3.2, DRV8825 stepper driver, footswitch, and an OLED for a UI.

With just a few parts, [owhite] managed to create a solder paste pen that’s better than the commercial i-extruder, and with a bit of practice can be used to place paste on some SMD pads.

Tools Of The Trade – Solder Paste Dispensing

The general process of circuit board assembly goes like this: You order your PCBs. You also order your components. For surface mount components, you apply solder paste to the pads, put the components on top, and then heat the board up so the solder paste flows and makes a bond. Then for through hole components you put the leads through the holes, and solder them with an iron or a solder wave or dip. Then you do an inspection for defects, program any microcontrollers, and finally test the completed board to make sure everything runs.

The tricky part is in volumes. If you’re only doing a few boards, it’s usually easiest to assemble them by hand. In the thousands you usually outsource. But new tools, and cheap hacked tools, have made it easier to automate small batches, and scale up into the thousands before outsourcing assembly.

In this new series which we’re calling Tools of the Trade we’ll be covering a variety of tools used for building products, and we’re starting with circuit board assembly. Let’s investigate our tools of the trade: solder paste dispensing. Continue reading “Tools Of The Trade – Solder Paste Dispensing”

Solder Paste Dispenser Has No 3D Printed Parts!

If you’ve never used a solder paste dispenser, you’re missing out. Think about always using a crappy soldering iron, and then for the first time using a high-end one. Suddenly you’re actually not bad at soldering things! It’s kind of like that.

Most solder paste dispensers make use of compressed air, which requires an extra setup to use that you might not have. The goal of this project was to make a solder paste dispenser that doesn’t use compressed air, and doesn’t have any 3D printed parts (in case you don’t have a 3D printer) — and it looks like the inventor, [MikeM], succeeded!

Continue reading “Solder Paste Dispenser Has No 3D Printed Parts!”

THP Semifinalst: Laser Solder Paste

laser

A relative latecomer to The Hackaday Prize, [AltMarcxs] has nevertheless come up with a very interesting tool for fabrication, the likes of which no one has ever seen before. It’s a rotating laser soldering paste applicator, meant to be an add-on to a CNC machine. What does it do? RIght now it looks extremely cool while being an immense time sink for [AltMarcxs], but the potential is there for being much more than that, ranging from a pick and place machine that also dispenses solder paste, to the closest thing you’ll ever get to a carbon fiber printer.

[AltMarcxs]’s build consists of two 3W laser diodes focused just beyond the tip of the syringe. The syringe dispenses solder paste, and rotating the diodes around, [Alt] is able to put a melted solder blob anywhere on a piece of perfboard. He put up a reasonably well focused video demonstrating this.

With a few homebrew pick and place machines making the semifinalist cut for The Hackaday Prize, it’s easy to see the utility of something like this: Putting a board in a machine, pressing a button, and waiting a bit for a completely populated and soldered board is a dream of the electronic hobbyist rivaled only by a cheap and easy way to make PCBs at home. [AltMarxcs]’s machine could be one step on the way to this, but there are a few other ideas he’d like to explore first.

The build also has wire feeders that allow a bit of copper wire to be soldered to the newly formed metal blob. There are plans to replace this with a composite fiber, replace the paste in the syringe with a UV resin, cut the fiber and cure the resin with the laser, and build something much better than other carbon fiber 3D printers we’ve seen before.


SpaceWrencherThe project featured in this post is a semifinalist in The Hackaday Prize. 

Electric Solder Paste Dispenser Speeds Up Reflow Prep

solder paste dispenser

[Geir Andersen] of Let’s Make Robots has been venturing deeper and deeper into the wonderful world of surface mounted devices, which as you know, can be tricky to solder! Not wanting to shell out a few hundred for a professional solder paste dispenser (and air compressor), [Geir] decided to build his own.

It allows him to use a standard syringe for solder paste, which can easily be refilled using this technique. The professional dispensers use air pressure to control the flow of the paste, but [Geir] decided to go the all-electric route instead. He’s hooked up a small stepper motor to a threaded shaft which can push the plunger up and down the syringe.

Couple that with a few 3D printed parts for the housing, a nicely designed PCB, and bam you have yourself a super handy solder paste dispenser! He’s even included a small potentiometer on the board to change the speed of the motor.  It might not be quite as accurate as a professional one, but as you can see in the video after the break it seems to work great for [Geir’s] purposes.

Continue reading “Electric Solder Paste Dispenser Speeds Up Reflow Prep”

Dispensing Solder Paste With A 3D Printer

There’s a strange middle ground in PCB production when it comes to making a few boards. Dispensing solder paste onto one board is easy enough with a syringe or toothpick, but when pasting up even a handful of boards, this method gets tiresome. Solder paste stencils speed up the process when you’re doing dozens or hundreds of boards, but making a stencil for just a few boards is a waste. The solution for this strange middle ground is, of course, to retrofit a 3D printer to dispense solder paste.

This project was a collaboration between [Jake] and [hzeller] to transform KiCAD files to G Code for dispensing solder paste directly onto a board. The machine they used was a Type A Machines printer with a solder paste dispenser in place of an extruder. The dispenser is hooked up to the fan output of the controller board, and from the looks of the video, they’re getting pretty good results for something that’s still very experimental.

All the code to turn KiCAD files into G Code are up on [hzeller]’s github. If you’re wondering, the board they’re pasting up is a stepper driver board for the BeagleBone named Bumps.

Videos below.

Continue reading “Dispensing Solder Paste With A 3D Printer”

Fast And Easy Solder Paste Stencils

If you’re making your own boards with SMD parts, you might want to get a solder paste stencil. Usually made of laser-cut mylar or extremely thin steel, these stencils allow you to squeegee solder paste onto your board’s pads and make assembly a whole lot easier. [Rochey] needed a stencil for a board he was working on, and lacking a laser cutter he turned to what he had available – a few bits of plastic and a CNC machine.

[Rochey] began making his stencils out of laminating pouches and an xacto knife. This worked well, but it was time-consuming, and a bit fiddly when cutting 1 mm square holes. To speed up the process, [Rochey] put one of these laminating pouches on his CNC machine, exported the ‘Top Cream’ layer in Eagle to the CNC software of his choice, and had his machine attack the plastic with a 1 mm drill bit.

To [Rochey]’s surprise, everything went as planned; in five minutes, he had a stencil with perfectly accurate holes that masked off everything but the SMD pads.

Thanks [Fabien] for sending this one in.