Stuff Wireless Charging Into A Nook’s Crannies

Qi receiver for NookMany technologies that come about for one type of product make us want to extend it to other things. For instance, we’d like the ability to remotely unlock our front door when it’s raining or our hands are full. Once [MS3FGX] experienced Qi wireless charging with his Nexus 5, he wanted the ability to wirelessly charge all the things. The first gadget on the list was his Nook Simple Touch eReader, which he successfully retrofit with a Qi receiver.

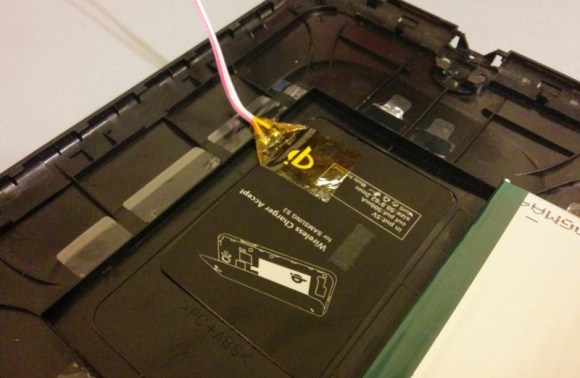
Space is at a premium inside of most modern technology. As it turns out, there is a burgeoning market for shoving inductive charging receivers into things. [MS3FGX] decided to try a Qi receiver meant for a Samsung S3, and it actually fits very well behind the battery. He glued it down and then cut a channel in the battery tray for the wires.

[MS3FGX] went full hack with this one and wired it to the Nook’s USB port on the inside. He would have preferred a thinner wire, but used some from a 40-pin IDE cable with little trouble. After the operation was complete, he put it on the Qi pad and it started charging right away. To his delight, the battery increased 20% after an hour. And yes, he can still charge the Nook the traditional way without any issues.

If you want to add wireless charging to any phone cheaply and easily, we’ve got you covered.

Electric Imp Locks And Unlocks Your Door Automatically

2013-11-19 14.23.18

When the folks over at PinMeTo moved into a new office, they were dismayed to find out an extra key would run them a whopping 500 sek (~$75 USD). Instead, they decided to build their own automatic door lock using the Electric Imp system.

If you’re not familiar, the Electric Imp is a small SD card designed to provide internet (Wi-Fi) functionality to consumer devices. While it looks like an SD card, you cannot just plug it into any SD card slot and expect it to work — it still needs a prototyping board. We’ve seen it used to make a wireless thermal printer, or even make a tweeting cat door to let you know of any feline intruders!

Anyway — back to the hack. To move the lock cylinder they’re using a basic RC servo connected directly to the Imp. A flex sensor is installed on the side of the door over-top the lock — this provides feedback to the Imp whether or not the door is in fact locked. The Imp then communicates to Everymote to allow for keypad access from your mobile phone.

It probably ended up costing more in time and money than a new key, but hey, it looks like it was a fun project to do!

Sniffing Wired Garage Door Opener Signals

sniffing-garage-door-signals

In addition to being something fun to do with an oscilloscope, this could be a valuable time-saver for anyone looking to tap into the wired communications on a garage door opener. If you own an older model you might be scratching your head. But newer units have more than just one button operation, usually extending to at least two extra buttons that control the lights on the motor unit and lock out wireless control. A quick probing turned up the communication scheme used by the button unit mounted next to the door into the house.

We’ve patched into our own garage door using a simple relay to interface with a microcontroller which will still work for opening and closing the door But if you’re looking for extended control you need to spoof one of the timing signals detailed in this post. We like the stated examples for future hacks: building a better wired button unit, or adding some type of RFID integration. We could see this approach for hacking in motion light control for door openers that don’t have it.

[Thanks Victor]

Raspberry Pi Garage Door Automation

Like many of us, [Felix] sometimes wonders if he actually closed the garage door. I know I’m always double-checking my car locks! So, he decided to automate his garage door to give him some peace of mind!

He’s been working on a pretty big Raspberry Pi home automation series, and in this final segment he shows off his new GarageMote board which, as you can guess, lets him wirelessly control the door. It’s a very simple board complete with a small relay, a diode, and 2 resistors. The 8 pin header provides connection to two hall effect sensors that detect the status of the garage door, and the original door opener. He then connects this to an open-source wireless Arduino clone of his own design, dubbed the Moteino. A pair of these communicate to the Raspberry Pi which acts as his secure home automation gateway server.

The whole project is extremely slick, and very well documented – so if you’re looking at automating your home, [Felix] has a wealth of knowledge to share — well at least if you want to use is Raspberry Pi!

Stick around after the break to see the web-server controlled garage door in action.

Continue reading “Raspberry Pi Garage Door Automation”

Wireless Toilet Occupancy Sensor

toilet-occupancy-sensor

It’s a bit awkward for all parties involved if someone is waiting right outside the bathroom door. This system helps to alleviate that issue by letting the next user know when the loo is available. [Akiba] has been working with the folks at Loftworks, a design company in Tokyo, to get the status beacons seen above up and running.

The staff is mostly women and there is just one single stall women’s toilet on each of the three floors. The boxes above represent the three stalls, using colored light to indicate if a bathroom is available or in use. Detection is based on a PIR motion sensor in each stall. They communicate back with the display units wirelessly, which initially presented quite a problem. The doors on the bathroom are steel, and when closed they effectively block communications. The 900 MHz radios used in the system are on the 802.15.4 protocol. But they can be set a couple of different ways by moving resistors. Each came configured for the fasted data throughput, but that’s not really necessary. By changing to a slower configuration [Akiba] was able to fix the communications problems.

We remember seeing a similar bathroom indicator in a links post some time ago.

Stealing Cars And Ringing Doorbells With Radio

The cheap software defined radio platforms that can be built out of a USB TV tuner aren’t getting much love on the Hackaday tip line of late. Thankfully, [Adam] sent in a great guide to cracking sub-GHz wireless protocols wide open, and ringing doorbells, opening cars, and potentially setting houses on fire in the process.

The first wireless hack [Adam] managed to whip up is figuring out how a wireless doorbell transmitter communicates with its receiver. [Adam] connected a FUNcube software defined radio dongle (although any one of the many USB TV tuner dongles we’ve seen would also work) and used GNU Radio to send the radio signals received to a WAV file. When looking at this audio file in Audacity, [Adam] saw the tell-tale signs of digital data, leaving with a string of 1s and 0s that would trigger his wireless doorbell.

The FUNcube dongle doesn’t have the ability to transmit, though, so [Adam] needed a more capable software defined radio to emulate the inner workings of a doorbell transmitter. He found one in the Ettus Research USRP, a software designed radio that’s doing a good job of keeping [Balint], Hackaday SDR extraordinaire, very busy. By sending the data [Adam] decoded with the FUNcube dongle over the USRP, he was able to trigger his wireless doorbell using nothing but a few hundred dollars of radio equipment and software ingenuity.

Doorbells are a low-stakes game, so [Adam] decided to step things up a little and unlock his son’s car by capturing and replaying the signals from a key fob remote. Modern cars use a rolling code for their keyless entry, so that entire endeavour is just a party trick. Other RF-enabled appliances, such as a remote-controlled mains outlet, are a much larger threat to home and office security, but still one [Adam] managed to crack wide open.

Mobile Chicken Coop Includes Wireless Sensors

mobile-chicken-coop-build

In and of itself this mobile chicken coop is a pretty nice build. There are some additional features lurking inside which you don’t find on most coops. [Neuromancer2701] built-in a set of sensors which can be accessed wirelessly. It makes it a snap to check up on the comfort of the hens without leaving the couch.

At the heart of the sensor system is an Arduino along with an Xbee module. The build isn’t quite finished yet, but so far three sensors have been implemented. A thermistor is used to read the temperature inside the coop. To make sure there’s enough water, two sheets of foil tape were applied to the water reservoir. The CapSense library measures the capacitance between these plates which correlates to the water lever (we’ve seen this type of water level sensor before). And finally, there’s a sensor that can tell if the door to the coop is open or shut.

He’s having trouble automating the door itself. This can be pretty tricky, especially if you go for a super complicated locking mechanism like this one.