Motorized Coop Door Lets The Chickens Out For You

[Larry] and [Carol] just upgraded the coop to make their lives easier, and to help keep the chickens happy. The image above is a chicken’s-eye-view of the newly installed automatic door. It’s a guillotine design that uses the weight of the aluminum plate door to make sure predators can’t get in at night. This is much easier to fabricate than a locking coop door would have been. Some leftover aluminum channel guides the door on either side, with a spool above it to wind up some rope, thereby lifting the door.

You can see the belt-drive motor is also mounted inside, out of the element. To the right of the image you can just make out a plastic food container. This protects the electronics from the elements. Inside you’ll find an H-bridge to drive the motor, a real-time-clock to make sure the schedule is well-timed, and an Arduino. There are a couple of reed switches which let the microcontroller sense the position of the door.

After the break you can see a demonstration video, as well as a slide show with build details. The motor is pretty quiet and, although it spooks the chicken in the demo just a bit, we’d be they’ll be used to it in no time.

Continue reading “Motorized Coop Door Lets The Chickens Out For You”

Color Changing Door Handles

This color changing door handle was made using a very simple manufacturing process. [Barmak] already had experience working with polyester resins when making passive component filled drawer pulls (he included a couple of pictures at the end of his post). The same process was used here except that instead making it from one solid chunk of clear resin he decided to use alternating layers of dyed resin.

The build begins with a mold made out of MDF. This material has a very smooth surface finish which will help with the final look of the door handle. Threaded rod is inserted through carefully placed holes in the side of the mold — these will serve as the mounting hardware when complete. He then pours thin coats of resin to build up the complete handle.

An RGB LED strip is incorporated in the side of the handle that will go toward the door. It seems like the wires to control the device pass through a hollow spacer surrounding the threaded rod. He makes some mention of using a 555 timer to control the colors, but there’s not much more information than that. Still, the reflected light is a unique feature if you’ve got a place in your home that needs to be spiced up.

Once you’re done, you can use any leftover resin to make your own project boxes.

Roomba Used To Map Indoor Air Quality

roomba_based_air_quality_tester

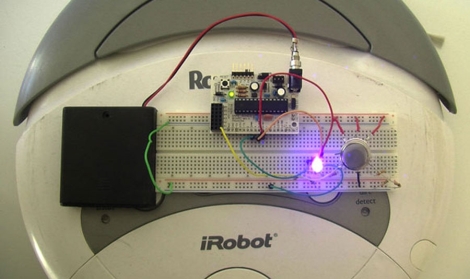
The next time you set off for a long day in the coal mines, forget the canary – bring your Roomba along instead!

While we are pretty sure that canaries are no longer used in the mining industry, this Roomba hack could make a suitable replacement if they were. A team from the Public Laboratory for Open Technology and Science (PLOTS) recently showed off a Roomba which they modified to test an area’s air quality. Using an Arduino and a volatile organic chemical (VOC) detecting air quality sensor, the Roomba goes about its normal business, lighting an LED any time it encounters overly contaminated air. When captured via a long exposure image, the process creates a “bad air” map of sorts, with the polluted areas highlighted by the glow of the LED.

While the Roomba currently only detects VOCs, the team plans on adding additional sensors in the near future to expand its functionality. The Roomba is merely a proof of concept at the moment, but we imagine that similar technology will be adapted for use in unmanned explorations of chemically hostile environments, if that hasn’t happened already.

[via DVice] [Image via TechnologyReview]

IButton Is Opening Doors At The TkkrLab

Finding alternative ways to unlock doors is a favorite hacker pastime. TkkrLab recently took on the challenge themselves. The hackerspace, which is located in the Netherlands, faced a problem common to communal workshops; how could they manage keyed access for a large number of members? The metal keys for the door are special, and cannot be cheaply duplicated. To further compound the issue, they are not the only tenants in the building so they can’t replace the lock with one that uses less-expensive keys. So they decided to add an electronic solution.

They first looked at a method for electronically opening the door. Often, this comes in the form of an electronic strike, but rather than alter the door jamb, they replaces the latching mechanism. The electronic latch was compatible with the original cylinder, which means the old keys still work in it. You can see the new assembly above. Just to the left of the lock is an iButton reader. We’ve seen this hardware in projects many times before. It’s cheap, and easy to work with. Now TkkrLab issues an iButton to each member, and can keep track of who is coming in door.

DIY Servo Activated Door Lock With Capacitive Touch Keypad

diy_servo_activated_door_lock_capacitive_touch

Since he was a kid [Giorgos Lazaridis] has always loved the idea of having an electronic door locking mechanism, and now that he has the means, he’s decided to construct one for securing the door to his apartment. He calls the project “simple and cheap”, though we’re not sure about the first part. Taking a look at his very detailed build log, you can see that he has invested quite a bit of time and effort into this impressive project.

Buying an off the shelf product was expensive and not a whole lot of fun, so [Giorgos] disassembled his door’s locking mechanism to see how he might be able to actuate the lock electronically himself. With minimal modifications to the lock, he was able to add a servo which reliably opens the it when triggered.

With the mechanical portion of the project out of the way, he spent a great deal of time working on the door’s electronic components, including the PIC-based controller and capacitive keypad. The keypad proved to be a bit of a problem, but after a few revisions he found a design that was both reliable and pleasing to the eye.

The locking mechanism works pretty well, as you can see in the video below, and [Giorgos] is quite pleased with the results.

Continue reading “DIY Servo Activated Door Lock With Capacitive Touch Keypad”

A Doorbell Loud Enough To Wake The Dead

really_loud_doorbell

[Ed Nauman] runs a machine shop, which we imagine can be quite loud at times. Sick of never hearing the doorbell when he was busy working on things, he decided that the solution to his problem was a new doorbell…an incredibly loud doorbell.

His Really Loud Doorbell (RLD for short) is actually a pretty simple device. We imagine he could have wired up an old alarm bell instead, but where’s the fun in that? The doorbell was built using a PIC16F876 uC, which is used to control the air flow through a pneumatic valve. When someone rings his doorbell, the pneumatic actuator pulses up and down, rapidly striking a piece of 1/4” thick steel pipe. As you can see in the video below, it is quite loud and likely to cut through any shop noise without much trouble.

We have seen some extremely loud doorbells before, but we figured that at least a handful of you work in similar environments – have you implemented any inventive ‘notification’ systems in your workspace? Let us know in the comments.

[via Adafruit Blog]

Continue reading “A Doorbell Loud Enough To Wake The Dead”

An Even Simpler Smartphone Garage Door Opener

We have seen smartphone garage door openers in the past, but [Lou’s] Hack is beautiful in its simplicity. His door opener tackles the problem without using computers, Arduinos, wireless modules or even any smartphone based applications. For this project all that is needed is a Bluetooth headset and a single transistor. The door opener uses the Samsung HM1100 Bluetooth headset, which [Lou] has done significant testing on to show that his creation is quite secure and will not open the door unexpectedly.

When this headset connects to a phone it produces a beep from the earbud, so [Lou] removed the speaker and replaced it with a transistor. Now he can use the voltage spike produced by the amplifier before the beep as his switching signal. By wiring the transistor in parallel with the door button inside his garage he is able to open the door wirelessly by connecting then right away disconnecting from the headset. This setup is apparently perfectly secure as the only way to initially link your phone with the headset is to be inside the garage. Check out the video after the break for build instructions and a demonstration.

Continue reading “An Even Simpler Smartphone Garage Door Opener”