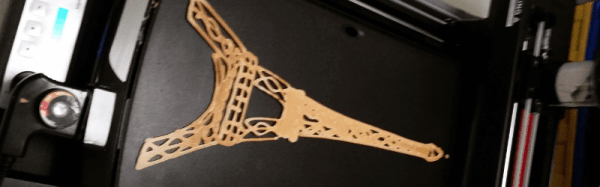
It is definitely a first world problem: What do you do when creating a custom pancake requires you to put a design on an SD card and plug it into your pancake printer? This is what was nagging at [drtorq]. Granted, since he works for a publication called “The Stack” maybe a pancake printer isn’t so surprising. [drtorq] built the custom PancakeBOT software on Linux as a start to his hacking on the flapjack creating robot.
[drtorq] promises more hacking on the printer in the future, so this is just step one. We expect the mods will be a lot like a typical 3D printer, except the heated bed is absolutely necessary on this model. The printer is more like a CNC engraver than a 3D printer since it is basically an XY carriage with a nozzle that flows batter instead of polymer.
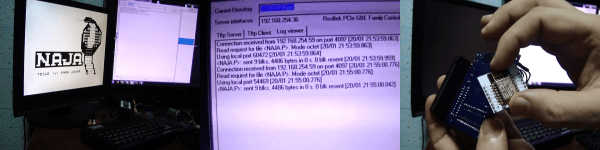
[Victor Trucco] makes us wish we spoke Portuguese. He’s done a lot of retrocomputing projects including connecting a ZX81 to the Internet to load programs. The project uses — what else — an ESP8266 to get the WiFi communications. You can see a video below if you want to exercise your high school Portuguese.
It is somewhat ironic that the ZX81’s CPU is kept busy driving the video, reading the keyboard, and running about just over 3 MHz which doesn’t even translate into 3 MIPS on that processor. Meanwhile, the “servant” ESP8266 has a 32-bit Tensilica CPU running at 80 MHz. Times have changed.
[CNLohr] is kinda famous round these parts; due to some very impressive and successful hacks. However, for his 20k subscriber video, he had a bit to say about failure.
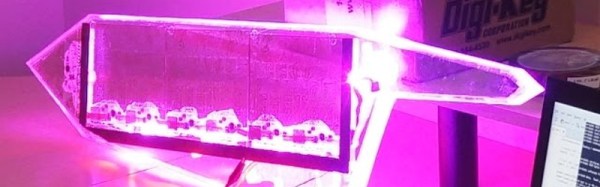
Of course glass circuit boards are cool. Linux Minecraft things are also cool. Hacks on the ESP8266 that are impressive enough people thought they were an April Fool’s joke are, admittedly, very cool. (Though, we have to confess, posting on April 1 may have added to the confusion.) For a guy who puts out so many successes you’d think he’d talk about the next ones planned; hyping up his growing subscriber base in order to reel in those sweet sweet Internet dollars.
Instead he shows us a spectacular failure. We do mean spectacular. It’s got beautiful intricate copper on glass key pads. He came up with clever ways to do the lighting. The circuit is nicely soldered and the acrylic case looks like a glowing crystal. It just never went anywhere and never worked. He got lots of people involved and completely failed to deliver.
However, in the end it was the failure that taught him what he needed to know. He’s since perfected the techniques and skills he lacked when he started this project a time ago. We’ve all had experiences like this, and enjoyed hearing about his. What failure taught you the most?
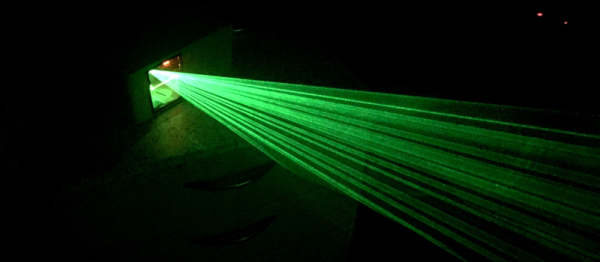
At its heart is an Arduino Uno and an Adafruit Motor Shield v2. The green laser is turned on and off by the Arduino through a transistor. But the part that makes this really a fun machine to watch at work are the two stepper motors and two mirrors that reflect the laser in the X and Y directions. The mirrors are rectangles cut from a hard disk platter, which if you’ve ever seen one, is very reflective. The servos tilt the mirrors at high speed, fast enough to make the resulting projection on the wall appear almost a solid shape, depending on the image.
He’s even written a Windows application (in C#) for remotely controlling the projector through bluetooth. From its interface you can select from around sixteen predefined shapes, including a what looks like a cat head, a heart, a person and various geometric objects and line configurations.
There is a sort of curving of the lines wherever the image consists of two lines forming an angle, as if the steppers are having trouble with momentum, but that’s probably to be expected given that they’re steppers controlling relatively large mirrors. Or maybe it’s due to twist in the connection between motor shaft and mirror? Check out the video after the break and let us know what you think.
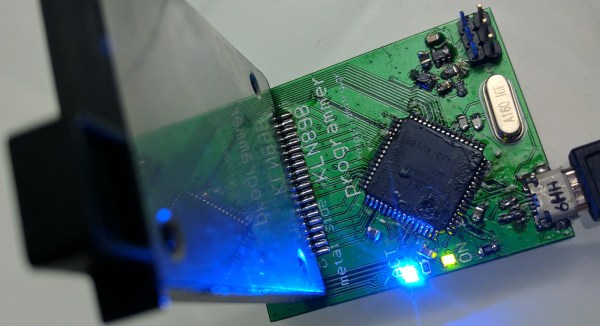
[Dmitry Grinberg] recently bought a Cessna 150 that contained an old IFR-certified GPS from 1996, the KLN89B. The GPS unit contains a database which by law has to be kept up-to-date for IFR flight. The problem was that, while Honeywell still supplied the data in electronic form, [Dmitry] had no way to update the GPS. The original ways for doing it are either no longer supported, too expensive and a pain to do, or not available to him due to the way his GPS was installed.
Two of those ways involved removing a data card which can legally be slid out of the GPS’s front panel. The data card is what stores all the data but it’s a proprietary card and there’s no reader for it. [Dmitry]’s solution was therefore to make his own reader/writer board.
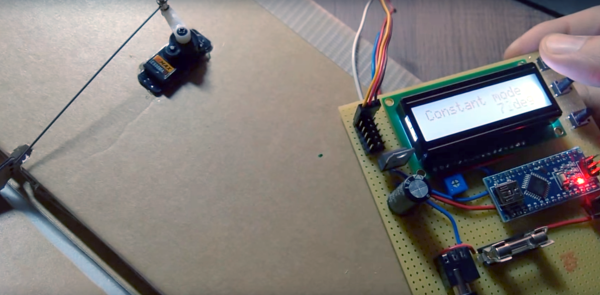
RC flying is one of those multi-disciplinary hobbies that really lets you expand your skill set. You don’t really need to know much to get started, but to get good you need to be part aeronautical engineer, part test pilot and part mechanic. But if you’re going to really go far you’ll also need to get good at electronics, which was part of the reason behind this Arduino servo tester.
[Peter Pokojny] decided to take the plunge into electronics to help him with the hobby, and he dove into the deep end. He built a servo tester and demonstrator based on an Arduino, and went the extra mile to give it a good UI and a bunch of functionality. The test program can cycle the servo under test through its full range of motion using any of a number of profiles — triangle, sine or square. The speed of the test cycle is selectable, and there’s even a mode to command the servo to a particular position manually. We’ll bet the build was quite a lesson for [Peter], and he ended up with a useful tool to boot.
Those of you with long memories and a compulsive TV viewing habit might remember [Max Headroom], a quirky piece of TV ephemera from the late 1980s and early 1990s. [Max] was a supposedly computer generated TV show host and VJ with a pseudomechanical stutter, a slightly blocky rendered head, and a moving background of rendered lines. He looks a little quaint for viewers with a few decades viewing experience of CGI, but in his day he was cutting-edge cypberpunk TV.
The real [Max Headroom] (Fair use) Via Wikimedia Commons.If you were a bored British teenager and future Hackaday writer vegging out in front of your parents’ TV on an April night in 1985, you’d have caught [Max]’s genesis. He strung upon us by rising out of a title screen full of static in the Channel 4 TV movie [Max Headroom]: 20 Minutes into the Future.
The plot is a trip in itself. An investigative journalist seeking to uncover the sinister owners of his network (they run speeded-up adverts with the unfortunate side-effect of causing overweight viewers to explode) is pursued, causing a road accident in which he is injured by a collision with a safety barrier. Hence the name: [Max Headroom]. The network try to cover it up by producing a computerized facsimilie of the reporter which turns out to be an embarassing failure. They scrap the computer and it falls into the hands of a pirate TV station operating from a decrepit campervan, the Alphabetti-eating proprietor of which turns the character it contains into a TV sensation. Meanwhile the reporter escapes, recovers, and prevails over the villains.
The [Max] character proved to be something of a hit, with a TV spin-off series, VJing, adverts, and more. But that wasn’t the whole story of his appearances, back to that unexplained hack of Chicagoland TV.
The Chicago fake [Max Headroom].On the night of the 22nd of November 1987, viewers of WGN were watching a sports program when the screen went blank and they were treated to a few seconds of a slightly home-made [Max Headroom] dancing in front of those trademark moving lines. A couple of hours later on WTTW a rerun of a [Doctor Who] episode was again interrupted with the same fake [Max], this time speaking for a while before, if his performance wasn’t already bizarre enough, being spanked by a woman whose face is off camera.
As a piece of television history it’s an intriguing mystery, though since so little is known about the mechanism through which it was achieved it hasn’t achieved the notoriety in the technical world that you might expect. The stations involved conducted full investigations at the time and failed to locate a culprit, perhaps they should have been looking for that old campervan with the antennae on its roof.
It is very unlikely that a similar stunt could be performed today, with entirely digital TV studios and easy access to encryption technologies for external links to transmitter sites. But in the 1980s a studio would still have been an analogue affair so there would have been more opportunities to insert an unauthorized feed. Next year sees the 30th anniversary of the event, it would be fascinating if the perpetrator would mark it by anonymously revealing how it was achieved. Of course, we’d love to hear how you would have done it in the comments below. Surely we have readers who are intimately familiar with the television broadcasting equipment of the time.
Below the break we’re showing you both fake [Max] intrusions into the Chicago airwaves. First is the short outing on EGN, below that the longer one on WTTV.

![The real [Max Headroom] (Fair use) Via Wikimedia commons.](https://hackaday.com/wp-content/uploads/2016/11/maxheadroommpegman.jpg)
![The Chicago fake [Max Headroom].](https://hackaday.com/wp-content/uploads/2016/11/fake-max.jpg)


