CNC Plotter Uses Only The Good DVD Drive Parts

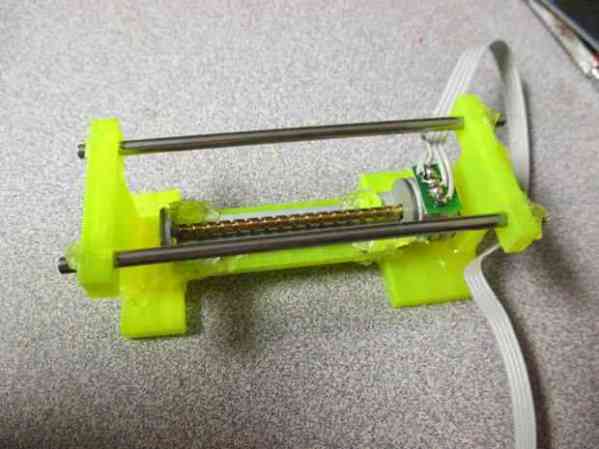
It wasn’t that long ago that wanting to own your own 3D printer meant learning as much as you possibly could about CNC machines and then boostrapping your first printer. Now you can borrow time on one pretty easily, and somewhat affordably buy your own. If you take either of these routes you don’t need to know much about CNC, but why not use the tool to learn? This is what [Wootin24] did when building a 3D printed plotter with DVD drive parts.

Plotters made from scrapped floppy, optical drives, and printers are a popular hand, and well worth a weekend of your time. This one, however, is quite a bit different. [Wootin24] used the drives to source just the important parts for CNC precision: the rods, motors, motors, and bearings. The difference is that he designed and 3D printed his own mounting brackets rather than making do with what the optical drive parts are attached to.

This guide focuses on the gantries and the mechanics that drive them… it’s up to you to supply the motor drivers and electrical side of things. He suggests RAMPS but admins he used a simple motor driver and Arduino since they were handy.

Hacking A DVD Recorder

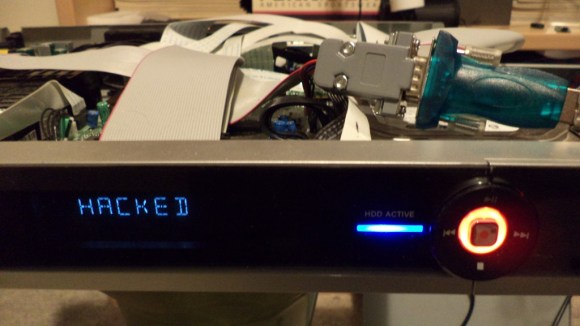
Hacked DVD Recorder

[w00fer] wanted to see if any modifications to a DVD Recorder were possible. Initially, the goal was to upgrade the internal hard drive for additional storage. However, after cracking open a DVDR3570H and finding a service port, he decided to look a bit deeper.

Connecting an RS232 to USB converter to the service port resulted in garbled data. It turned out that the port was using TTL signal levels instead of RS232 levels. This was solved by building a converter using the MAX232 converter IC.

With the converter in place, the service menu appeared. It performs some tests and spits out the results when the device is booted. After that, it sits at a prompt and waits for commands. Fortunately, [w00fer] found the service manual which lists the available commands. So far, he’s been able to generate test patterns, test lights, change the display text, spin up the hard drive, and read device information. However, the next steps include disabling Macrovision copy protection, dumping the EEPROM and NVRAM, and copying data off of the hard drive. If you think you can help [w00fer] out, let him know.

LEGO Jukebox Choses From Different CDs

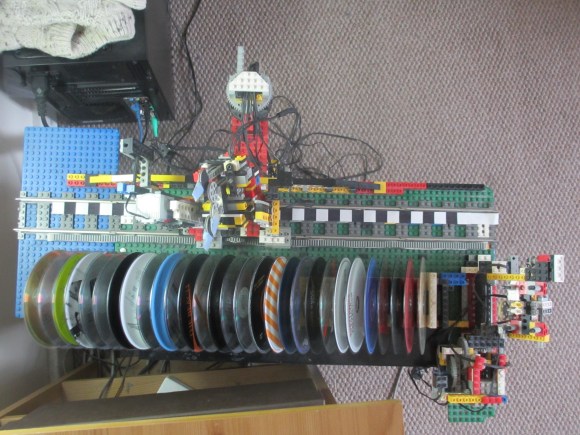
lego-jukebox

Music used to be delivered on round plastic sheets called Compact Discs. [Ralph] still has some of them lying around which he used in his latest project. It’s a CD changer built out of LEGO pieces. It reminds us of the mid-century jukeboxes that changed out 45s on a record player.

You can’t tell from this image, but the entire disc changer build is shaped to sit atop a computer case. The system is built in two parts. There is a transport arm which moves left and right along the rack of CDs. It uses that black and white strip as an encoder to track its movement. It can reach in, grab a disc, and take it all the way down to the right where it drops it off in a staging area. The second part of the build now takes over, grabbing the disc from the staging holder and rotating it down into the CD tray of the PC. All of this is demonstrated after the jump.

If you’re like us you prefer digital delivery for your music. We haven’t crossed that watershed with video games yet and that’s why we still love this Xbox 360 disc changer hack.

Continue reading “LEGO Jukebox Choses From Different CDs”

DVD Laser Diode Used To Build A Laser Engraver

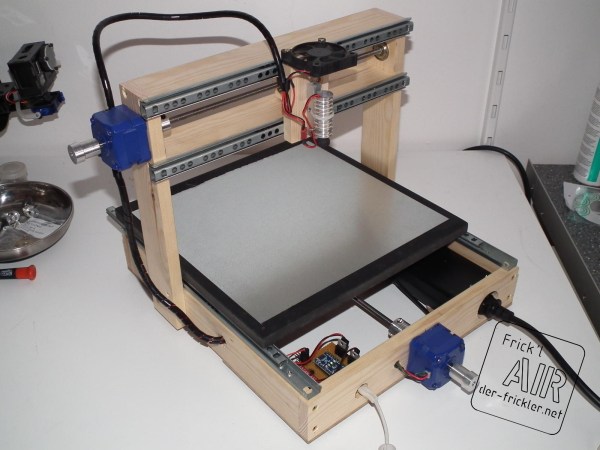
[Johannes] has been reading Hackaday for years but this is the first project he’s tipped us off about. It’s a laser engraver built from a DVD burner diode (translated). It turned out so well we wonder what other projects he’s forgotten to tip us off about?

This is the second CNC machine he’s seen through from start to finish. It improves upon the knowledge he acquired when building his CNC mill. The frame is built from pine but also uses bits of plywood and MDF. It can move on the X and Y axes, using drawer sliders as bearings. The pair of blue stepper motors drive the threaded rods which move the platform and the laser mount. Just above the laser he included a small DC fan to keep it from burning up. The control circuitry is made up of an Arduino Nano and a stepper motor driver board. Catch a glimpse of the engraver cutting out some stencil material after the break.

There must be something about Spring that brings out the urge to work with laser diodes. We just saw a similar 1W cutter last week.

Continue reading “DVD Laser Diode Used To Build A Laser Engraver”

DVD Power Supply Repair Tips

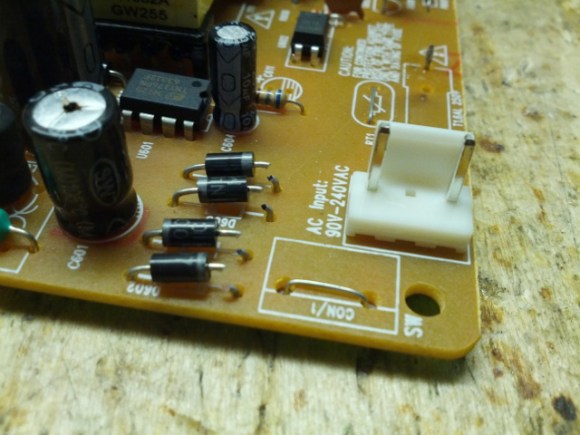
bridge-rectifier-repair

This demonstration fixes the power supply of a DVD player, but the skills transcend this one application. [Alan] walks us through the process of repairing a power supply (translated) on a simple consumer electronics unit.

Obviously this starts by cracking open the dead device and verifying that the culprit is the power supply. [Alan] then removes that board from the chassis and gets down to work with a visual inspection. He’s got several images which illustrate things to look for; blistered electrolytic capacitors, cracked solder joins, scorch marks, etc. In his case there’s obviously a burnt out fuse, but that merely protects the hardware from further damage, it’s not the cause. Next he examines the diodes of the bridge rectifier. These need to be removed from the system to do so, which he accomplishes by clipping one end of each as seen above. He found that two diodes on one side of the bridge had broken down. After replacing them he tries a new fuse which immediately burns out. But a quick swap of the capacitors and he gets the thing back up and running.

We perk up every time we see this type of repair hack. We figure if we can build our own hobby electronics we should be able to fix the cheap devices like this one.

Scrapped DVD Player Turns Into A Full Featured Clock

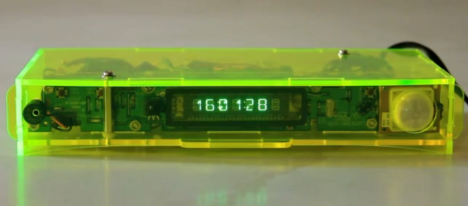
[Dmitry] really went the distance with this project. It started as a broken DVD player scrapped for parts, and turned into this clock with way too many features. That link is a pretty a dry technical collection of the work. You’ll definitely want to have a look at it, but we’d suggest first watching the demo video after the break which is initially much more exciting.

The donor DVD hardware included a Vacuum Fluorescent display which is the nugget which [Dmitry] was after. But that board came along with some other nice things, like an integrated IR receiver. He also chose to use the PSU from the device. An Arduino is used to drive the clock. We’re not sure where he found it, but the video shows the service manual for the DVD player which must have a been a real help in interfacing with the display. The white dome on the right is a PIR motion sensor. It brings the device out of sleep mode when someone is in the room.

The case is laser-cut and started as cardboard to ensure everything fit as designed. The enclosure makes it a showpiece, but the features of displaying day, date, time, and temperature make it functional as well. Since the VFD is alpha-numeric we think this could even see future upgrades to be used as a new-mail/tweet/IM alert as well.

GD-ROM Drive Emulated To Use SD Cards Instead

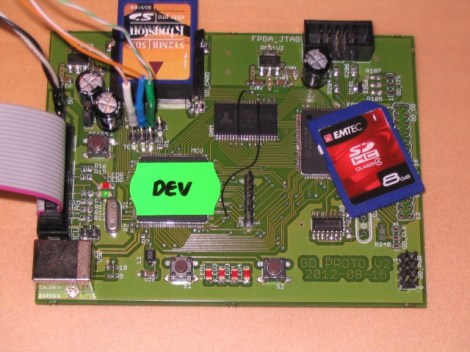
This board is the prototype which [Deunan] has been working on in order to use an SD card in place of a GD-ROM drive. The idea is to fully implement the hardware protocol used by a GD-ROM drive so that it can be completely replaced. The end goal is to do away with the optical drive on a Dreamcast game console.

As these game systems age, the optical drive is the most likely part to fail first as it involves moving parts and a lens that may degrade over time (we’re basing that assumption on our experience with DVD-ROM and RW). This may sound like a way to play pirated games, but [Deunan] makes it clear in his question and answer post that the firmware for his prototype is written to only play proper disc images and will probably not play the rips which are found in the darker recesses of the interwebs.

He’s been at this for quite a while. Here’s an earlier project he did that uses an FPGA board for the hardware.

[Thanks Walt]