Build A Plotter Using Scrap DVD Drives

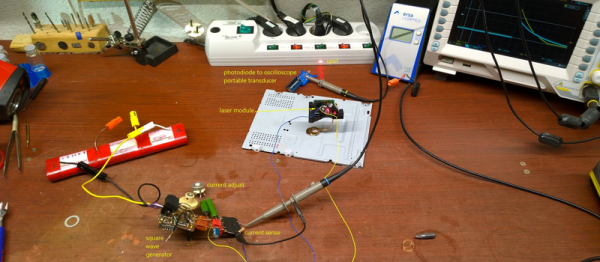
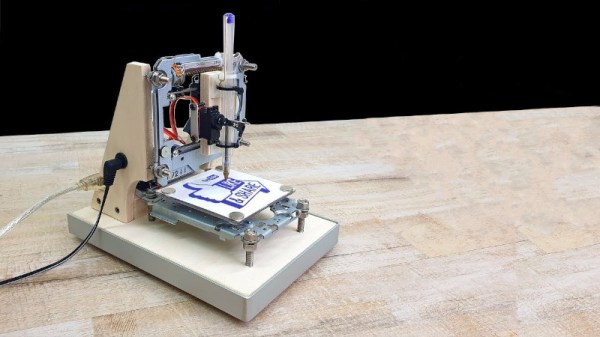
Building your own CNC machine can present a series of varied challenges. There are the software considerations, but also the mechanical side of things – motors, shafts, screws and slides all need to be addressed in a working design. Of course, you can always outsource some of the work – and that’s precisely what [Daniele Tartaglia] did with this pen plotter build (Youtube link, embedded below).

It’s a capable plotter, able to nicely reproduce both graphics and text.

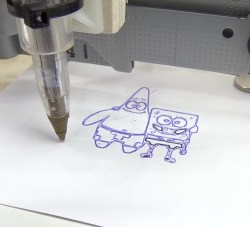
The build gains X and Y axes by virtue of two salvaged DVD drives. The tray mechanisms come ready to go with stepper motors and lead screws already assembled, and make a great basis for a compact plotter. A wooden frame is constructed to hold everything together. The pen is held against the paper with a rubber band which helps the ballpoint to draw a nice dark line, with a servo used as a pen retract mechanism. An Arduino Uno with a stepper driver shield is then employed to run the show.

It’s a tidy build, with neat cable management and smart design choices giving it a pleasing aesthetic. The CNC fundamentals are good, too – with minimal backlash and slop, the plotter is able to draw quite effectively. Old optical drives are a popular choice for plotter builds, as it turns out. Video after the break.

Continue reading “Build A Plotter Using Scrap DVD Drives”

RISC-V Will Stop Hackers Dead From Getting Into Your Computer

The greatest hardware hacks of all time were simply the result of finding software keys in memory. The AACS encryption debacle — the 09 F9 key that allowed us to decrypt HD DVDs — was the result of encryption keys just sitting in main memory, where it could be read by any other program. DeCSS, the hack that gave us all access to DVDs was again the result of encryption keys sitting out in the open.

Because encryption doesn’t work if your keys are just sitting out in the open, system designers have come up with ingenious solutions to prevent evil hackers form accessing these keys. One of the best solutions is the hardware enclave, a tiny bit of silicon that protects keys and other bits of information. Apple has an entire line of chips, Intel has hardware extensions, and all of these are black box solutions. They do work, but we have no idea if there are any vulnerabilities. If you can’t study it, it’s just an article of faith that these hardware enclaves will keep working.

Now, there might be another option. RISC-V researchers are busy creating an Open Source hardware enclave. This is an Open Source project to build secure hardware enclaves to store cryptographic keys and other secret information, and they’re doing it in a way that can be accessed and studied. Trust but verify, yes, and that’s why this is the most innovative hardware development in the last decade.

Continue reading “RISC-V Will Stop Hackers Dead From Getting Into Your Computer”

A Solar-Powered Headset From Recycled Parts

Solar power has surged ahead in recent years, and access for the individual has grown accordingly. Not waiting around for a commercial alternative, Instructables user [taifur] has gone ahead and built himself a solar-powered Bluetooth headset.

Made almost completely of recycled components — reducing e-waste helps us all — only the 1 W flexible solar panel, voltage regulator, and the RN-52 Bluetooth module were purchased for this project. The base of the headset has been converted from [taifur]’s old wired one, meanwhile a salvaged boost converter, and charge controller — for a lithium-ion battery — form the power circuit. An Apple button makes an appearance alongside a control panel for a portable DVD player (of all things), and an MP4 player’s battery. Some careful recovery and reconfiguration work done, reassembly with a little assistance from the handyman’s secret weapon — duct tape — and gobs of hot glue bore a wireless fruit ready to receive the sun’s bounty.

Continue reading “A Solar-Powered Headset From Recycled Parts”

From CRT TV To All-In-One Console

When the Raspberry Pi first appeared there was some excitement among Raspberry Jam attendees at the prospect of a computer with a video output on a board small enough to be concealed inside a TV. But while the idea is a good one the prospect of poking around among the high voltages of an older CRT model has meant that surprisingly few such ideas turned into reality.

One person who made the idea into a reality was [Jon], who took a [Dora] The Explorer branded CRT/DVD combo in a fetching shade of red and turned it into an all-in-one retro console gaming system with an embedded Raspberry Pi.

nintendo-crt-tv-thumbnail
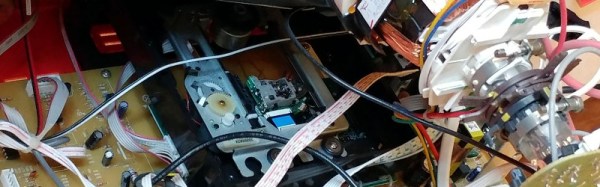
This is however not merely a Pi stuffed inside the rear casing with a few holes for cables, instead he took away the substantial part of the DVD mechanism and mounted his Pi safely in a plastic box. Some USB extension cables bring all four USB sockets to the front panel through the DVD slot with a bit of Sugru to hold them in place. An HDMI panel-mount extension goes to the TV’s rear connector panel, as does a power switch for the Pi which is wired to a USB charger mounted on a trailing mains socket inside the case. The composite video from the Pi is wired to the TV’s AV in video socket.

We don’t blame [Jon] for not looking at the TV’s power rails to find power for his Pi, though a TV of this recent age would have safely mains-isolated rails that’s still a task fraught with hazards. The resulting unit is a high quality retro console, and as a final touch he’s given it a Nintendo logo and some storage for his gamepads on the rear.

We’ve had a few CRTs with integrated computers before here at Hackaday, but not all have been as they seemed. This Pi for instance sat in a vintage Singer TV, but the CRT was replaced with a modern LCD. Our favourite though it this Chromecast driving a 1978 GE model.

Hacklet 122 – Spectrometers

There is always something interesting to find when browsing the projects on Hackaday.io. I’m always amazed at how much hackers can get done in their basements and home labs. One surprising trend I’ve found is the sheer number of spectrometer projects people across the globe are working on. I’ve always known what a spectrometer is, but I never knew so many hackers would want them. The numbers don’t lie though – plenty of hackers around the world want to measure the spectra of light — be it to test out a new LED, or determine the structure of an object. This week we’re checking out some of the best spectrometer projects on Hackaday.io!

ramanpiWe start with [fl@C@] and ramanPi – Raman Spectrometer. RamanPi is one of the first spectrometer projects on Hackaday.io. [fl@C@] entered his project in the 2014 Hackaday Prize, and was one of 5 finalists. As the name implies, ramanPi is a raman spectrometer, a type often used in chemistry. [fl@C@’s] original use for the machine was determining atomic bond angles. RamanPi uses 3D printed parts created with standard desktop printers wherever possible. A Raspberry Pi runs the system, originally a model B, though now I’m sure a Pi 3 would fit the bill. The detector is a Toshiba linear CCD.


dh-specNext up is [David H Haffner Sr] with DH 4.0 Spectrometer V 4 ( upgrade 2 ). [David’s] project doesn’t give a lot of background in the description text – he dives right in to the technical details of designing and building a spectrometer. His sensor is a JDEPC-OV04, which is a webcam module intended for use in laptops. Much of [David’s] recent work has been on the optical path. Optical spectrometers can use a diffraction grating and a slit to split light into spectra. [David] is using a recordable DVD as his diffraction grating. The slit is a bit more home-made. Two Gillette razor blades and an acetate strip are used to form an optical slit only 0.11 mm wide. [David] has already used his spectrometer to analyze crude oil.

pure-engNext we have [Pure Engineering] with C12666MA Micro-Spectrometer. Electro-Optics manufacturer Hamamatsu has created an optical spectrometer in a fingertip sized can. Their C12666MA micro-spectrometer sounds like it must be magic — and it is. The magic of Microelectromechanical systems (MEMS) have brought this device to life. Bringing one of these devices up isn’t exactly an easy task though. [Pure Engineering] has designed a breakout board for the C12666MA. They’ve even included a 404nm laser diode and a white LED for illumination. The board can plug into a standard Arduino header.

adamFinally, we have [Adam] with Handheld VNIR Spectrometer. VNIR in this case stands for visible and near-infrared. [Adam] created this device so he could learn how spectrometers worked. That’s a noble purpose if I ever heard one. He is building his system to be portable, so he can take measurements outside the lab. The sensor is a Sony ILX511B linear CCD. An Arduino nano reads the CCD and passes the data on to a PC for analysis. [Adam’s] diffraction grating is a concave holographic affair from Public Lab. [Adam] is also using an acetate slit purchased from Public Lab. Illumination enters via a fiber optic bundle.

If you want to see more spectrometer projects, check out our new spectrometer projects list. See a project I might have missed? Don’t be shy, just drop me a message on Hackaday.io. That’s it for this week’s Hacklet, As always, see you next week. Same hack time, same hack channel, bringing you the best of Hackaday.io!

Sciencing DVD-RW Laser Diodes

If you’ve played around with laser diodes that you’ve scavenged from old equipment, you know that it can be a hit-or-miss proposition. (And if you haven’t, what are you waiting for?) Besides the real risk of killing the diode on extraction by either overheating it or zapping it with static electricity, there’s always the question of how much current to put into the thing.

[DeepSOIC] decided to answer the latter question — with science! — for a DVD-burner laser that he’s got. His apparatus is both low-tech and absolutely brilliant, and it looks like he’s getting good data. So let’s have a peek.

Laser Detector on 3D Printer Scrap

First up is the detector, which is nothing more than a photodiode, 100k ohm load resistor, and a big capacitor for a power supply. We’d use a coin-cell battery, but given how low the discharge currents are, the cap makes a great rechargeable alternative. The output of the photo diode goes straight into the scope probe.

He then points the photodiode at the laser spot (on a keyboard?) and pulses the laser by charging up a capacitor and discharging it through the laser and a resistor to limit total current. The instantaneous current through the laser diode is also measured on the scope. Plotting both the current drawn and the measured brightness from the photodiode gives him an L/I curve — “lumens” versus current.

laser_curve

Look on the curve for where it stops being a straight line, slightly before the wiggles set in. That’s about the maximum continuous operating current. It’s good practice to de-rate that to 90% just to be on the safe side. Here it looks like the maximum current is 280 mA, so you probably shouldn’t run above 250 mA for a long time. If the diode’s body gets hot, heatsink it.

If you want to know everything about lasers in general, and diode lasers in particular, you can’t beat Sam’s Laser FAQ. We love [DeepSOIC]’s testing rig, though, and would love to see the schematic of his test driver. We’ve used “Sam’s Laser Diode Test Supply 1” for years, and we love it, but a pulsed laser tester would be a cool addition to the lab.

What to do with your junk DVD-ROM laser? Use the other leftover parts to make a CNC engraver? But we don’t need to tell you what to do with lasers. Just don’t look into the beam with your remaining good eye!

SDR Tutorials From Michael Ossmann

If you’re just getting into software-defined radio (SDR) but you find some of the math and/or terminology a bit of hurdle, you could absolutely do worse than to check out these SDR tutorials by [Michael Ossmann]. While they’re aimed at people using his HackRF One tool (which we love), most of the tutorial videos are very generally applicable, and we realized that we hadn’t mentioned them explicitly before. Shame on us!

Ossmann focuses on SDR using the open-source GNURadio Companion GUI tool, which makes implementing a lot of cool SDR techniques as easy as dragging and dropping items into a flow diagram. If you want an overview of GNURadio or SDR in general, these videos are a must-watch.

In particular, we loved his entries on complex numbers and complex numbers in DSP because he goes through the whole rationale behind using imaginary numbers in radio work with a graphical presentation that helps add rationale to the otherwise slightly spooky math. Heck, watch these two even if you’re not interested in radio.

The newest entry, covering DSP filters includes a great hands-on introduction to finite impulse response (moving average) digital filters. We really like the practical, simulation-based approach presented in the video — it’s just perfect for a quick introduction.

So if you’re looking for a relatively painless way to get into SDR, grab yourself an RTL-SDR dongle, burn yourself a GNURadio Live DVD, and work through these videos.