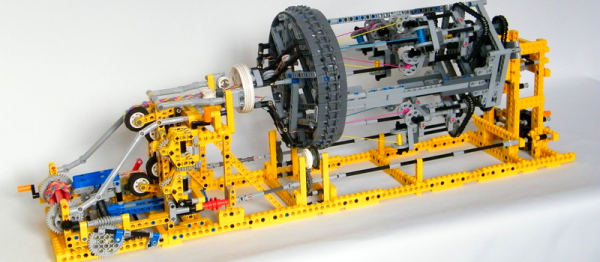
One of the earliest Nintendo products to gain popularity was the Game and Watch product line. Produced by Nintendo between 1980 and 1991, they are a source of nostalgia for many an 80s or 90s kid. These were those electronic handheld games that had pre-drawn monochrome images that would light up to make very basic animations. [Andrew] loved his old “Vermin” game as a kid, but eventually he sold it off. Wanting to re-live those childhood memories, he decided to build his own Game and Watch emulator.
The heart of [Andrew’s] build is a PIC18F4550 USB demo board he found on eBay. The board allows you to upload HEX files directly via USB using some simple front end software. [Andrew] wrote the code for his game in C using MPLAB. His device uses a Nokia 5110 LCD screen and is powered from a small lithium ion battery.
For the housing, [Andrew] started from another old handheld game that was about the right size. He gutted all of the old parts and stuck the new ones in their place. He also gave the housing a sort of brushed metal look using spray paint. The end result is a pretty good approximation of the original thing as evidenced by the video below. Continue reading “Give In To Nostalgia With A Retro Game And Watch”→
Rotary encoders are pretty interesting pieces of technology. They’re a solid way to accurately measure rotation including the direction. [David] recently wrote some software to handle these input devices, but unlike everyone else, his application can get by on only one microcontroller pin.
Most people will use three pins to handle a rotary encoder with a microcontroller: one to handle the switch and two to handle the quadrature inputs. With only one pin left available on his project [David] had to look for another solution, and he focused on the principle that the encoder pins behaved in very specific ways when turning the shaft. He designed a circuit that generates an analog voltage based on the state of those pins. He also wrote a program that can recognize the new analog patterns produced by his rotary encoder and his new circuit.
If you’ve been stuck on a project that uses a rotary encoder because you’ve run out of pins, this novel approach may help you get un-stuck. It’s a pretty impressive feat of circuit design to boot. Just think of how many other projects use these types of input devices and could benefit from it!
[Cody] has a nice little ranch in the middle of nowhere, a rifle, and a supply of ammunition. That’s just fine for the zombie apocalypse, but he doesn’t have an infinite supply of ammo. Twenty years after Z-day, he may find himself without any way to defend himself. How to fix that problem? He needs gunpowder. How do you make that? Here’s a plastic jug.
There are three ingredients required to make gunpowder – saltpeter, charcoal, and sulfur. The last two ingredients are easy enough if you have trees and a mine like [Cody], but saltpeter, the a source of nitrates, aren’t really found in nature. You can make nitrates from atmospheric nitrogen if you have enough energy, but [Cody] is going low tech for this experiment. He’s saving up his own urine in a compost pile, also called a niter bed. It’s as simple as putting a few grass clippings and straw on a plastic tarp, peeing on it for a few months, and waiting for nitrogen-fixing to do their thing.
Calcium Nitrate
[Cody] doesn’t have to wait a year for his compost pile to become saturated with nitrates. He has another compost pile that has been going for about 18 months, and this is good enough for an experiment in extracting calcium nitrate. After soaking and straining this bit of compost, [Cody] is left with a solution of something that has calcium nitrate in it. This is converted to potassium nitrate – or saltpeter – by running it through wood ash. After drying out this mess of liquid, [Cody] is left with something that burns with the addition of a little carbon.
With a source of saltpeter, [Cody] only needs charcoal and sulfur to make gunpowder. Charcoal is easy enough to source, and [Cody] has a mine with lead sulfide. He can’t quite extract sulfur from his ore, so instead he goes with another catalyst – red iron oxide, or rust.
The three ingredients are combined, and [Cody] decides it’s time for a test. He has a homebuilt musket, or a piece of pipe welded at one end with a touch hole, and has a big lead ball. With his homebrew gunpowder, this musket actually works. The lead ball doesn’t fly very far, but it’s enough to put a dent in a zombie or deer; not bad for something made out of compost.
Historically, this is a pretty odd way of making gunpowder. For most of history, people with guns have also had a source of saltpeter. During the Napoleonic Wars, however, France could not import gunpowder or saltpeter and took to collecting urine from soldiers and livestock. This source of nitrates was collected, converted from calcium nitrate to potassium nitrate, and combined with charcoal and sulfur to field armies.
Still, [Cody] has a great example of what can be done using traditional methods, and the fact that he can fire a ball down a barrel is proof enough that the niter bed he’s peeing in will produce even better gunpowder.
Every now and then a remote control acts up. Maybe you are trying to change the channel on your television and it’s just not working. A quick way to determine if the remote control is still working is by using a cell phone camera to try to see if the IR LED is still lighting up. That can work sometimes but not always. [Rui] had this problem and he decided to build his own circuit to make it easier to tell if a remote control was having problems.
The circuit uses a Vishay V34836 infrared receiver to pick up the invisible signals that are sent from a remote control. A Microchip 12F683 processes the data and has two main output modes. If the remote control is receiving data continuously, then a green LED lights up to indicate that the remote is functioning properly. If some data is received but not in a continuous stream, then a yellow LED lights up instead. This indicates that the batteries on the remote need to be replaced.
The circuit also includes a red LED as a power indicator as well as RS232 output of the actual received data. The PCB was cut using a milling machine. It’s glued to the top of a dual AAA battery holder, which provides plenty of current to run the circuit.
Your mission, should you choose to accept it, is to code a program that leaks information to the user but does so in a way that can’t be discovered in a code audit. This was the challenge for the 2014 Underhanded C contest; the seventh time they’ve held the event. [Richard Mitton] took part and wrote a very entertaining entry. He didn’t win, but he did just share the details of his super-sneaky code.
The challenge set out for the Citizen-Four-like coders set up a scenario where they were writing a program for a shady company (or sketchy government entity) which makes completely secret decisions based on publicly posted social media. The twist is they were tasked with getting code past an audit that leaked the decisions made by this program to the users being secretly observed.
Above is the core trick which [Richard] used after taking inspiration from Heartbleed. The struct assignment has an off-by-one error in it which is shown corrected in the lower code block. This, used in conjunction with malloc and free, allows memory to be used under the guise of storage during the encryption process. Secretly, this same bit of memory is accessed later and leaked to the user being targeted.
Have your own Underhanded C that you’re dying to share? We want to hear about it so send us a tip!
Way before you kids had touch screens and mice, we had to walk uphill both ways to tell a computer where we were pointing at on the screen. I speak, of course, of light pens. When these photodiodes in a pen were pointed at a CRT, the display driver would tell the computer where the pen was pointing. It’s a pretty incredible video hack today, and these things were around in the 1970s. You could, of course, use a light pen with most of the old 8-bit home computers, including the Commodore 64.
[Jan] has a soft spot for the light pen on the C64. So much so he made a new input device using this tech. It’s great, and if this existed in 1985, all the cool kids would have known about it.
The build is called the LightHammer. It’s a light pen, inside the head of a plastic hammer, with a few springs, nuts, and washers to tell the computer to read the light pen input. The light pen itself is just a photodiode with a few transistors; it was a simple circuit in the 80s, and it’s a simple circuit today.
A new input device isn’t worth anything without an app to show off the tech, and [Jan] is about three steps ahead of us here. He wrote a game for this LightHammer – a digital version of Whac-A-Mole and Simon. They’re exactly what you think they are: the classic ‘repeat the computer’ and ‘murder rodents’ games.
If that’s not enough, [Jan] also built an arcade cabinet for his C64 setup, with the monitor, joysticks, a 1541, and a TV mounted in a cabinet that would look great in a bar. You can check out a video of that and the games using the LightHammer below.
Over the last few years, connecting a camera to the Internet has gotten cheaper and cheaper. The advances that made this possible did not come through security cameras, but instead tiny cell phone camera modules, ARM boards, and embedded computing. Right now, if you want a livestream of your back yard, you’d probably get a Raspberry Pi and camera module. This will work for 90% of cases, but what if you want to livestream a slightly harsher environment? What if you want image processing right on the camera? What if you want this camera to have a rating for environmental protection?
[Apodiant]’s entry for the 2015 Hackaday Prize is solving the latter problem. It’s an Open Source Industrial Smart Camera with Ethernet, USB, and serial outputs, an ARM CPU for image processing, all tucked away in a sturdy aluminum enclosure.
The preliminary BOM for this camera is an iMX6 – a very capable microcontroller that can run Linux and OpenCV. The image sensor is a 1.2 megapixel unit [Apodiant] already has experience with, and the enclosure is an off the shelf deal for anyone who wants to build their own.
If this sort of setup sounds familiar, you’re right: there have been a few projects that have taken camera modules, added a powerful microcontroller, and run image processing on them. The latest in a long line of these projects is the OpenMV. That had a successful Kickstarter, and since [Apodiant] is going for the Hackaday Prize Best Product competition, it looks like a good fit.