Snap-together PCB Mill

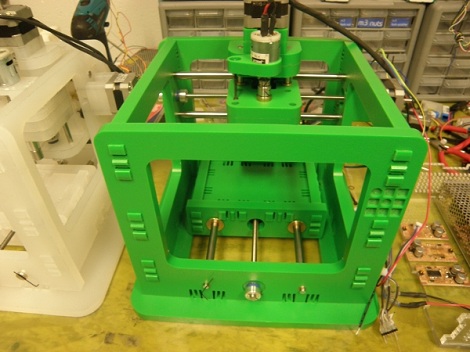
[Jonathan Ward] came up with the MTM Snap, a snap-together pcb mill as part of the Machines That Make group at MIT.

We covered [Jonathan]‘s previous work made out of half-inch plywood, but the new iteration of his PCB includes a clever snap-together mechanism instead of screws and bolts. Although the MTM Snap looks a lot like3d printers such as a reprap, the similarities end with the off-the-shelf stepper motors. Instead of using motor drivers and control electronics from a reprap, the project uses custom stepper drivers, controlled by a bare Arduino.

We’re really impressed with the results of the MTM Snap compared with what is possible on a reprap-derived milling machine like a makerbot or wolfstrap. We’re thinking that’s due to the mass of this project compared to the printed ABS parts of the ‘common’ 3d printers, but any MEs are more than happy to correct that notion.

Check out the video after the break to see the machine in action and a great view of the snap-fit mechanism.

Continue reading “Snap-together PCB Mill”

A Keygen For The Real World

key_generator

[Nirav] found that he rarely printed anything useful with his RepRap, so to shake things up, he decided he needed to work on a project that didn’t involve printing yet more RepRap parts.

The goal of his project was to create working replicas of house keys by simply using the code imprinted at the factory. He purchased a handful of used lock sets from eBay, then carefully measured the keys with a ruler and calipers to get the blank dimensions just right. After that was done, he looked around online and was eventually able to create an OpenSCAD model using a chart of pin depth specifications he located. By changing the last line in the model’s code he can print any coded key. For keys lacking a code, he can manually measure the height of each bit and print replicas that way as well. Once printed, he says that they keys are strong enough to turn most locks he has come across, including deadbolts.

This is undoubtedly a neat project in its own right, though we would be interested to see if someone could get it paired with a program like SNEAKEY to generate bit measurements by sight alone.

Print Your Own Header Shrouds

Don’t get us wrong, printable whistles are cool and all, but these printable header shrouds make us think that filament printers like the Makerbot and RepRap might just be worth their salt. This utilitarian purpose is a departure from the souvenirs, toys, and art that we’re used to seeing from the expensive development toys tools.

The six and ten pin header shrouds are designed for a snug fit that makes it easy to glue them onto the plastic spacers of male pin headers. We use IDC plugs and ribbon cable all the time in our projects, but never seem to order shrouded connectors; this is perfect for us. It makes us wonder what other PCB-friendly printable designs we’ve been missing out on? Surely someone’s been printing stand-offs with threaded inserts, right? If you know of something useful that we can share with the rest of the readers, don’t hesitate to send in a tip.

[via Dangerous Prototypes]

Molded Parts: Prusa Mendel In 30 Minutes

This set of white RepRap parts were created in molds, instead of being printed by another RepRap. [Mark A. Ganter] of the University of Washington admits that this breaks the idea of a 3D printer that is self-replicating. But the molds – which were created by tweaking Prusa Mendel parts to be mold friendly – have the ability to produce every plastic part necessary to build your own RepRap and they can do it much faster. Once the molds were completed [Mark] and his students were able to produce a full set of parts in just 30 minutes, cutting as much as 14 hours off of the time it would have taken to print the parts. Still not convinced? How about this: the molds can be created by a 3D printer or by using a high-resolution power printing method like they have here.

The process starts by printing master parts, then creating a silicone RTV mold from them. Once the molds are ready, [Mark’s] team pours polyurethane into them and waits for it to harden. They plan to share the STL files in less than a week so that you can make your own molds to use to build your RepRap army.

The Twelve Days Of… Self-replicating

Okay, it’s more like the 23 days but who’s counting? [Kliment] is giving the gift of self-replication this holiday season by uploading one new printable part a day. If you follow along and print each one you’ll have a Prusa Mendel by Christmas (this started on 12/2 so you’ll need to catch up). The Prusa is a variation on the Mendel that uses bushings wherever possible, reducing the need for bearings down to just two.

So yeah, you need to have access to a 3D printer in order to make the parts for this 3D printer, but that’s how it always works. [Kliment] has gone the distance to make this little exercise enjoyable. The parts that take longer to print are reserved for the weekends, some have been altered to include a holiday theme, and all of them have been optimized to fit on a Makerbot build platform.

[Thanks Christopher]

Building A Laser Cutter From A Weak Laser

We covet laser cutters and this diy model with a 1 Watt IR diode may be well within our price range. Most commercially available laser cutters, and some homemade ones, work in the 20-100 Watt ranges, using a CO2 laser. They have more than enough power to cut right through a lot of materials so how can a 1W diode compare? It seems that the weaker laser is still quite powerful right at its focal length, so moving that point along the Z axis will let you burn away a larger depth of material. The test rig seen above uses optical drive components for the three axes and managed to cut a rectangular piece out of the black plastic from a CD case.

This isn’t [Peter’s] first try with CNC lasers. He’s the one that’s be working on an open source selective laser sintering platform.

[Thanks Osgeld and Vesanies]

Bay Area Maker Faire 2010 In Pictures

Just when you think it couldn’t possibly get any bigger and crazier, they manage to outdo themselves again. The Bay Area Maker Faire wrapped up Sunday evening, but we have so many story leads that we’ll probably be busy until next year’s event. In the meantime, here’s just a tiny, random sampling of the countless delights that greeted visitors this past weekend.

Continue reading “Bay Area Maker Faire 2010 In Pictures”