Burning Man is almost here! In just a few days, artists, hackers, makers, and engineers will converge on the Black Rock Desert in northern Nevada. They’ll endure the heat, the dust, and possibly a few bugs to create one of the largest outdoor art festivals in the world. Every year, the playa is covered with art cars, giant rolling barges, and fire-breathing animals covered in RGB LEDs. With so many projects to work on, it’s no surprise that quite a few Hackaday.io members (and Hackaday staffers) are burners. This week’s Hacklet is about some of the best Burning Man projects on Hackaday.io!
 We start with [David Nghiem] and “The Deep” – DC’s Sonic Jellyfish Art Cart. There’s just something calming about a watching a luminescent jellyfish floating serenely through the dark ocean. [David] and his team are recreating that effect in the desert with The Deep. They’re hanging a giant jellyfish in front of a golf cart. The medusa will be festooned with yards of silk and other types of fabric to create a flowing effect. Lighting will come from 8 RGB LED strips, controlled by 15 Teensy LCs. The Teensys will keep the lights flashing to the beat of the music. Burners can dance inside the sculpture, because this jellyfish thankfully has no sting.
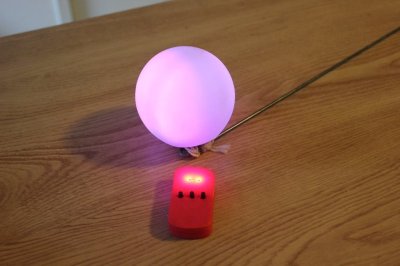 Bicycles are the preferred mode of personal transportation at Burning Man. As you might imagine, it can be pretty hard to find your bike among all the other parked cycles. [Bob Baddeley] has made this a bit easier with Anglerfish for Bikes. Real anglerfish have an illicium, which is a stalk with a lighted tip that hangs just in front of their mouth. The bioluminescent light lures prey to the fish. [Bob] is using an RGB LED illuminated ball to lure him to his bike. This anglerfish started life as a blinky globe from Amazon. [Bob] removed the original electronics and replaced them with a Bluetooth radio on his own custom PCB. A simple press of a button gets the ball shimmering and blinking, leading [Bob] to his ride.
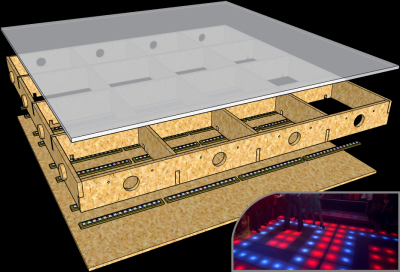 Next up is [Jeremy] with Interactive Disco Dance Floor. Inspired by Saturday Night Fever and the music video for Billy Jean, [Jeremy] is creating a dance floor that responds to those dancing on it. The floor is lit by 80 meters of 5050 RGB LEDs, controlled by ATmega168s. The ATmega168’s are connected to a capacitive sensor made up of a chicken wire grid. The system is sensitive enough to pick up feet even when wearing thick motorcycle boots. All the processors connect to a central computer via an RS-485 network. This allows the computer to take over and drive pre-programmed patterns to the floor. The PC side code is written in JavaScript, so it’s easy to modify.
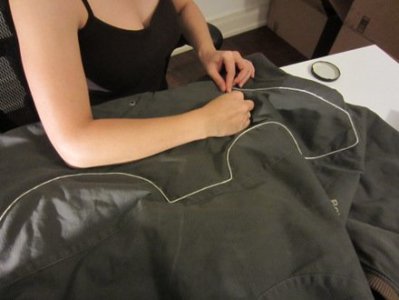 Finally, we have Hackaday.io’s own [Jasmine] with Glow Jacket. Walking around at night in Black Rock City can be dangerous. People running from party to party, high cyclists flying across the playa, you never know who might run into you! Having something to make sure you’re visible is a great start of a project. Keeping warm through the cold nights in the desert would be an added bonus. [Jasmine] sewed 32 feet of electroluminescent (EL) wire onto the back of a black parka. The wire ran to two AA battery-powered inverters hidden in the jacket. The hardest part turned out to be sewing all that EL wire to a jacket. Once all the stitching was done though, her husband [Ben] glows like a beacon in the night.
Burners unite! [Jasmine] has set the Hacker Burners project page as a meeting place for all burners and fans of Burning Man. If you’re interested, join up! If you’d like to see more Burning Man projects, I’ve got you covered with our new Burning Man project list. If I missed your project, don’t hesitate to drop me a message on Hackaday.io. That’s it for this week’s Hacklet. As always, see you next week. Same hack time, same hack channel, bringing you the best of Hackaday.io!