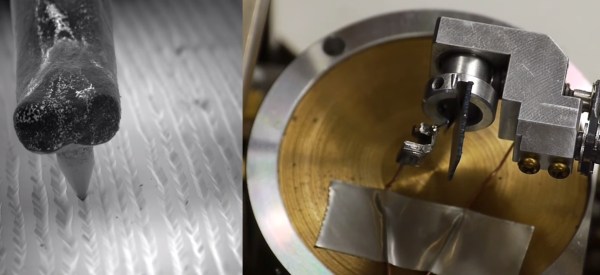
Hackaday Prize judge [Ben Krasnow] has been busy lately. He’s put his scanning electron microscope (SEM) to work creating an animation of a phonograph needle playing a record. (YouTube link) This is the same 80’s SEM [Ben] hacked back in November. Unfortunately, [Ben’s] JSM-T200 isn’t quite large enough to hold an entire 12″ LP, so he had to cut a small section of a record out. The vinyl mods weren’t done there though. SEMs need a conductive surface for imaging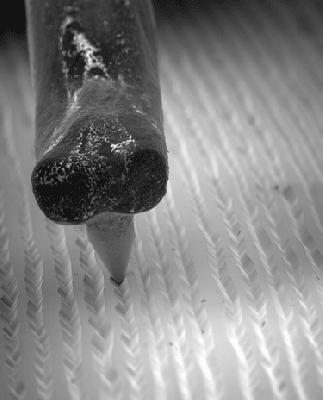 . Vinyl is an insulator. [Ben] dealt with this by using his vacuum chamber to evaporate a thin layer of silver on the vinyl.
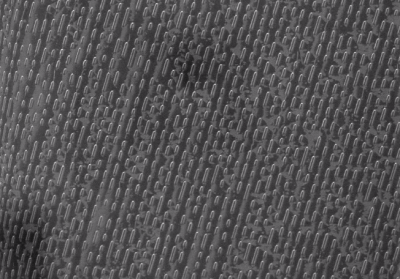
Just imaging the record wouldn’t be enough; [Ben] wanted an animation of a needle traveling through the record grove. He tore apart an old phonograph needle and installed it in on a copper wire in the SEM. Thanks to the dual stage setup of the JSM-T200, [Ben] was able to move the record-chip and needle independently. He could then move the record underneath the needle as if it were actually playing. [Ben] used his oscilloscope to record 60 frames, each spaced 50 microns apart. He used octave to process the data, and wound up with the awesome GIF animation you see on the left.
 [Ben] wasn’t done though. He checked out a few other recording formats, including CD and DVD optical media, and capacitance electronic disc, an obscure format from RCA which failed miserably in the market. The toughest challenge [Ben] faced was imaging the CD media. The familiar pits of a CD are stored on a thin aluminum layer sandwiched between the lacquer label and the plastic disc. He tried dissolving the plastic with chemicals, but enough plastic was left behind to distort the image. The solution turned out to be double-sided tape. Sticking some tape down on the CD and peeling it off cleanly removed the aluminum, and provided a sturdy substrate with which to mount the sample in the SEM.
We’re curious if stereo audio data can be extracted from the SEM images. [Oona] managed to do this with a mono recording from a toy robot. Who’s going to be the first one to break out the image analysis software and capture some audio from [Ben’s] images?
Continue reading “Phonographs Through The Eye Of An Electron Microscope”
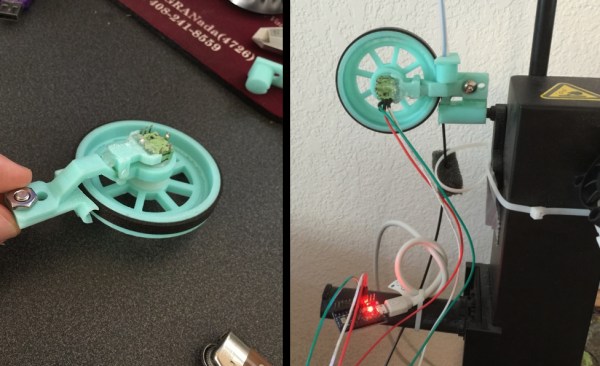
 [Florian] designed a small assembly with a wheel and encoder that measures filament movement. The filament passes under the encoder wheel before it’s fed into the 3D printer. The encoder is hooked up to an Arduino which measures the Gray code pulses as the encoder rotates, and the encoder count is streamed over the serial port to a computer.