Diabetes affects almost 400 million people worldwide, and complications due to diabetes – blindness, cardiovascular disease, and kidney problems – can be reduced by regular monitoring of blood glucose. The usual way of measuring blood glucose is with a pin prick of blood and a small test strip that costs about $0.30. That’s a lot of test strips and blood used by 400 million diabetics every day. Wouldn’t it be better if there was a less invasive way of measuring blood glucose?
[marcelclaro]’s project for The Hackaday Prize aims to do just that. Instead of measuring blood directly, his project will measure blood glucose by shining light through a finger or an earlobe. Using light to detect blood glucose is something that has been studied in the lab, but so far, there aren’t any products on the market that use this technique.
There are two major problems [marcel] needs to overcome to turn this project into reality. The first is simply raw data for calibration. For [marcel], this is easy; he has Type 1 diabetes, and takes four glucose measurements a day. Patient heal thyself, or something.
The second problem is getting a photosensor that’s sensitive enough. By using an InGaAs PIN diode, a current-controlled oscillator, and a digital counter, [marcel] should have a sensor that’s good enough, with electronics that are cheap enough, to create some tech that is truly game changing for a few hundred million people around the world.
There are many more things to know about a battery than its voltage and current output at any given moment, and most of them can’t be measured with a standard multimeter unless you also stand there for a long time with an Excel spreadsheet. The most useful information is battery capacity, which can tell you how much time is left until the battery is fully charged or fully discharged. [TJ] set out to create a battery data harvester, and used the ubiquitous ESP8266 to make a fully-featured battery monitor.
Measuring battery capacity is pretty straightforward but it does take time. A battery is first benchmarked to find its ideal capacity, and then future voltage and current readings can be taken and compared to the benchmark test to determine the present capacity of the battery. The ESP8266 is a relatively good choice for this kind of work. Its WiFi connection allows it to report its information to a server which will store the data and make it available for the user to see.
The first page of this project details building the actual module, and the second page outlines how to get that module to communicate with the server. Once you’ve built all of this, you can use it to monitor your whole-house UPS backup system or the battery in your solar-powered truck. There is quite a bit of information available on the project site for recreating the build yourself, and there’s also a video below which shows its operation.
Remember this Android app that will tell you the value of resistors by reading their color code. Another option for the iOS crowd was presented at Maker Faire last weekend. It’s called ResistorVision, and it’s perfect for the colorblind people out there. An Android version of ResistorVision will be released sometime in the near future.
A few folks at Langly Research Center have a very cool job. They built a hybrid electric tilt wing plane with eight motors on the wing and two on the tail. It’s ultimately powered by two 8 hp diesel engines that charge Liion batteries. When it comes to hydrocarbon-powered hovering behemoths, our heart is with Goliath.
A bottom-of-the-line avionics panel for a small private plane costs about $10,000. How do you reduce the cost? Getting rid of FAA certification? Yeah. And by putting a Raspberry Pi in it. It was expoed last month at the Sun ‘N Fun in Florida, and it’s exactly what the pilots out there would expect: a flight system running on a Raspberry Pi. It was installed in a Zenith 750, a 2-seat LSA, registered as an experimental. You can put just about anything in the cabin of one of these, and the FAA is okay with it. If it’ll ever be certified is anyone’s guess.
Having a basement or garage shop sure comes in useful for the home handyman. One downside to having a self-funded show is that you may not have every tool that you need. [unknownuser2007] had a hand-held belt sander and regularly used it to round off sharp corners on small parts instead of using it for its intended purpose; smoothing out long flat boards. It was typical for [unknownuser2007] to hold the sander in one hand and his work in the other while sanding his wooden parts.
This method of sanding was not very precise (or safe) so he decided it was time to do something about it and build a stand for the sander. The frame is built from 1/2 inch plywood, with pieces jig-sawn to fit the contour of the belt sander housing. After the frame was assembled, a dust collection system was made using an old vacuum attachment and some plastic sheet. The finished rig mounts solidly to the work bench and now allows [unknownuser2007] to use both hands to shape his creations.
As much as we love thesetypes useful tool mods, on revision 2 we’d like to see an easily accessible on/off switch and a work support square to the belt. If you’re interested in more DIY sander solutions, check out this 20 inch disk sander.
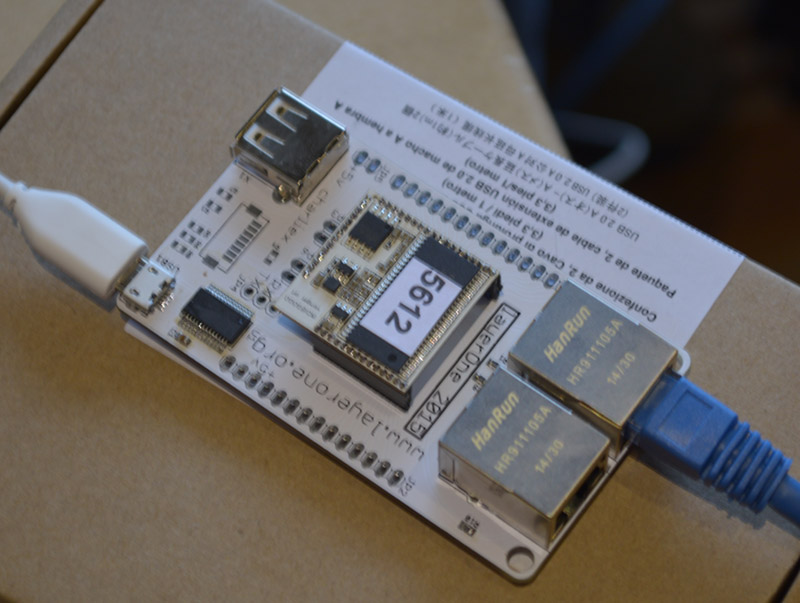
Go to DEFCON and you’ll stand in line for five hours to get a fancy electronic badge you’ll be showing to your grandchildren some day. Yes, at DEFCON, you buy your hacker cred. LayerOne is not so kind to the technically inept. At LayerOne, you are given a PCB, bag of parts, and are told to earn your hacker cred by soldering tiny QFP and SOT-23 chips by hand. The Hardware Hacking Village at LayerOne was packed with people eagerly assembling their badge, or badges depending on how cool they are.
The badges are designed by [charlie x] of null space labs, one of the many local hackerspaces around the area. The design and construction of these badges were documented on the LayerOne Badge project on hackaday.io, and they’re probably best con badges we’ve ever seen.
There are two badges being distributed around LayerOne. The first is an extremely blinkey badge with a Cypress PSoC4 controlling 22 individually addressable RGB LEDs. Most conference attendees received a bare PCB and a bag of parts – the PCB will get you in the door, but if you want your nerd cred, you’ll have to assemble your own badge.
There are still a few interesting features for this badge, including an ESP8266 module that will listen to UDP packets and drive the LEDs. Yes, a random person on the same WiFi AP can control the LEDs of the entire conference event. The badges can also be chained together with just three wires, but so far no one has done this.
The Speaker and Staff badge, based on a VoCore
The second badge – for speakers and staff – is exceptionally more powerful. It’s a Linux box on a badge with two Ethernet connectors running OpenWRT. For a con badge, it’s incredibly powerful, but this isn’t the most computationally complex badge that has ever been at a LayerOne conference. For last year’s badge, [charlie] put together a badge with an FPGA, SAM7 microcontroller, SD card, and OLED display. They were mining Bitcons on these badges.
The Hardware Hacking Village was loaded up with a dozen or so Metcal soldering irons, binocular microscopes, and enough solder, wick, and flux to allow everyone to solder their badge together. Everyone who attempted it actually completed their badge, and stories of badge hacking competitions at other cons were filled with tales of people sprinkling components on random solder pads. Imagine: a conference where people are technically adept. Amazing.
SMD solder stencil for the LEDs
A hot plate was available for those who were not cool enough to solder 22 smd LEDs
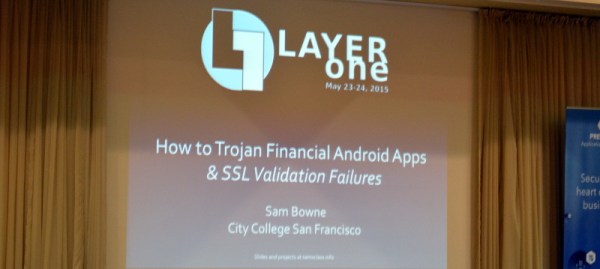
This was both an amusing and frightening talk. [Sam Bowne] presented How to Trojan Financial Android Apps on Saturday afternoon at the LayerOne Conference. [Sam] calculates that 80-90% of the apps provided by major financial institutions like banks and investment companies are vulnerable and the ease with which trojans can be rolled into them is incredible.
Some Background
[Sam] did a great job of concisely describing the circumstances that make Android particularly vulnerable to the attacks which are the subject of the talk. Android programs are packaged as APK files which are easy to unpack. The “compiled” code itself is called smali and is readable in a similar way as Java. It’s super easy to unpack and search this byte code using grep. Once the interesting parts are located, the smali code can be altered and the entire thing can be repackaged. The app will need to be resigned but Google doesn’t control the signing keys so an attacker can simply generate a new key and use that to sign the app. The user still needs to install the file, but Android allows app installation from webpages, email, etc. so this isn’t a problem for the bad guys either.
The Attack
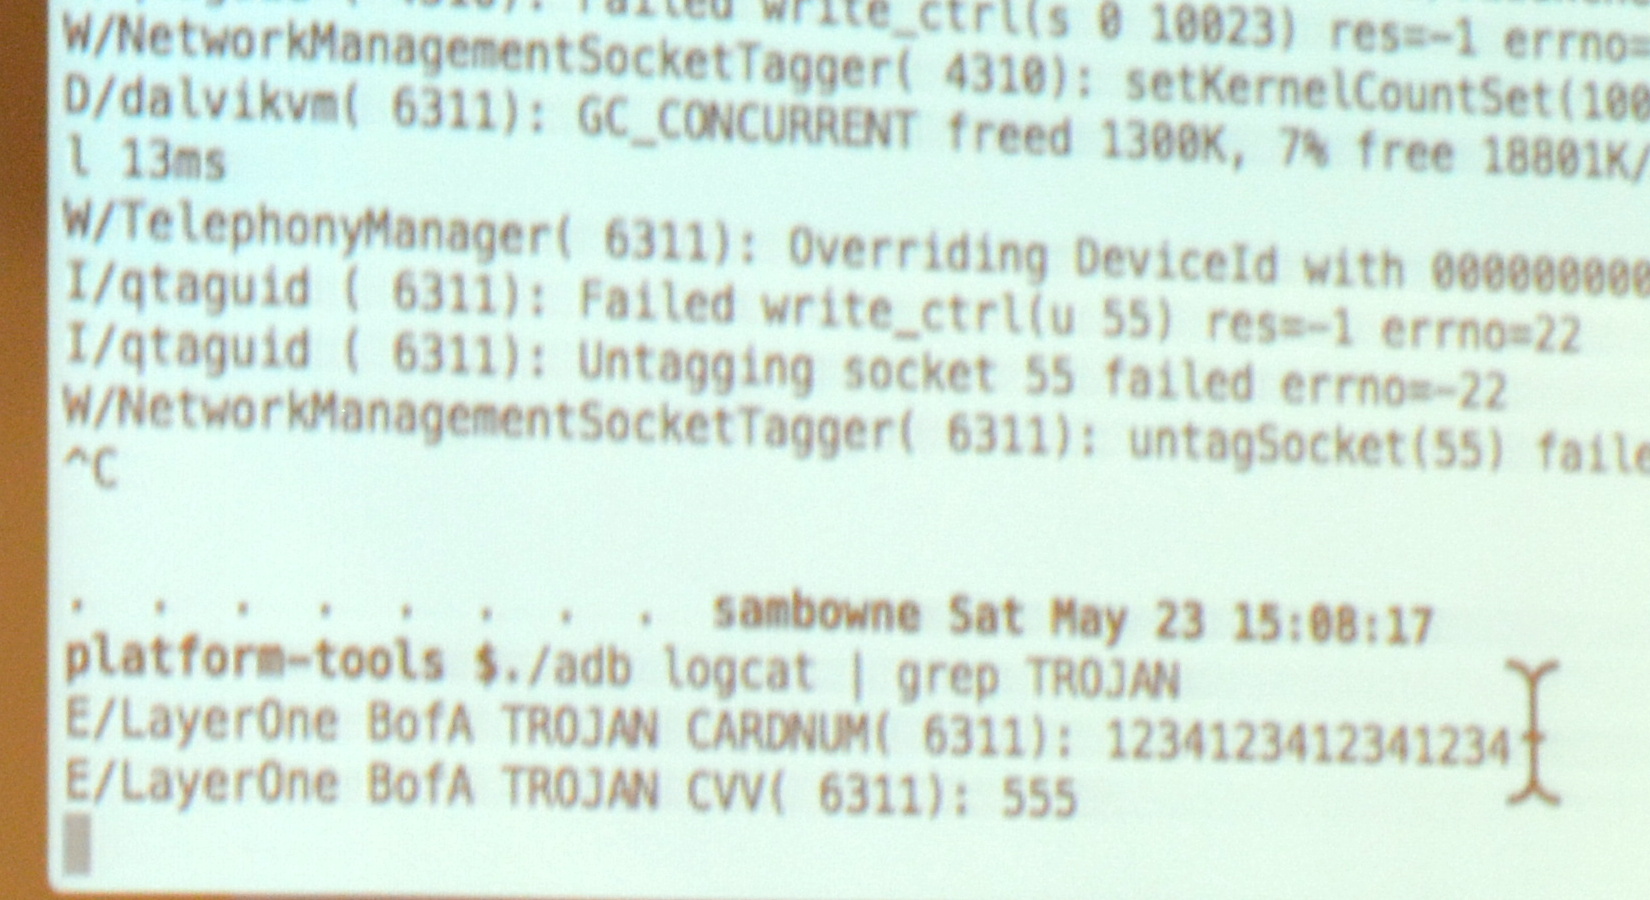
So what can be done? This is about information harvesting. [Sam’s] proof of concept uses a python script to insert logging for every local variable. The script looks at the start of every module in the smali code, grabs the number of local variables, increments it by one and uses this extra variable to write out the values through logcat.
ADB Log shows the Credit Card Number
He demonstrated live on the Bank of America app. From the user side of things it looks exactly like the official app, because it is the official app. However, when you register your account the log reports the card number as you can see here. Obviously this information could easily be phoned-home using a number of techniques.
As mentioned, the vast majority of banking and financial apps are vulnerable to this, but some have made an attempt to make it more difficult. He found the Bancorp app never exposes this information in local variables so it can’t just be logged out. However, the same trojan technique works as a keylogger since he found the same function kept getting called every time a key is pressed. The same was true of the Capital One app, but it echos out Google’s Android keymap values rather than ascii; easy enough to translate back into readable data though.
The Inability to Report Vulnerabilities
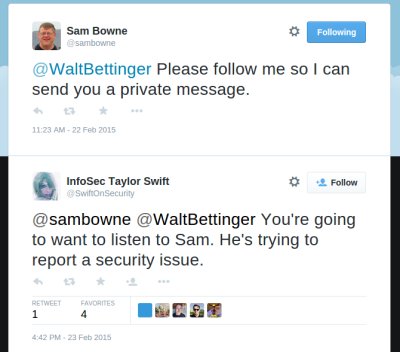
What is the most troubling is that none of these companies have a means of reporting security vulnerabilities. It was amusing to hear [Sam] recount his struggle to report these issues to Charles Schwab. Online contact forms were broken and wouldn’t post data and several publicly posted email addresses bounced email. When he finally got one to accept the email he later discovered another user reporting on a forum that nobody ever answers back on any of the Schwab accounts. He resorted to a trick he has used many times in the past… Tweeting to the CEO of Charles Schwab to start up a direct-message conversation. This itself is a security problem as @SwiftOnSecurity proves by pointing out that whenever @SamBowne Tweets a CEO it’s because he found a vulnerability in that company’s platform and can’t find a reasonable way to contact the company.
There is Hope
Although very rare, sometimes these apps do get patched. The Trade King app was updated after his report and when [Sam] tried the exploit again it crashes at start-up. The log reports a verification failure. This indicates that the injected code is being noticed, but [Sam] wonders if the verification is included in the app itself. If it is, then it will be possible to track it down and disable it.
This may sound like all of us Android users should despair but that’s not the case. Adding verification, even if it’s possible to defeat it, does make the apps safer; attackers may not want to invest the extra time to try to defeat it. Also, there are obsfucators available for a few thousand dollars that will make these attacks much more difficult by making variable names unreadable. The free obsfucator available now with the Android development suites doesn’t change names of everything… local variables are left unaltered and programmers have a habit of using descriptive names for variables. For instance, BofA used “CARDNUM” in the example above.
The Slides
[Sam Bowne’s] slides and testing results for the entire talk are available under the “Upcoming Events” part of his website.
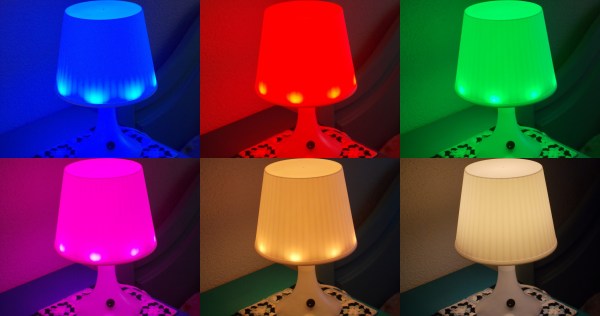
Sometimes too much overkill isn’t enough. [Jesus Echavarria] hacked an IKEA Lampan light for his daughter to add color LEDs, a timer, Bluetooth control over the hue, and a local override knob. The result: a $5 lamp with at least $50 of added awesomeness. Let’s have a look at the latter.
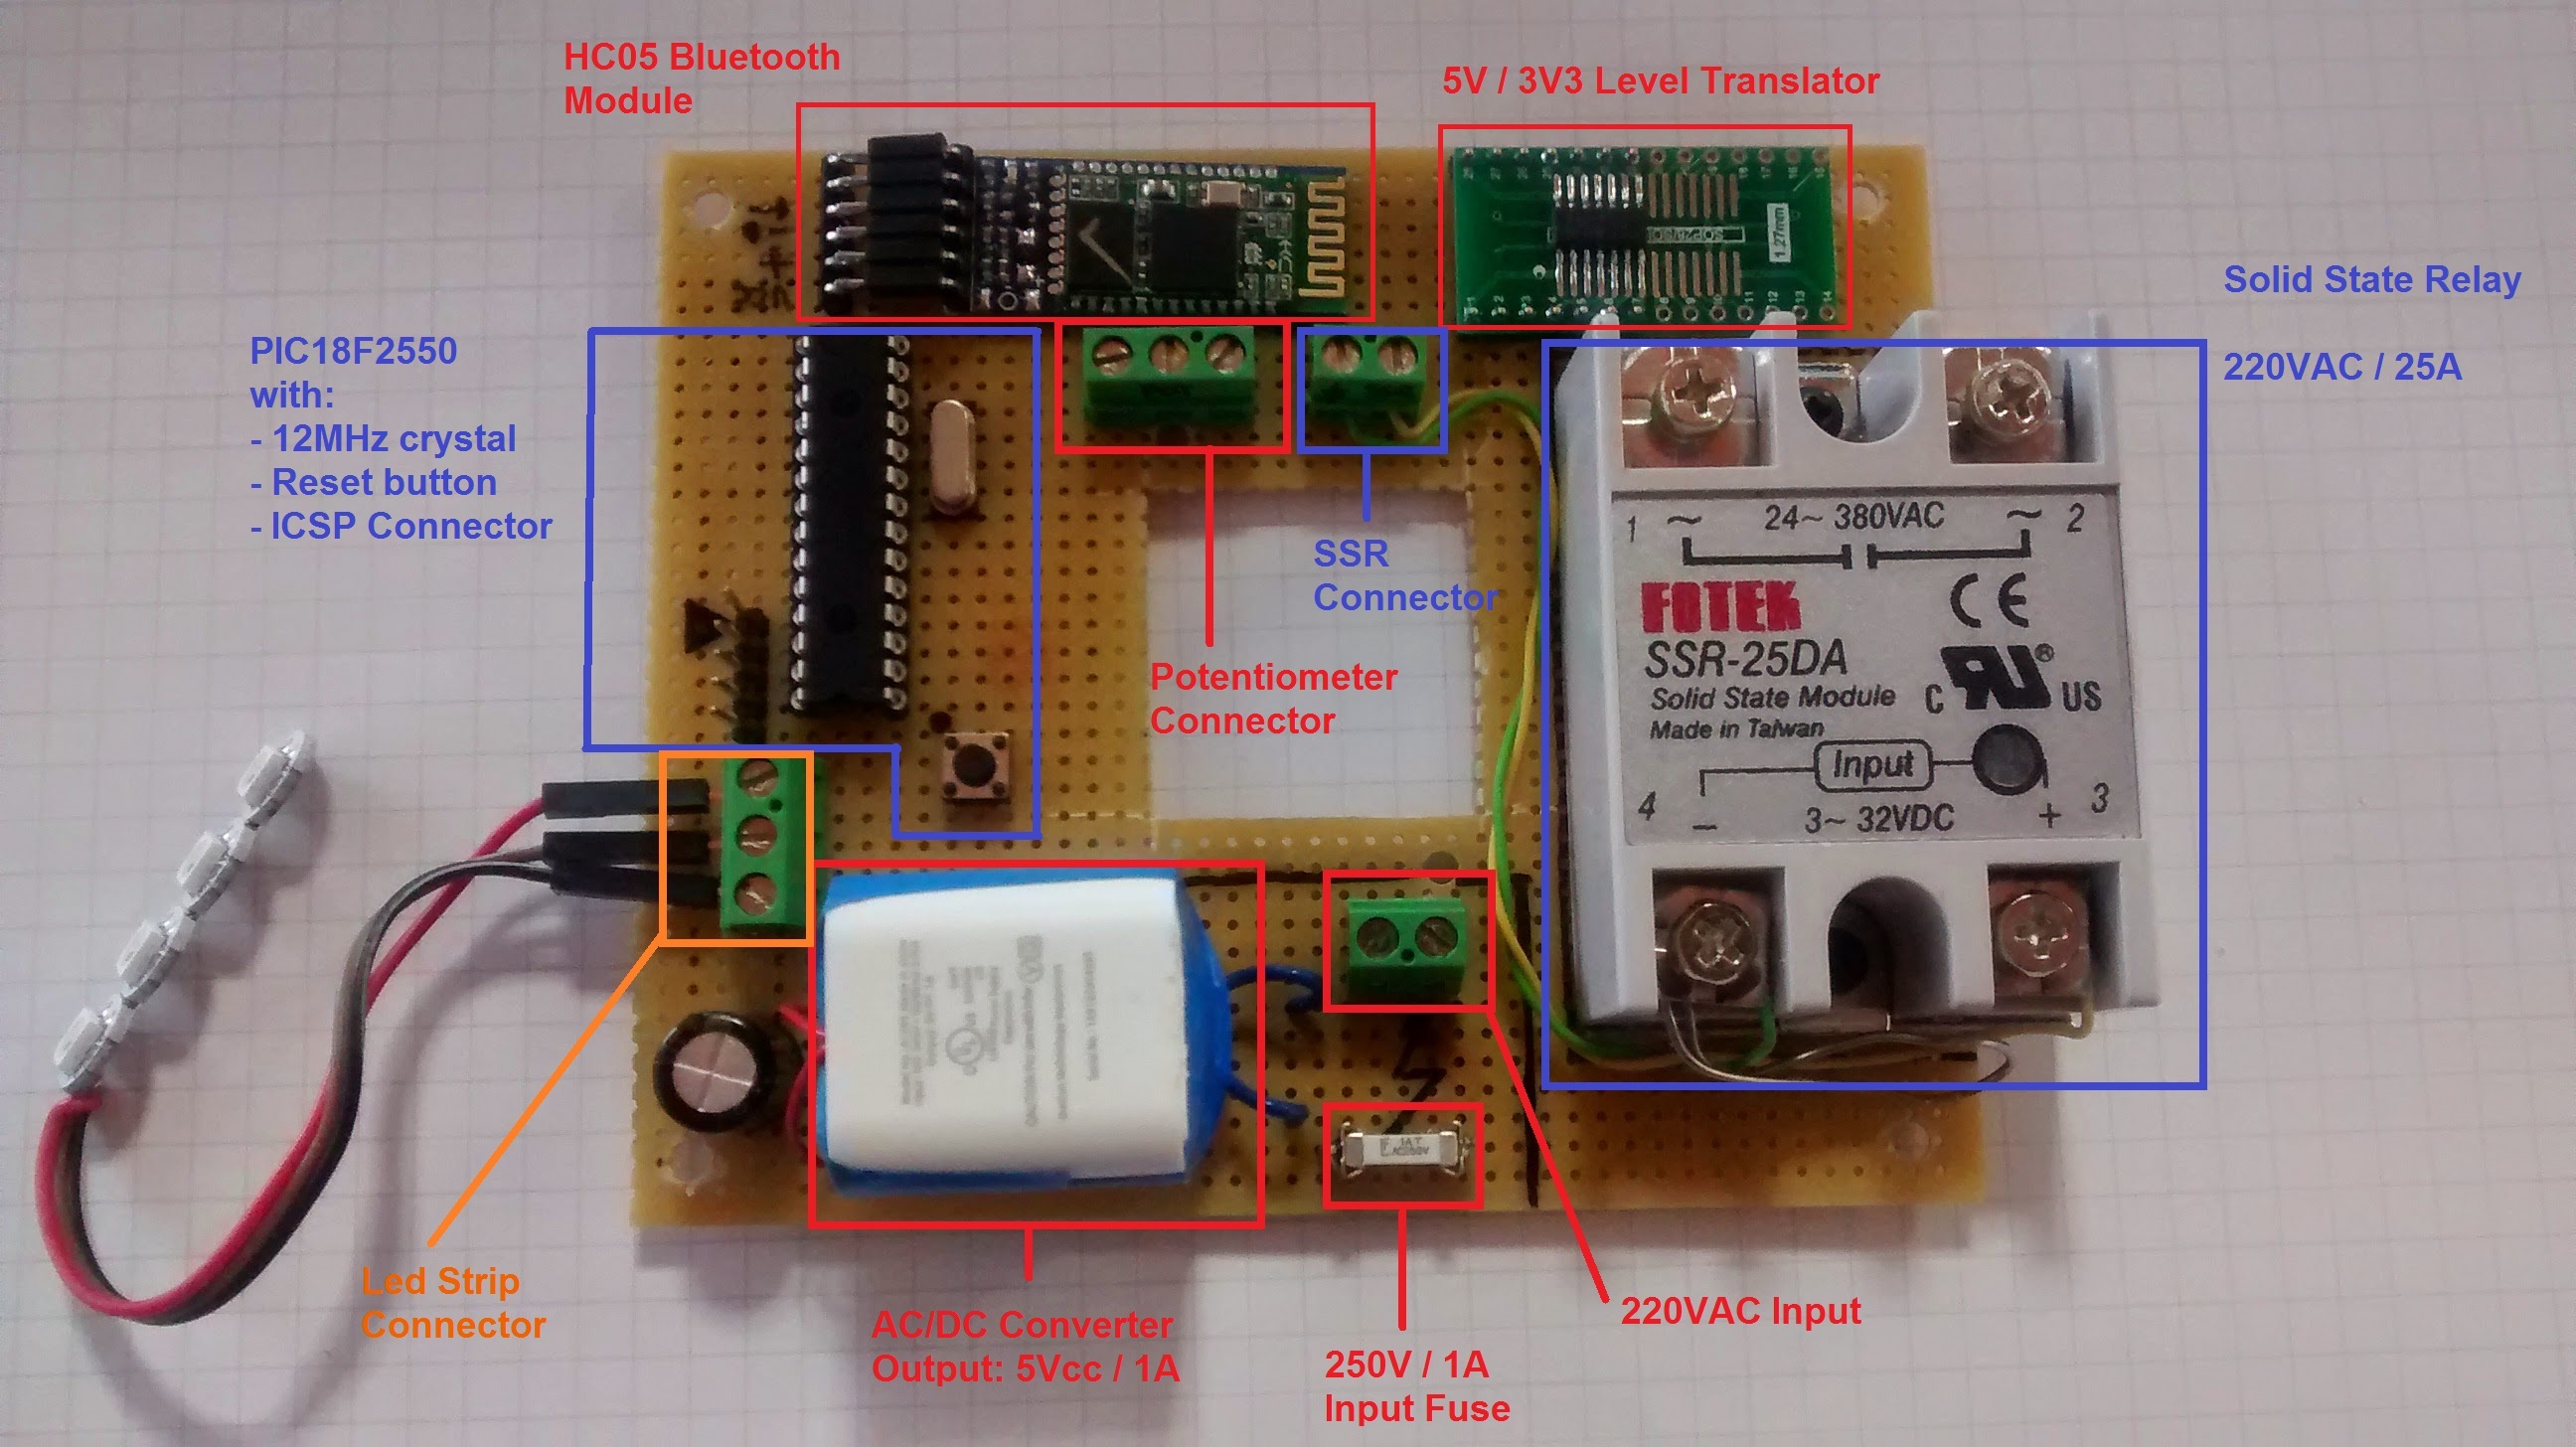
The whole lamp system is based around a PIC microcontroller and WS2811 LEDs for the color light show. Since the lamp was already built to run a 40W lightbulb, and [Jesus] wanted to retain that functionality, he added an SSR to the build. Yeah, it’s rated for 5,000W, but it’s what he had on hand.
Next comes the low-voltage power supply. [Jesus] needed 5V for the PIC, and used the guts from a cheap USB charger as a quick and dirty 5V converter — a nice hack. To power the HC-05 Bluetooth module, which requires 3.3V, he wired up a low-dropout voltage regulator to the 5V line. A level-converter IC (74LVC07) gets the logic voltage levels straight between the two.
A fuse for the high-voltage power line, screw-terminal connectors all around, and a potentiometer for manual override round out the hardware build.
On the software side, [Jesus] set up the knob to turn on and off the built-in lamp as well as control the colors of the LED ring. That’s a nice touch for when his daughter wants to change the lamp’s color, but doesn’t want to go find her cellphone. But when she does, the SPP Pro app sets the colors by sending pre-programmed serial commands over Bluetooth to the PIC in the lamp.
All in all, a nice build, well-documented, and with enough rough edges that none of you out there can say it’s not a hack. Nice job [Jesus]! We can’t wait to see what he does next… robot lamp anyone?


 What is the most troubling is that