A few weeks ago, [Debarghya Das] had two friends eagerly awaiting the results of their High School exit exams, the ISC national examination, taken by 65,000 12th graders in India. This exam is vitally important for each student’s future; a few points determines which university will accept you and which will reject you. One of [Debraghya]’s friends was a little anxious about his grade and asked if it was possible to hack into the board of education’s servers to see the grades before they were posted. [Debraghya] did just that, and was able to download the exam records of nearly every student that took the test.. Looking even closer at the data, he also found evidence these grades were changed in some way.
Getting the grades off the CISCE board of education’s servers was very simple; each school has a separate code, and each student is given an individual number. With the simplest javascript magic, [Debraghya] discovered that individual grades could be accessed by pointing a script to /[4 digit school ID]/[3 digit student ID] on the CISCE server. There was absolutely no security here, an impressive oversight indeed.
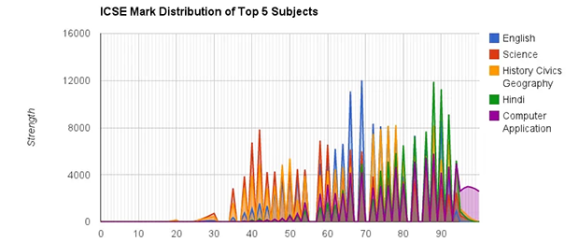
After writing a small script and running it on a few machines, [Debraghya] had the exam results, names, and national IDs of 65,000 students. Taking a closer look at the data, he plotted all the scores and came up with a very strange-looking graph (seen above). It looked like a hedgehog, when nearly any test with a population this large should be a continuous curve.
[Debraghya] is convinced he’s discovered evidence of grade tampering. Nearly a third of all possible scores aren’t represented in the data, but scores from 94 to 100 are accounted for, making the hedgehog shape of the graph statistically impossible. Of course [Debraghya] only has the raw scores, and doesn’t know exactly how the tests were scored or how they were manipulated. He does know the scores were altered, though, either through normalizing the raw scores or something stranger and more sinister.
While scraping data off an unencrypted server isn’t much of a hack, despite what the news will tell you, we’re awfully impressed with [Debraghya]’s analysis of the data and his ability to blow the whistle and put this data out in the open. Without any information on how these scores were changed, it doesn’t really change anything, and we’ll welcome any speculation in the comments.