How Store Anti-Theft Alarms Work: Magnetostriction

Now that’s uncanny. Two days before [Ben Krasnow] of the Applied Science YouTube blog posted this video on anti-theft tags that use magnetostriction, we wrote a blog post about a firm that’s using inverse-magnetostriction to generate electricity. Strange synchronicity!

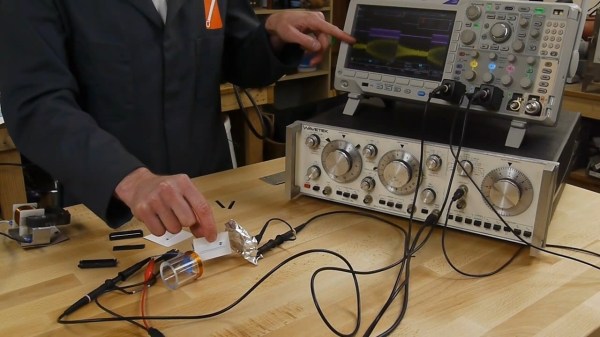
[Ben] takes apart those rectangular plastic security tags that end up embarrassing everyone when the sales people forget to demagnetize them before you leave the store. Inside are two metal strips. One strip gets magnetized and demagnetized, and the other is magnetostrictive — meaning it changes length ever so slightly in the presence of a magnetic field.

A sender coil hits the magnetostrictive strip with a pulsed signal at the strip’s resonant frequency, around 58kHz. The strip expands and contracts along with the sender’s magnetic field. When the sender’s pulse stops, the strip keeps vibrating for a tiny bit of time, emitting an AC magnetic field that’s picked up by the detector. You’re busted.

The final wrinkle is the magnetizable metal strip inside the tag. When it’s not magnetized at all, or magnetized too strongly, the magnetostrictive strip doesn’t respond as much to the sender’s field. When the bias magnet is magnetized just right, the other strip rings like it’s supposed to. Which is why they “demagnetize” the strips at checkout.

We haven’t even spoiled [Ben]’s explanation. He does an amazing job of investigating all of this. He even measures these small strips changing their length by ten parts per million. It’s a great bit of low-tech measurement that ends up being right on the money and deserves the top spot in your “to watch” list.

And now that magenetostriction is in our collective unconscious, what’s the next place we’ll see it pop up?

Continue reading “How Store Anti-Theft Alarms Work: Magnetostriction”

Audio-coupled Smoke Alarm Interface Sends Texts, Emails

The Internet of Things is getting to be a big business. Google’s Nest brand is part of the trend, and they’re building a product line that fills niches and looks good doing it, including the Nest Protect smoke and CO detector. It’s nice to get texts and emails if your smoke alarm goes off, but if you’d rather not spend $99USD for the privilege, take a look at this $10 DIY smoke alarm interface.

The secret to keeping the cost of [Team SimpleIOThings’] interface at a minimum is leveraging both the dirt-cheap ESP8266 platform and the functionality available on If This Then That. And to keep the circuit as simple and universal as possible, the ESP8266 dev board is interfaced to an existing smoke detector with a simple microphone sensor. From what we can see it’s just a sound level sensor, and that should work fine with the mic close to the smoke detector. But with high noise levels in your house, like those that come with kids and dogs, false alarms might be an issue. In that case, we bet the software could be modified to listen for the Temporal-Three pattern used by most modern smoke detectors. You could probably even add code to send a separate message for a CO detector sounding a Temporal-Four pattern.

Interfacing to a smoke detector is nothing new, as this pre-ESP8266 project proves. But the versatile WiFi SoC makes interfaces like this quick and easy projects.

Continue reading “Audio-coupled Smoke Alarm Interface Sends Texts, Emails”

Hacklet 84 – Alarm Clocks

The stereotypical hardware hacker is a creature of the night. Some of us do our best work in the wee hours. The unfortunate side effect of this is that we have a hard time getting up in the morning. Sometimes life demands a hacker be up-and-at-em before noon though. In these cases, the only solution is an alarm clock. This week’s Hacklet features some of the best alarm clock projects on Hackaday.io!

mercyWe start with [hberg32] and Merciless Pi Alarm Clock. Merciless is a good name for this Raspberry Pi based clock. We have to say it’s quite snazzy with its laser cut case and large seven segment LED face. When the alarm goes off though, this Pi bites back.

Titanium drivers powered by a 20 watt amplifier will wake even the heaviest sleepers. If that’s not enough, [hberg32] added a bed shaker to vibrate you out of the sack. The snooze button only works 3 times, after that you can press all you want, the music will still play. As if that wasn’t enough, this clock even has a pressure sensor. If you get back in bed, the alarm starts up again. Truly fitting of the name “merciless”.

irss[Ceady] took the kinder, gentler route with Integrated Room Sunrise Simulator. This alarm clock simulates dawn, gently waking the user up. A Lutron Maestro series wireless dimmer allows the sunrise simulator to slowly increase the room’s light level over a period of 10 minutes, allowing [Ceady] to wake up silently.

The clock itself uses an ATmega168 for control. [Ceady] spent a considerable amount of time testing out different methods of creating a seven segment LED display. When casting with cornstarch and resin didn’t do the trick, he went to commercial LED diffuser film from Inventables. The film proved to be just what he was looking for.

chumby2Next up is [Spiros Papadimitriou] with DIY Chumby-lite. Taking inspiration from [Bunnie Huang] and the Chumby project, [Spiros] created a friendly alarm clock with a touchscreen LCD. Much like the Chumby, this clock packs a WiFi module.

In this case though, the WiFi module is an ESP8266, whose on-board Xtensa microcontroller runs the whole show. [Spiros] programmed his Sparkfun ESP8266 Thing in C++. To keep costs down, [Spiros] left out anything unnecessary – like a real-time clock module. The Chumby-lite uses NTP to stay regular. The reductions paid off – this clock can be built for around $13.00, not including the very nice 3D printed case.

1983[Wanderingmetalhead] takes us all way back to 1983 with his 7 Day Alarm Clock. 32 years ago, this was [wanderingmetalhead’s] first embedded system project. As the name implies, this clock stores a different wake time for each day of the week. Actual numeric entry sure beats the old “hold two buttons and watch the numbers spin” system.

This is an oldie. The system is based upon a Motorola (which became Freescale, and is now NXP) 6802 micro. The code was written in assembly and cross-assembled on an Apple II. A 3.58MHz colorburst crystal divided down to 60 Hz provides the time base. This setup wasn’t perfect, but good down to a about a minute a month. The whole project lived and worked in an old amplifier case, where it dutifully woke [wanderingmetalhead] each day for 17 years.

If you want to see more alarm clock projects, check out our new alarm clocks list! If I didn’t wake up early enough to catch your project, don’t be shy, just drop me a message on Hackaday.io. That’s it for this week’s Hacklet. As always, see you next week. Same hack time, same hack channel, bringing you the best of Hackaday.io!

BTTF Alarm Clock

Back To The Future Alarm Clock Is As Real As It Gets

While real time-travel is obviously not happening anytime soon, with this Back to the Future themed alarm clock, you can go to the future in seven hour eight hour increments by going to sleep. Great Scott!

[CrossleyAcoustics] spent the past few months designing and building this movie-prop worthy alarm clock, and it certainly shows. After designing everything on breadboards, he had custom PCBs made, he modeled the whole thing in Sketchup (first time he’s used it!) and even tried his hand at the sheet metal fabrication after shops quoted him thousands for what he wanted.

The coolest part of the build is that [CrossleyAcoustics] had some detailed drawings that he had made himself… when he was 8 years old. Talk about a plan coming together!

Continue reading “Back To The Future Alarm Clock Is As Real As It Gets”

arduino alarm panel

Upgrading Your Alarm System With An Arduino

When [Doug] moved into his new house, he found an old alarm panel set up — but it had no monitoring service any more. Not wanting to pay a monthly fee to have it setup, he decided to try interfacing an Arduino with the system in order to push events to the net!

The cool thing is he was actually inspired by another similar project we shared on Hackaday a few years ago entitled Bending a Home Security Control Panel to Your Will. But that project only showed you how to interface the Arduino with the keypad — [Doug] went the extra mile and interfaced directly with the control board for more features.

He’s using an Arduino Uno and an Ethernet breakout board to hook it up to the network. This allows him to send text messages to himself when the alarm system is armed, disarmed, or triggered. All the code is available on GitHub in case you also have a DSC 1550 alarm system.

It’s a pretty slick hack, so don’t forget to check out the video after the break.

Continue reading “Upgrading Your Alarm System With An Arduino”

Fight Frost With An Internet Of Things Fridge Alarm

It has been incredibly humid around these parts over the last week, and there seems to be something about these dog days that makes you leave the fridge or freezer door open by mistake. [pnjensen] found this happening all too often to the family chill chest, with the predictable accretion of frost on the coils as the water vapor condensed out of the entrained humid air and froze. The WiFi-enabled fridge alarm he built to fight this is a pretty neat hack with lots of potential for expansion.

Based on a Sparkfun ESP8266 Thing and home-brew door sensors built from copper tape, the alarm is rigged to sound after 120 seconds of the door being open. From the description it seems like the on-board buzzer provides a periodic reminder pip while the door is open before going into constant alarm and sending an SMS message or email; that’s a nice touch, and having the local alarm in addition to the text or email is good practice. As a bonus, [pjensen] also gets a log of each opening and closing of the fridge and freezer. As for expansion, the I2C header is just waiting for more sensors to be added, and the built-in LiPo charger would provide redundancy in a power failure.

If frost buildup is less a problem for you than midnight snack runs causing another kind of buildup, you might want to check out this willpower-enhancing IoT fridge alarm.

Saving An Alarm System Remote And $100

[Simon] has been using his home alarm system for over six years now. The system originally came with a small RF remote control, but after years of use and abuse it was finally falling apart. After searching for replacement parts online, he found that his alarm system is the “old” model and remotes are no longer available for purchase. The new system had similar RF remotes, but supposedly they were not compatible. He decided to dig in and fix his remote himself.

He cracked open the remote’s case and found an 8-pin chip labeled HCS300. This chip handles all of the remote’s functions, including reading the buttons, flashing the LED, and providing encoded output to the 433MHz transmitter. The HCS300 also uses KeeLoq technology to protect the data transmission with a rolling code. [Simon] did some research online and found the thew new alarm system’s remotes also use the same KeeLoq technology. On a hunch, he went ahead and ordered two of the newer model remotes.

He tried pairing them up with his receiver but of course it couldn’t be that simple. After opening up the new remote he found that it also used the HCS300 chip. That was a good sign. The manufacturer states that each remote is programmed with a secret 64-bit manufacturer’s code. This acts as the encryption key, so [Simon] would have to somehow crack the key on his original chip and re-program the new chip with the old key. Or he could take the simpler path and swap chips.

A hot air gun made short work of the de-soldering and soon enough the chips were in place. Unfortunately, the chips have different pinouts, so [Simon] had to cut a few traces and fix them with jumper wire. With the case back together and the buttons in place, he gave it a test. It worked. Who needs to upgrade their entire alarm system when you can just hack the remote?