Solving Ultra High Vacuum Leaks Has An Elementary Solution

When we think of a vacuum leak we generally think of a car that just doesn’t want to run quite right. Most normally aspirated internal combustion engines rely on the vacuum created by the pistons to draw in the air fuel mixture that’s produced by the carburetor or fuel injection system. Identifying the leak usually involves spraying something combustible around common trouble areas while the engine is running. Changes to the engine speed indicate when the combustible gas enters the intake manifold and the leak can be found.

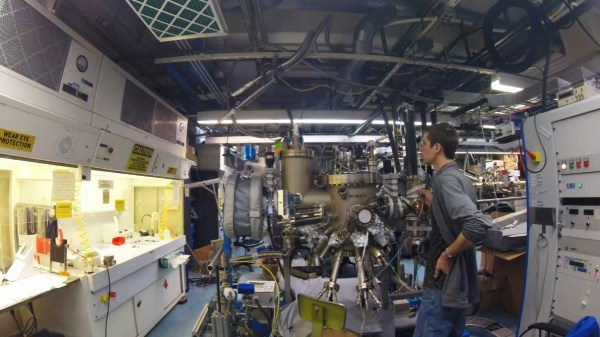
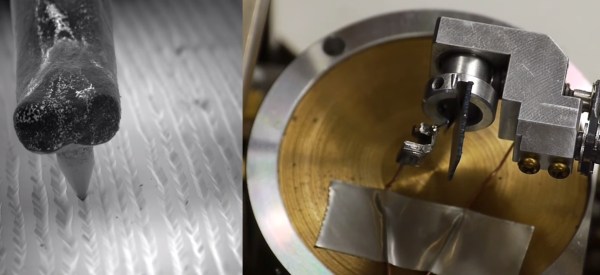
What if your vacuum leak is in a highly specialized piece of scientific equipment where the pressures are about 12 times orders of magnitude lower than atmospheric pressure, and the leak is so small it’s only letting a few atoms into the vacuum chamber at a time? [AlphaPhoenix] takes dives deep into this very subject in his video “Air-tight vs. Vacuum-tight.” which you can watch below the break.

Not only does [AlphaPhoenix] discuss how a perfect pressure vessel is sealed, he also explains the specialized troubleshooting methods used which turn out not to be all that different from troubleshooting an automotive vacuum leak- only in this case, several magnitudes more complex and elemental in nature.

We also enjoyed the comments section, where [AlphaPhoenix] addresses some of the most common questions surrounding the video: Torque patterns, the scarcity of the gasses used, and leaving well enough alone.

Does talking about vacuums get you pumped? Perhaps you’d enjoy such vacuum hacks as putting the toothpaste back in the tube in your homemade vacuum chamber.

Thank you [Morgan] for sending this one in. Be sure to send in your own hacks, projects, and fantastic finds through the Tip Line!

Continue reading “Solving Ultra High Vacuum Leaks Has An Elementary Solution”

Soldering Glass And Titanium With Ultrasonic Energy

Ultrasonic soldering is a little-known technology that allows soldering together a variety of metals and ceramics that would not normally be possible. It requires a special ultrasonic soldering iron and solder that is not cheap or easy to get hold of, so [Ben Krasnow] of [Applied Science] made his own.

Ultrasonic soldering irons heat up like standard irons, but also require an ultrasonic transducer to create bonds to certain surfaces. [Ben] built one by silver soldering a piece of stainless steel rod (as a heat break) between the element of a standard iron and a transducer from an ultrasonic cleaner. He made his special active solder by melting all the ingredients in his vacuum induction furnace. It is similar to lead-free solder, but also contains titanium and small amounts of cerium and gallium. In the video below [Ben] goes into the working details of the technology and does some practical experimentation with various materials.

Ultrasonic soldering is used mainly for electrically bonding metals where clamping is not possible or convenient. The results are also not as neat and clean as with standard solder. We covered another DIY ultrasonic soldering iron before, but it doesn’t look like that one ever did any soldering.

Ultrasonic energy has several interesting mechanical applications that we’ve covered in the past, including ultrasonic cutting and ultrasonic welding.

Continue reading “Soldering Glass And Titanium With Ultrasonic Energy”

Citizen Science Hack Chat With Ben Krasnow

Join us on Wednesday, April 29 at noon Pacific for the Citizen Science Hack Chat with Ben Krasnow!

For most of human history, there was no such thing as a professional scientist. Those who dabbled in “natural philosophy” were mainly men — and occasionally women — of privilege and means, given to spend their time looking into the workings of the world. Most went where their interest lay, exploring this facet of geology or that aspect of astronomy, often combining disciplines or switching to new ones as they felt like it. They had the freedom to explore the universe without the pressure to “publish or perish,” and yet they still often managed to pull back the curtain of ignorance and superstition that veiled the world for eons, at least somewhat.

In their footsteps follow today’s citizen scientists, a relatively small cohort compared to the great numbers of professional scientists that universities churn out year after year. But where these credentialed practitioners are often hyper-focused on a particular sub-field in a highly specialized discipline, the citizen scientist enjoys more freedom to explore the universe, as his or her natural philosopher forebears did. These citizen scientists — many of whom are also traditionally credentialed — are doing important work, and some are even publishing their findings in mainstream journals.
Continue reading “Citizen Science Hack Chat With Ben Krasnow”

How Store Anti-Theft Alarms Work: Magnetostriction

Now that’s uncanny. Two days before [Ben Krasnow] of the Applied Science YouTube blog posted this video on anti-theft tags that use magnetostriction, we wrote a blog post about a firm that’s using inverse-magnetostriction to generate electricity. Strange synchronicity!

[Ben] takes apart those rectangular plastic security tags that end up embarrassing everyone when the sales people forget to demagnetize them before you leave the store. Inside are two metal strips. One strip gets magnetized and demagnetized, and the other is magnetostrictive — meaning it changes length ever so slightly in the presence of a magnetic field.

A sender coil hits the magnetostrictive strip with a pulsed signal at the strip’s resonant frequency, around 58kHz. The strip expands and contracts along with the sender’s magnetic field. When the sender’s pulse stops, the strip keeps vibrating for a tiny bit of time, emitting an AC magnetic field that’s picked up by the detector. You’re busted.

The final wrinkle is the magnetizable metal strip inside the tag. When it’s not magnetized at all, or magnetized too strongly, the magnetostrictive strip doesn’t respond as much to the sender’s field. When the bias magnet is magnetized just right, the other strip rings like it’s supposed to. Which is why they “demagnetize” the strips at checkout.

We haven’t even spoiled [Ben]’s explanation. He does an amazing job of investigating all of this. He even measures these small strips changing their length by ten parts per million. It’s a great bit of low-tech measurement that ends up being right on the money and deserves the top spot in your “to watch” list.

And now that magenetostriction is in our collective unconscious, what’s the next place we’ll see it pop up?

Continue reading “How Store Anti-Theft Alarms Work: Magnetostriction”

Scanning Electron Microscope Images And Animations Pulled By Impressive Teensy LC Setup

When you’ve got a scanning electron microscope sitting around, you’re going to find ways to push the awesome envelope. [Ben Krasnow] is upping his SEM game with a new rig to improve image capture (video link) and more easily create animated GIFs and videos.

The color scheme of the SEM housing gives away its 80s vintage, and the height of image capture technology back then was a Polaroid camera mounted over the instrument’s CRT. No other video output was provided, so [Ben] dug into the blueprints and probed around till he found the high-resolution slow scan signal.

To make his Teensy-LC happy, he used a few op-amps to condition the analog signal for the greatest resolution and split out the digital sync signals, which he fed into the analog and digital ports respectively. [Ben] then goes into a great deal of useful detail on how he got the video data encoded and sent over USB for frame capture and GIF generation. Reading the ADC quickly without jitter and balancing data collection with transmission were tricky, but he has established a rock-solid system for it.

Continue reading “Scanning Electron Microscope Images And Animations Pulled By Impressive Teensy LC Setup”

Phonographs Through The Eye Of An Electron Microscope

Hackaday Prize judge [Ben Krasnow] has been busy lately. He’s put his scanning electron microscope (SEM) to work creating an animation of a phonograph needle playing a record. (YouTube link) This is the same 80’s SEM [Ben] hacked back in November. Unfortunately, [Ben’s]  JSM-T200 isn’t quite large enough to hold an entire 12″ LP, so he had to cut a small section of a record out. The vinyl mods weren’t done there though. SEMs need a conductive surface for imagingphono_anim_1
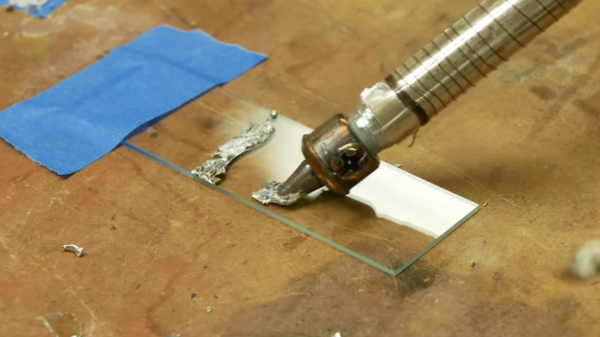
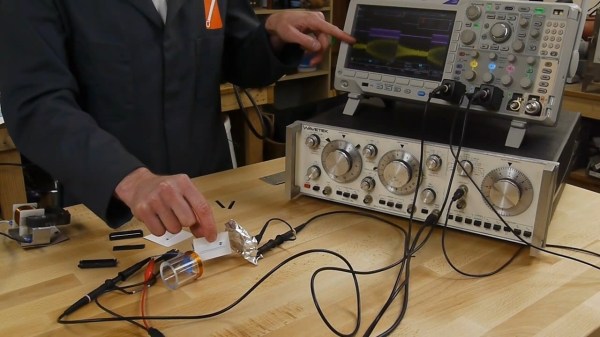
. Vinyl is an insulator. [Ben] dealt with this by using his vacuum chamber to evaporate a thin layer of silver on the vinyl.

Just imaging the record wouldn’t be enough; [Ben] wanted an animation of a needle traveling through the record grove. He tore apart an old phonograph needle and installed it in on a copper wire in the SEM. Thanks to the dual stage setup of the JSM-T200, [Ben] was able to move the record-chip and needle independently. He could then move the record underneath the needle as if it were actually playing. [Ben] used his oscilloscope to record 60 frames, each spaced 50 microns apart. He used octave to process the data, and wound up with the awesome GIF animation you see on the left. 

pits
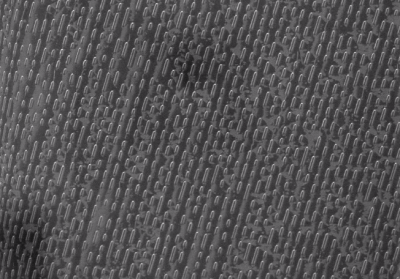
[Ben] wasn’t done though. He checked out a few other recording formats, including CD and DVD optical media, and capacitance electronic disc, an obscure format from RCA which failed miserably in the market. The toughest challenge [Ben] faced was imaging the CD media. The familiar pits of a CD are stored on a thin aluminum layer sandwiched between the lacquer label and the plastic disc. He tried dissolving the plastic with chemicals, but enough plastic was left behind to distort the image. The solution turned out to be double-sided tape. Sticking some tape down on the CD and peeling it off cleanly removed the aluminum, and provided a sturdy substrate with which to mount the sample in the SEM.

We’re curious if stereo audio data can be extracted from the SEM images.  [Oona] managed to do this with a mono recording from a toy robot.  Who’s going to be the first one to break out the image analysis software and capture some audio from [Ben’s] images?

Continue reading “Phonographs Through The Eye Of An Electron Microscope”

How To Zip, Stick, And Screw Stuff Together

One of the first problems every new hacker/maker must solve is this: What’s the best way to attach part “A” to part “B”. We all have our go-to solutions. Hot glue, duck tape ( “duct tape” if you prefer) or maybe even zip ties. Super glue, epoxy, and if we’re feeling extra MacGyver-ish then it’s time for some bubble gum. For some Hackaday readers, this stuff will seem like old hat, but for a beginner it can be a source of much frustration. Even well versed hackers might pick up a few handy tips and tricks presented in this video after the break.

In part one of this series, [Ben Krasnow] shows us the proper use of just a few of the tools and techniques he uses in his shop. [Ben] starts out with a zip-tie tool which he loves in part because of a tension setting that ensures it’s tight but not overly. He moves on to advice for adhesive-vs-material and some tips on using threaded fasteners in several different circumstances. He also included a list of the parts and tools he uses so you don’t have to go hunting them down.

[Ben] is no stranger to us here at Hackaday. He does some epic science video. You can subscribe to his channel or follow his blog if you enjoy what you see.

Continue reading “How To Zip, Stick, And Screw Stuff Together”