Not Your Average Nixie Tube Clock

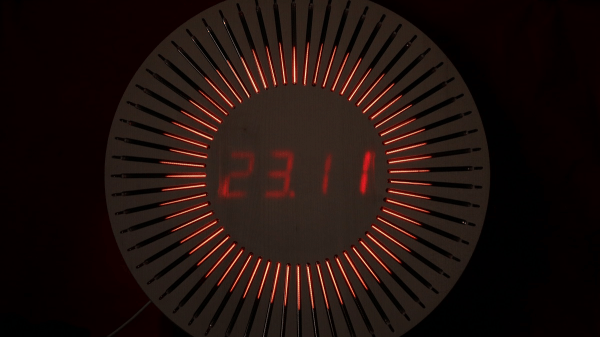
When it comes to Nixie clocks, we all pretty much know what to expect: a bunch of Nixies with some RGB LEDs underneath, a wooden case of some sort, and maybe some brass gears or fittings for that authentic steampunk look. It’s not that we don’t appreciate these builds, but the convergent designs can be a little much sometimes. Thankfully, this 60-tube Nixie clock bears that mold, and in a big way.

The key to [limpkin]’s design is the IN-9 Nixie, which is the long, skinny tube that used to show up as linear indicators; think bar graph displays on bench multimeters or the VU meters on mixing boards. [limpkin] realized that 60 on the tubes could be arranged radially to represent hours or minutes, and potentially so much more. The length of the segment that lights up in the IN-9 is controlled by the current through the tube, so [limpkin] designed a simple driver for each segment that takes a PWM signal as its input. The job of a 60-channel, 14-bit PWM controller fell to an FPGA. An ESP8266 — all the rage five years ago when he started the project — took care of timekeeping and control, as well as driving a more traditional clock display of four 7-segment LEDs in the center of the clock face.

The custom PCB lives in a CNC-machined MDF wood face; the IN-9s shine through slots in the face, while the seven-segment display shows through a thinned area. It looks pretty cool, and there are a lot of display options, like the audio spectrograph shown in the video below. We’re glad [limpkin] decided to share this one after all this time.

Continue reading “Not Your Average Nixie Tube Clock”

How Much Is That Plotter In The Window?

We live in a strange time indeed. People who once eschewed direct interactions with fellow humans now crave it, but to limited avail. Almost every cashier at the few stores deigned essential enough to maintain operations are sealed away behind plastic shields, with the implication that the less time one spends lingering, the better. It’s enough to turn an introvert into an extrovert, at least until the barriers are gone.

We get the idea that the need to reach out and touch someone is behind [Niklas Roy]’s “Please Leave a Message”, an interactive art installation he set up in the front window of his Berlin shop. Conveniently located on a downtown street, his shop is perfectly positioned to attract foot traffic, and his display is designed to catch the eye and perhaps crack a smile. The device consists of a large wooden easel holding the guts from an old X-Y pen plotter, an Arduino and an ESP-8266, and a couple of drivers for the plotter’s steppers. Passers-by are encouraged to scan a QR code that accesses a web page served up by the ESP-8266, where they can type in a brief message. The plotter dutifully spells it out on a scroll of paper for all to see, using a very nice font that [Niklas] designed to be both readable and easily plotted. The video below shows it in action with real people; it seems to be a crowd-pleaser.

[Niklas] has been incredibly prolific, and we’ve covered many of his interactive art installations. Just search for his name and you’ll find everything from a pressure-washer dancing waters display to a plus-sized pinball machine.

Continue reading “How Much Is That Plotter In The Window?”

Watch The Snappy, Insect-like Moves Of This DIY Quadruped Robot

Some legged robots end up moving with ponderous deliberation, or wavering in unstable-looking jerks. A few unfortunates manage to do both at once. [MusaW]’s 3D Printed Quadruped Robot, on the other hand, moves in rapid motions that manage to look sharp and insect-like instead of unstable. Based on an earlier design he made for a 3D printable quadruped frame, [MusaW] has now released this step-by-step guide for building your own version. All that’s needed is the STL files and roughly $50 in parts from the usual Chinese resellers to have the makings of a great weekend project.

The robot uses twelve SG90 servos and an Arduino nano with a servo driver board to control them all, but there’s one additional feature: Wi-Fi control is provided thanks to a Wemos D1 Mini (which uses an ESP-8266EX) acting as a wireless access point to serve up a simple web interface through which the robot can be controlled with any web browser.

Embedded below is a brief video. The first half is assembly, and the second half demonstrates the robot’s fast, sharp movements.

Continue reading “Watch The Snappy, Insect-like Moves Of This DIY Quadruped Robot”

Better Ways To Drive Nixie Tubes

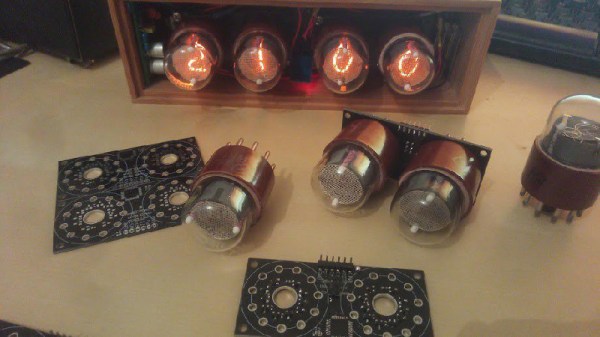
Ah, Nixie tubes. You’re not cool unless you have a few Nixie tubes sitting around, and you’re not awesome unless you’ve built your own Nixie tube clock. That’s what [Thomas] is doing for his entry into the Hackaday Prize, and he’s come up with a very low-cost way of doing it.

For the high voltage supply of this build, [Thomas] is turning to one of the standard circuits based on the MC34063 that’s simple enough and good enough to make everything work. There are really no surprises with the power supply here. This is all a project about turning on different digits inside the Nixie, though, and for that [Thomas] spun his own board capable of driving a pair of IN-1 Nixies with a single ATMega8.

These two-Nixie boards are daisy chained together through a UART connection, where each board passes digits down the line. For example, the first board receives, 12, 30, and 59, displays 59, and passes 12 and 30 down to the next boards. The second board then displays 30 and passes 12 to the last board.

Of course, if you’ve designed a Nixie driver, the next thing to do is to build a clock. [Thomas] had the rather clever idea of making an enclosure for this clock out of concrete, using a 3D printed interior mold. Everything seemed to be going well until it was time to pull the interior mold out, and a few light taps resulted in some fairly large cracks. That’s disappointing, but with a slight redesign and some more fibers in the concrete mix, this is going to turn out to be a weighty win.

Turning Cheap WiFi Modules Into Cheap WiFi Swiss Army Knives

When the ESP8266 was released, it was sold as a simple device that would connect to a WiFi network over a UART. It was effectively a WiFi modem for any microcontroller, available for just a few bucks. That in itself is awesome, but then the hackers got their hands on it. It turns out, the ESP8266 is actually a very capable microcontroller as well, and the newest modules have tons of Flash and pins for all your embedded projects.

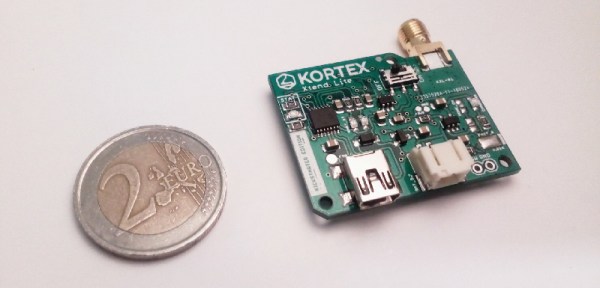
For [Amine]’s entry to the Hackaday Prize, he’s using the ESP8266 as the ultimate WiFi Swiss Army knife. The Kortex Xttend Lite is a tiny little WiFi repeater that’s capable of doing just about anything with a WiFi network, and with a bit of added hardware, can connect to Ethernet as well.

The hardware on this board sports an ESP8266-07S module, with two free GPIO pins for multiple functions. There’s a USB to UART in there, and a voltage regulator that’s capable of outputting 600mA for the slightly power hungry radio. There’s also an integrated battery management and charge controller, allowing this board to charge an off-the-shelf lithium cell and run for hours without any wires at all.

So, what can this board do? Just about everything you would want for a tiny little WiFi Swiss Army knife. There’s traffic shaping, port mapping, packet sniffing, and even support for mesh networking. There’s also an SMA connector on there, so grab your cantennas — this is a great way to extend a WiFi network, too.

This is a well-designed and well-executed project, and what makes this even more amazing is that this was done as one of [Amine]’s high school projects. Yes, it took about a year to finish this project, but it’s still amazing work for [Amine]’s first ‘high-complexity’ design. That makes it an excellent learning experience, and an awesome entry to this year’s Hackaday Prize.

Friday Hack Chat: Everything About The ESP

When the ESP-8266 first arrived, it was a marvel. For two dollars, you could buy a simple module that could serve as a bridge between WiFi networks and microcontroller projects. It understood the Hayes command set, it didn’t use much power, and, as noted before, it only cost two dollars. The idea of cheap and accessible Internet of Things things was right there for the taking.

Then hackers figured out what was actually going on inside the ESP-8266. It was a full-blown microcontroller. There was Lua stuff you could put on it. You could program it with the Arduino IDE. It had WiFi. This was the greatest microcontroller release in the last decade, and it came from a company no one had ever heard of.

Since then, the ESP ecosystem has bloomed, and there’s a new ESP on the block. The ESP-32 is an even more powerful WiFi and Bluetooth-enabled chip that’s just as easy to program, and it costs three dollars. Microcontrollers have never been cooler.

For this week’s Hack Chat, we’re going to be talking all about the ESP. Our guest for this Hack Chat should need no introduction, but if you’re unfamiliar, [Sprite_tm] plays video games on his keyboard and has installed Linux on a hard drive. He also works at Espressif, the company behind the ESP-8266 and ESP-32, where he’s applied his skills towards tiny Game Boys and miniature Macs.

During this week’s Hack Chat, we’re going to be covering everything about the ESP, including peripherals, ultra-low power consumption, SIP packages, and what’s coming up for the ESP family. You are, as always, welcome to submit your questions for [Sprite]; just add those as a comment on the Hack Chat page.

join-hack-chat

Our Hack Chats are live community events on the Hackaday.io Hack Chat group messaging. [Sprite]’s in China, so we’re not doing this one at the usual time: This week, the Hack Chat will happen at 7:00 am, Pacific, Friday, March 9th. Want to know what time this is happening in your neck of the woods? Have a countdown timer!

Click that speech bubble to the right, and you’ll be taken directly to the Hack Chat group on Hackaday.io.

You don’t have to wait until Friday; join whenever you want and you can see what the community is talking about.

Zombie Badges Take Over Security Con

We can’t get enough of hacker-con badges. BSides Cape Town, held Last December, featured an IR-equipped badge that immersed attendees in a game while they chatted.

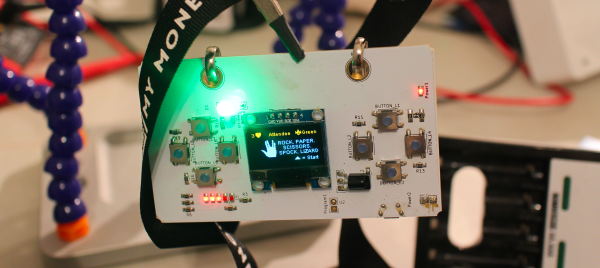
A group led by [AndrewMohawk] and [ElasticNinja] designed the badge around an ESP8266 and 128×64 OLED display, with eight buttons, an IR receiver and transmitter, five “level” LEDs, an RGB LED, and a 600 mAh LiPo that charged over USB.

The hardware was designed specifically to play an organic game so that the organizers could watch the interaction between the badges in real time. Each badge was randomly sorted into a faction, either red, blue, or green—identifiable by an RGB LED glowing on the badge. There was also a series of five LEDs signifying your level in the game. When two or more badges got close to each other, enough for the IR to link, the badge with the lowest level was converted to the faction of the winner.

Of course, the badge displayed attendees’ handles and contained a list of convention programming. It also presented attendees with a series of challenges, which could be unlocked to play Pong or Rock/Paper/Scissors/Lizard/Spock, scan for wireless networks, and run animations.

Continue reading “Zombie Badges Take Over Security Con”