Hacklet 84 – Alarm Clocks

The stereotypical hardware hacker is a creature of the night. Some of us do our best work in the wee hours. The unfortunate side effect of this is that we have a hard time getting up in the morning. Sometimes life demands a hacker be up-and-at-em before noon though. In these cases, the only solution is an alarm clock. This week’s Hacklet features some of the best alarm clock projects on Hackaday.io!
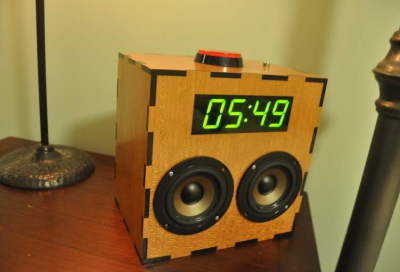
mercyWe start with [hberg32] and Merciless Pi Alarm Clock. Merciless is a good name for this Raspberry Pi based clock. We have to say it’s quite snazzy with its laser cut case and large seven segment LED face. When the alarm goes off though, this Pi bites back.

Titanium drivers powered by a 20 watt amplifier will wake even the heaviest sleepers. If that’s not enough, [hberg32] added a bed shaker to vibrate you out of the sack. The snooze button only works 3 times, after that you can press all you want, the music will still play. As if that wasn’t enough, this clock even has a pressure sensor. If you get back in bed, the alarm starts up again. Truly fitting of the name “merciless”.
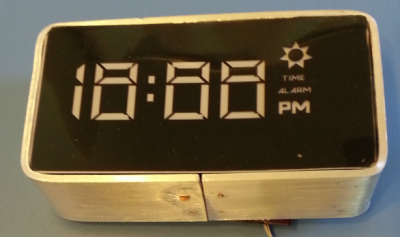
irss[Ceady] took the kinder, gentler route with Integrated Room Sunrise Simulator. This alarm clock simulates dawn, gently waking the user up. A Lutron Maestro series wireless dimmer allows the sunrise simulator to slowly increase the room’s light level over a period of 10 minutes, allowing [Ceady] to wake up silently.

The clock itself uses an ATmega168 for control. [Ceady] spent a considerable amount of time testing out different methods of creating a seven segment LED display. When casting with cornstarch and resin didn’t do the trick, he went to commercial LED diffuser film from Inventables. The film proved to be just what he was looking for.
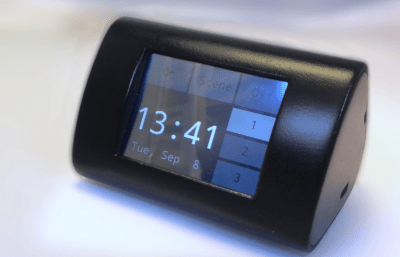
chumby2Next up is [Spiros Papadimitriou] with DIY Chumby-lite. Taking inspiration from [Bunnie Huang] and the Chumby project, [Spiros] created a friendly alarm clock with a touchscreen LCD. Much like the Chumby, this clock packs a WiFi module.

In this case though, the WiFi module is an ESP8266, whose on-board Xtensa microcontroller runs the whole show. [Spiros] programmed his Sparkfun ESP8266 Thing in C++. To keep costs down, [Spiros] left out anything unnecessary – like a real-time clock module. The Chumby-lite uses NTP to stay regular. The reductions paid off – this clock can be built for around $13.00, not including the very nice 3D printed case.

1983[Wanderingmetalhead] takes us all way back to 1983 with his 7 Day Alarm Clock. 32 years ago, this was [wanderingmetalhead’s] first embedded system project. As the name implies, this clock stores a different wake time for each day of the week. Actual numeric entry sure beats the old “hold two buttons and watch the numbers spin” system.

This is an oldie. The system is based upon a Motorola (which became Freescale, and is now NXP) 6802 micro. The code was written in assembly and cross-assembled on an Apple II. A 3.58MHz colorburst crystal divided down to 60 Hz provides the time base. This setup wasn’t perfect, but good down to a about a minute a month. The whole project lived and worked in an old amplifier case, where it dutifully woke [wanderingmetalhead] each day for 17 years.

If you want to see more alarm clock projects, check out our new alarm clocks list! If I didn’t wake up early enough to catch your project, don’t be shy, just drop me a message on Hackaday.io. That’s it for this week’s Hacklet. As always, see you next week. Same hack time, same hack channel, bringing you the best of Hackaday.io!

DIY Matchhead Cannon Brings The Heat

If your local surplus store is fresh out of supercapacitors but you’re just really in the mood to fire stuff at other stuff, check out [austiwawa]’s step-by-step guide to building a thermal cannon. It shoots whatever will fit into a 1/2″ copper pipe, propelled by cut-up matchheads and lit by a propane torch. [austiwawa] demonstrates it by firing an AA battery at an unsuspecting pumpkin. For what it’s worth, we don’t necessarily condone applying this much heat to alkaline cells.

[austiwawa] used a copper pipe for the barrel because it provides the fastest heat transfer. One end of it is flattened and folded over to form the propellant chamber. A couple of packs worth of match heads are tamped down into the folded end with a paper towel serving as wadding. [austiwawa] tosses in his battery, lights the torch, and then runs away.

This whole dangerous contraption is secured to a wooden base with a u-bolt and a couple of pipe straps, and suspended between more pieces of wood with a length of threaded rod for stability and aiming.

We’ll let the safety-conscious readers do our work for us in the comments, but in the meantime, note that this thing is not safe. As [austiwawa] demonstrates, the copper gets brittle and will split open along the folded edge.

But kudos anyway to [austiwawa] for showing shot after shot of the cannon in action at the end of his video. You know where to find it.

If it’s a stronger, more beautiful barrel you’re after, just machine one by hand.

Continue reading “DIY Matchhead Cannon Brings The Heat”

Repairing A Twisted Prius Display Computer

This one is from way back in 2007, but the steps [hobbit] took to evaluate and repair a failed Prius Multi-Function Display (MFD) is a refresher course in how to go about fixing stuff that’s broken.

The 2004 / 2005 models of the Prius had peculiar problems with their MFD. Buttons and touch functions became sluggish and unresponsive, it wouldn’t display ECU data such as current and average fuel consumption, and couldn’t control stereo and air-conditioning. Lots of Prius users were reporting similar problems on the Priuschat forum.

The issues would usually arise long after warranty expired, and replacement units cost a couple of thousand dollars new. Toyota knew what the problem was (PDF link), but their fix involved swapping the defective units out.

[hobbit] managed to get a defective MFD unit from a friend, and because his own Prius still had a working MFD, he was able to carry out comparative tests on both units. The broken unit was generally laggy, and the buttons didn’t beep when pressed. Apparently, the AVCLan, a small data network between various components in the car, wasn’t reaching the MFD reliably. The MFD would send the “beep” command to the audio amplifier and wait for a confirmation that would never arrive. The system hung here until the MFD timed out.

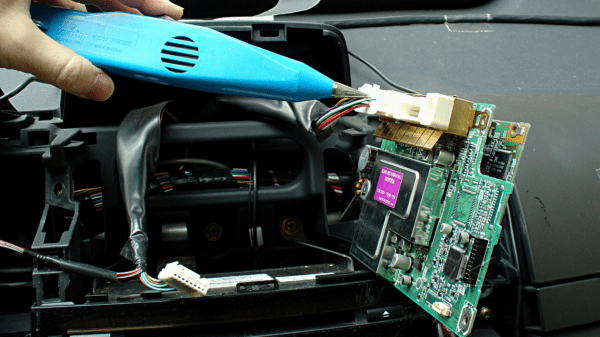
In the end, the cause of the problem was the 60-pin micro connector that interfaces the two main boards of the MFD. Once the two are mated, tightening the mounting screws twisted the two boards ever so slightly, leading to flaky contacts.

The fix? [hobbit] tweaked all of the 60 pins outwards enough that they still made contact even when the connector housing got twisted. Comparing the defective MFD to the one in [hobbit]’s own car also demonstrated how the factory fixed the problem.

Thanks to [Nick] for sending in this tip, which he stumbled upon “while searching for ideas for a very small solder tip to repair something on my laptop.”

A Better, Open Hardware Keyboard

A keyboard is the most important tool in the modern desk jockey’s arsenal but, despite this fact, millions of people suffer the $10 membrane keyboards that shipped with the computer they got a decade ago. It’s a terrible way to live your life, but for those of us who are enlightened, there’s another way: mechanical keyboards. [Mário] over at the Bit Bang Theory just built his own mechanical keyboard with his own homebrew firmware and a few interesting features that aren’t found in other open hardware keyboard projects.

The ‘from scratch’ aspect of this build is somewhat of a misnomer; the key switches used in this build were taken from a Monterey K108, and the key caps were taken from a keyboard with a Portuguese layout. Once the switches were in place and soldered up, it was time for the electronics.

While most homebrew keyboards these days use a Teensy 2 thanks to some amazing firmware and development tools that have grown up around this device, there’s not a Teensy to be found inside this keyboard. The keyboard controller is built around a PIC18F4550 and uses the USB available on the chip. Naturally, there are more than a few WS2812b RGB LEDs around the edge of the keyboard that “breathe”, run a KITT-style LED chaser, or simply display a single chosen color.

There are a few neat features in this keyboard controller that aren’t readily available with other open source keyboard firmwares. There’s a keylogger, macro recorder, and a toggle macro that will activate or deactivate a (secret) internal 8GB USB storage key. Settings are saved in the internal EEPROM.

It’s a great looking build, and something we don’t see enough of around here. In any event, it’s just one step further towards eliminating the menace of cheap keyboards, and something we hope to see more of soon.

Physical Security For Desktop Computers

There’s a truism in the security circles that says physical security is security. It doesn’t matter how many bits you’ve encrypted your password with, which elliptic curve you’ve used in your algorithm, or if you use a fingerprint, retina scan, or face print for a second factor of authentication. If someone has physical access to a device, all these protections are just road bumps in the way of getting your data. Physical access to a machine means all that data is out in the open, and until now there’s nothing you could do to stop it.

This week at Black Hat Europe, Design-Shift introduced ORWL, a computer that provides the physical security to all the data sitting on your computer.

The first line of protection for the data stuffed into the ORWL is unique key fob radio. This electronic key fob is simply a means of authentication for the ORWL – without it, ORWL simply stays in its sleep mode. If the user walks away from the computer, the USB ports are shut down, and the HDMI output is disabled. While this isn’t a revolutionary feature – something like this can be installed on any computer – that’s not the biggest trick ORWL has up its sleeve.

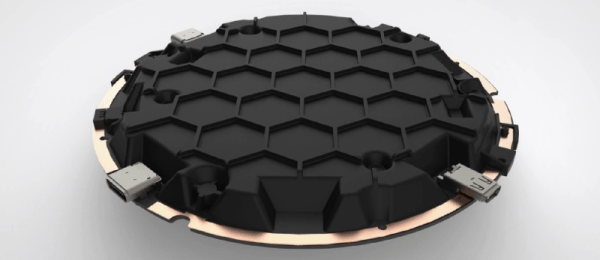
ORWL2The big draw to the ORWL is a ‘honeycomb mesh’ that completely covers every square inch of circuit board. This honeycomb mesh is simply a bit of plastic that screws on to the ORWL PCB and connects dozens of electronic traces embedded in this board to a secure microcontroller. If these traces are broken – either through taking the honeycomb shell off or by breaking it wide open, the digital keys that unlock the computer are erased.
The ORWL specs are what you would expect from a bare-bones desktop computer: Intel Skylake mobile processors, Intel graphics, a choice of 4 or 8GB of RAM, 64 to 512GB SSD. WiFi, two USB C ports, and an HDMI port provide all the connections to the outside world.

While this isn’t a computer for everyone, and it may not even a very large deployment, it is an interesting challenge. Physical security rules over all, and it would be very interesting to see what sort of attack can be performed on the ORWL to extract all the data hidden away behind an electronic mesh. Short of breaking the digital key hidden on a key fob, the best attack might just be desoldering the chips for the SSD and transplanting them into a platform more amenable to reading them.

In any event, ORWL is an interesting device if only for being one of the few desktop computers to tackle the problem of physical security. As with any computer, if you have physical access to a device, you have access to all the data on the device; we just don’t know how to get the data off one of these tiny computers.

Video below.

Continue reading “Physical Security For Desktop Computers”

Self Folding Graphene Paper

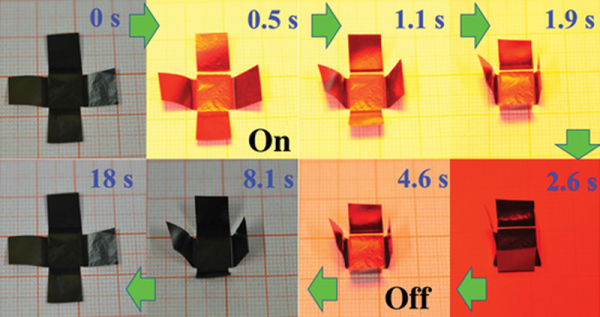
Origami, the art of folding paper into shapes, is the latest craft to fall to automation. Researchers in China have published a paper in Science Advances describing how they created graphene-based paper that can fold itself. According to their paper (that is, the paper they wrote, not their graphene paper), the new material can adopt a predefined shape, walk, or even turn a corner.

Active materials like shape memory polymers, aren’t new. But there are many practical problems with using such materials. Using MGMs (Macroscopic Graphene Materials), the researchers created paper that can change shape based on light. temperature, or humidity.

The video below shows a few uses including a self-folding box, a worm-like motion device, and a hand-like piece of paper making a grasping motion. The creators mention that there are a wide range of applications including robotics, artificial muscles, and sensing devices. After watching the video, we couldn’t help but wonder how cool a paper flower that opened in the sunlight would be.

We’ve covered how to make your own graphene in a home lab and even inside a DVD burner. We’ll be interested to see who is the first to hack some graphene paper and what you’ll use it for.

Continue reading “Self Folding Graphene Paper”

Seeking Distinct Hardware Passion

This is it, the Hackaday SuperConference blasts into existence tomorrow. You should be there.

Hardware is passion. Hardware is art. Hardware is creation. Hardware is life. This is your mantra and this weekend is your one chance to connect in person with your community. At this very moment the people presenting 30+ spectacular hardware talks and hands-on workshops are headed to San Francisco to make it happen. They are joined by hundreds of Hackers, Designers, Engineers, Artists, and other Bohemians that make up something unique: a hardware conference that is actually about hardware creation.

You need to be a part of the SuperCon. It runs Saturday and Sunday at Dogpatch Studios. If you can’t make it for both days, block out your Saturday night for the Hackaday Prize Party. Starting at 5:30pm you can catch [Sprite_TM’s] talk, join a fireside chat with MythBusters veteran [Grant Imahara], be there live for the 2015 Hackaday Prize and Best Product award announcements, and then enjoy dinner and the celebration afterward. There is no charge to attend the Prize Party.

There is no better way to spend time than by exercising your passion. Don’t let the Hackaday SuperCon pass you by.

The 2015 Hackaday Prize is sponsored by: